 Gyromite
and Famicom Converters
-David, webmaster DVGI

 Gyromite
and Famicom Converters
-David, webmaster DVGI
For a long, long time there have been countless resources on the 'net and urban gaming legends about Famicom to NES converters being inside early release NES cartridges. Some people push this off as nothing more than a rumor while others kick and scream that every NES game sealed with normal screws has a converter board inside. Then there are those who write how once you find one of the magical converters playing Famicom games on an NES falls into place instantly. As someone who has spent a lot of time with this issue I'm going to clarify the truth behind this popular subject of retrogaming along with a walkthrough on turning one of these special cartridges into something useful. This isn't a feature on how to mod one of these cartridges since to do a nice looking job you need a few tools and it's always a little different, so you have to figure that out on your own. However you will find a walkthrough on how I built the one particular Famicom to NES converter pictured below.
To begin with, when Nintendo decided to sell the Famicom in the US it went through some changes. As video games were taboo after the industry went belly up in 1983, Nintendo repackaged their console as the Nintendo Entertainment System or NES. Of course selling the console as an "Entertainment System" and game cartridges as "Game Paks" allowed them critical insertion to toy stores that wanted nothing to do with video games. Aside from cosmetic changes the NES would use a 72 pin cartridge connector as opposed to the 60 pin connector used by the Famicom. Four of the added pins ran to the new 10NES lockout chip inside the NES. The lockout chip inside the NES would compare data with a matching chip inside a licensed cartridge for authentication. If the code matched then the system would start up and the game run, if the proper code was not given then the system would not load the game. Ten of the new pins directly interfaced with the NES expansion port on the underside of the system. Two pins from the Famicom were removed that allowed for Famicom games to use their own onboard sound expansion chips. So there were 14 extra pins, 2 original pins removed (which caused some inferior games on US shores but that's another story) for a total of a 12 pin difference between the two consoles. More pins meant wider cartridges. Additionally the Zero Insertion Force, or ZIF, connector meant that the games were loaded in and down rather than from the top as with the Famicom. This lead to NES games being larger than nearly all Famicom games even though the internals of most NES cartridges are empty space.
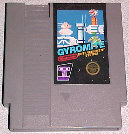 The
original launch bundle for the NES contained the system, two control pads,
one Zapper lightgun, R.O.B. the Robot along with attachments for Gyromite,
one Duck Hunt cartridge, and one Gyromite cartridge. Nintendo wasn't
going to be able to meet their production deadline for the new cartridge
manufacturing requirements so instead of shortchanging their vendors they
came up with a quick fix. Nintendo opted to use the boards out of
Japanese Famicom versions of games, along with a 60 pin passthrough socket
and a 60 to 72 pin convertor with a NES lockout chip onboard, inside a
normal NES cartridge shell. It is said that Gyromite, Duck Hunt,
Hogan's Alley and any of the original launch games from the very early
days of the system may contain these special internals. Since for
the most part it was only produced during the early days of the NES, Gyromite
cartridges are usually where converter hardware is most likely to be found.
At least it is the most common cartridge to contain the hardware.
Also of note, the only other game designed for R.O.B., StackUp, never had
a revision made since so few copies were produced. In other words
every copy of StackUp for the NES has the converter hardware inside - however
destroying this rare cartridge just to get the converter hardware is a
complete waste especially when with a little work one can be found in a
surplus Gyromite cartridge. Remember that Gyromite was never sold
without, at the very least, a full set of Gyromite R.O.B. accessories.
So every loose copy of Gyromite signals an accessory set or R.O.B. out
there somewhere in the world alone or that has since been trashed.
(yes, for every Gyromite cartridge there is, or was, a full set of the
gyros for it out there as well)
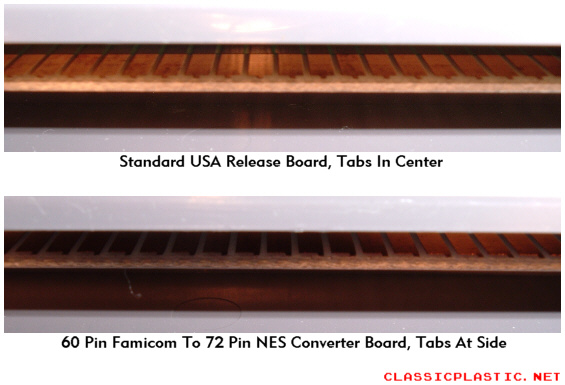
Eventually Nintendo replaced the costly converter setup with a standard 72 pin NES Gyromite board and did the same with the other converter rich cartridges. Of course then comes the age old question of "how do you know if a Gyromite cartridge has a converter inside?" Honestly the question you want to ask yourself is how do you know if a Gyromite cartridge doesn't have a converter inside. There have been countless sources online that go through ways to check based on cosmetics. For instance if a cartridge has the trademark symbol on it "TM" then it won't have a converter inside - this is FALSE. I've had two identical Gyromite cartridges, both with the TM on them, and one had a converter and one did not. Color of the label is another point that I've found in the past, again I've come across identical cartridges that were completely different inside. However if you look at the back label of a cartridge and see "REV-A" printed on the label then you will know for certain that the cartridge does NOT have a converter inside. Also be warned that the later revision NES version and the Famicom converted version of Gyromite run the same in an NES, displaying the Japanese game name "Robot Gyro." Aside from that concerning labels, trademarks, coloring and text, it's really all the luck of the draw. So how can you tell without opening a cartridge up? Easy, by looking at the connectors.
As long as a cartridge meets some very important and easy to identify criteria, it will have converter hardware inside. If all of the following are met the cartridge will contain converter hardware...
Great, you've got that odd copy of Gyromite. That two dollars at the flea market is about to pay off. So you grab your precision screwdriver, open it up, and see one of two things...
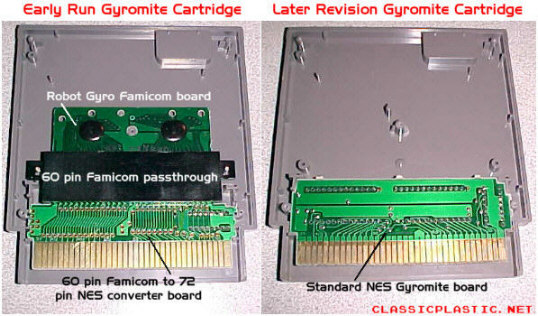
On the right is a later revision standard NES Gyromite, no converter, just the game - thanks for playing, try again. On the left is paydirt - a Famicom Robot Gyro board, 60 pin passthrough, and 60 to 72 pin converter board. Now there are a few ways you can go about using this passthrough and converter to play Famicom games on your NES...
Next it's time to reconnect the Famicom to NES converter board to the shorter end of the passthrough, simply plug it in. Usually at this point I compare with one of my already assembled converters to get the measurement for the next step but if I was making one without reference then an extra step is needed. To get the measurement, take the top of the Gyromite cartridge shell and set the converter and passthrough in it, the converter should be chip side down. It's not going to fit in there since the passthrough is turned around but that's not anyone's concern right now. Mark the NES cartridge shell just above where the little screw tabs on the passthrough are. Remove the converter and passthrough and transfer the marking to the outside of the shell. Reassemble the two empty cartridge shell halves and transfer the mark all the way around the shell, this is where the cartridge will be cut. I use the fiberglass cut off wheel to start the cut on both ends, going a half inch or so into the cartridge. Then I put the shell in a vice and use a hacksaw to make the full cut, with both halves of the cartridge together you'll get more uniform results. Even after cutting, two screws should still be holding the lower half of the shell together. Back to the grinder, I spend a good amount of time carefully evening out and leveling the edge where I just cut the cartridge. This will become the top of the converter so you want it to be smooth, clean, and uniform. Inside the shell you will have to remove two small plastic support tabs as they will be in the way of the passthrough tabs. Again, fiberglass cut off wheel, chop them out and smooth them over.
Now that the shell is cut and ready, set the converter (chip side down) and passthrough into the top half of the modified Gyromite shell. At this point I securely tack down the converter and passthrough to the top of the shell with hot glue, however you need to be careful not to glob glue in the path of where the other half of the shell will rest. After this put the other half (bottom) of the modified Gyromite shell back on and secure it with the two screws. Make sure the converter and passthrough are straight and level. Now I fill the holes in the modified Gyromite cartridge shell on the left and right of the converter and passthrough with hot glue. This will mount them securely in place and you should never have to open the cartridge up anyway so I say pour it on. To cover up the holes up top I take an NES dust cover and cut two little covers to size, attaching them with super glue to the top of the modified Gyromite shell. It covers up the holes and the glue work filling. Last step is to take the hot glue gun and carefully put a bead of glue between both sides of the passthrough and the edge of the cartridge shell. I make sure there's a solid smooth bead, too much glue means that Famicom cartridges will rub against the bead which leads to the glue peeling back or carts not seating correctly. Take your time with this, it's probably the hardest step if you're not handy with a hot glue gun.
That's pretty much it. Make sure the glue fully sets, hardens, and cools. After all that cutting, grinding, and gluing you should end up with something like this...
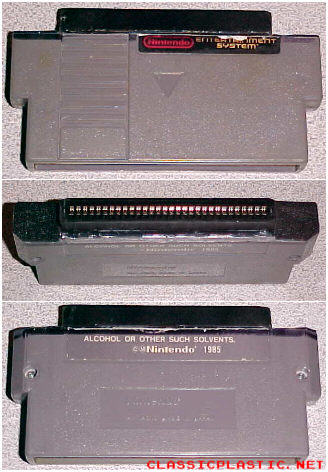
This is the prototype
converter that I base all the converters I build off of.
Usage is crazy simple. Insert a Famicom cartridge with its front side DOWN onto the top of the newly built converter. A good way to remember this is that the mitered edges of the Famicom cartridge should match the mitered edges of the converter - another advantage to using a converter built like this. Then you want to slide the converter with the Famicom cartridge atop it into your NES like a normal cartridge. Power on as usual and granted that your NES and the converter contacts are clean, the Famicom game will load up as if it was an NES cartridge.
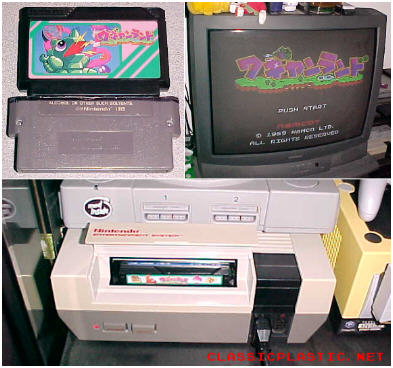
Getting the cartridge back out can be tricky. Most pirate converters have a thin strap atop them that allows the converter and Famicom game to be pulled back out. Of course you can add something similar to your converter and if you're using a top loading NES then this isn't an issue. The way I get the cartridges out is to reach in and wiggle the cartridge just a bit when pushing down the NES tray to raise the cartridge back up to the top level. Since the Famicom cartridges are smaller it's easy to get in there and grip them. Once loose from the connectors and back up at the top level the whole thing will slide out easily. If you're using a bare converter board and passthrough this is a total pain, it's also hard to insert the whole thing lined up properly - another reason why building a modified shell is the way to go.
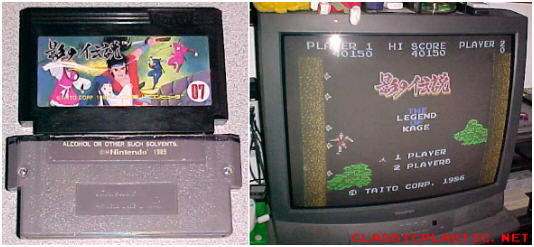
Building a converter such as this one eliminates the problems with the pirate converters out there on the market since it's using genuine Nintendo parts. It's a real 10NES lockout chip, it's a converter board and passthrough that Nintendo approved, and it's a true NES cartridge shell to guide the whole thing in. It will provide many years of super smooth performance without the usual on/off and tapping the reset button dance all the pirate converters require. It's not a simple quick job by any means but if you have the tools and the time it's a worthwhile little mod to perform. If the NES is your system it's one of those things you need to do to earn your Famicom import cred.
Here are pictures of the other converter rich NES cartridges I have personally come across since originally writing this editorial...
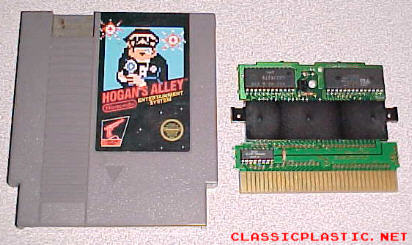
Converter hardware inside Hogan's Alley
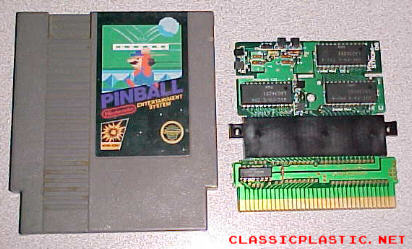
Converter hardware inside Pinball
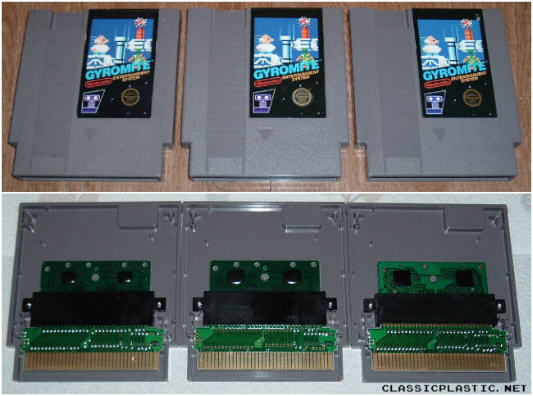
Three sets of converter hardware inside
three copies of Gyromite
If you are interested in purchasing a pre
made, ready to use Famicom to NES converter made from official parts same
as the one documented above, then please e-mail
me. If I have a spare one on hand at the time I will gladly sell
it to you. Let me know and we'll work something out.
Written on 03-28-06 by David, insanedavid@classicplastic.net
Last amended 09-23-08 by David, insanedavid@classicplastic.net