
Chronicles of a Pachinko
Machine Restoration
Attention:
The information here is listed in chronological order starting with the
oldest
posts first. That means the newest information will be at the
bottom of the page. This makes it so you can read a running log of
the project starting at the top. Special Note: Any information
here is to be taken as just that, information. I wrote the following
as a dated chronicle of my progress restoring my machine. Please
understand that many approaches to certain aspects of the restoration changed
over time, so I may say something in one post and two weeks later have
a totally different understanding of it. This
is not to be taken as a guide to restoring vintage pachinko machines.
For the most part I was learning as I went along and I can tell you now
I know a lot more than when I first began. Besides being a record
of the machine's restoration for my own personal archival, the information
below is presented in hope that it can be used as a jumping off point for
others attempting to restore a vintage machine. There are countless
ways to approach the restoration and below is the way I went about it utilizing
what little information existed before what I have written here.
 Pachinko
is still Japan's number one form of gambling, a game where you fire small
metal balls into a playfield where they bounce and cascade through rows
of pins in hopes they will enter win targets which reward you with more
balls. The balls are later exchanged for prizes or money. Really
pachinko is more like a slot machine than a pinball machine or game.
In the 1960's and 1970's many pachinko casinos had machines exported to
the United States. At the time the machines ran on a different power
rating so the importers would remove the power supplies before shipping,
this made the lights non-functional but the games still ran fine without
them - pachinko machines are pure mechanics. Due to the complexity
and uniqueness of the machines no one wanted to service them so they began
to fall out of popularity leading to many wonderful machines being junked.
Newer pachinko machines have video displays, automatic ball reload, automatic
push-button ball fire, and so forth but the older machines are starting
to become increasingly popular and sought after as antique collector's
items.
Pachinko
is still Japan's number one form of gambling, a game where you fire small
metal balls into a playfield where they bounce and cascade through rows
of pins in hopes they will enter win targets which reward you with more
balls. The balls are later exchanged for prizes or money. Really
pachinko is more like a slot machine than a pinball machine or game.
In the 1960's and 1970's many pachinko casinos had machines exported to
the United States. At the time the machines ran on a different power
rating so the importers would remove the power supplies before shipping,
this made the lights non-functional but the games still ran fine without
them - pachinko machines are pure mechanics. Due to the complexity
and uniqueness of the machines no one wanted to service them so they began
to fall out of popularity leading to many wonderful machines being junked.
Newer pachinko machines have video displays, automatic ball reload, automatic
push-button ball fire, and so forth but the older machines are starting
to become increasingly popular and sought after as antique collector's
items.
The second week of April brought with it
a trip out to the local flea market to look for video games and other such
things. When looking over the wares of one seller I noticed a pachinko
machine that was in really good condition. I've wanted a pachinko
machine for awhile but most of the ones I've come across were severely
damaged, missing their back mechanisms, and the seller wanted $40 ~ $70.
In other words big money for junk. Well the seller of this particular
machine wanted $30 or best offer but finally settled on $25. It needed
a few things such as replacement front glass, a full clean up, and of course
pachinko balls but other than that it looked to all be there. Here
you will find a chronicle of my progress as I attempt to restore this machine
to it's previous glory.
04-05-2005 Today I bought
the machine from a seller at the local flea market and brought it home.
Damn these guys are heavy!! It wasn't that bad but carrying it out
from the flea market under my arm was a bear. I got it home and gave
it a good look over and again - I'm really happy with my purchase.
The machine is one of Nishijin's Sophia series, one of the largest pachinko
manufacturers on the planet and a good first machine to begin with.
At this point the following items need to be addressed...
-
Full clean up of all surfaces - lots of dirt
but surprisingly little rust.
-
Replace front glass - the panel installed
is cracked, missing two corners and has some sharpie writing on it.
-
Replace lights - there are four lights on
this particular model, all of which are missing.
-
Rebuild wiring harness - although the switches
are on the machine and can be rebuilt, all the wiring itself is completely
gone as is the fuse board.
-
Some wood chipping on the lower portion of
the frame.
-
Base of the frame isn't secured properly -
the part of the board at the bottom that is nailed together has split away
and will have to be reinforced.
-
No keys for the front lock to open the machine
from its frame.
-
Payout reserve hopper on the back is loose.
After finishing up a basic clean up it looks
like all the mechanisms are there however I'll need some pachinko balls
to test it. There are two covers missing from the back, one for the
center action target and the other for the payoff mechanism. Missing
covers are common and this really isn't a big deal since all the mechanics
seem to still be in place and working. The mechanisms to open the
machine from its frame as well as the glass door and ball load door open
releases work properly and close firmly. I'll probably get a key
made for the external lock since I'd like to keep it original as possible.
Also I noticed that there are two grooves for glass panels on the front
of the machine. It turns out when these units were imported to the
US only the inner glass was on the machine. When I get the  machine
restored I'll replace the inner plexiglass and put a normal glass panel
in the outer groove. Then I don't have to worry about the surface
targets being damaged if someone pushes against the front of the machine.
The glass will stop any external damage and the plexi will keep the balls
in the machine. Having the plexi out also let me have a good look
at the playfield of the machine. First off the printing on the back
of the playfield is heavily faded but since the machine has an ocean theme
it still looks fine but it's not vivid. There is VERY slight water
and rust damage along the very top of the machine above the light bar and
an occasional tiny mark here or there but nothing as severe as many other
machines I see. In fact you don't see it unless you're looking for
it. The tulips are complete and seem to be working properly and there
are no missing pins although a couple of them will need to be aligned.
The center target is a cute little crab that flips over when a ball reaches
him and flips back over upon the next hit. This piece is bright,
vivd, and complete - it also works perfectly. The spinners are in
good condition and all spin smoothly although they are pretty dirty.
The launcher mechanism seems to be working fine as well. If I'm reading
the dating information correctly on the front sticker this machine was
manufactured in 1972. It's a little hard to understand at first but
the
only page I found with dating information is here - worth a look if
you own or are going to purchase a pachinko machine.
machine
restored I'll replace the inner plexiglass and put a normal glass panel
in the outer groove. Then I don't have to worry about the surface
targets being damaged if someone pushes against the front of the machine.
The glass will stop any external damage and the plexi will keep the balls
in the machine. Having the plexi out also let me have a good look
at the playfield of the machine. First off the printing on the back
of the playfield is heavily faded but since the machine has an ocean theme
it still looks fine but it's not vivid. There is VERY slight water
and rust damage along the very top of the machine above the light bar and
an occasional tiny mark here or there but nothing as severe as many other
machines I see. In fact you don't see it unless you're looking for
it. The tulips are complete and seem to be working properly and there
are no missing pins although a couple of them will need to be aligned.
The center target is a cute little crab that flips over when a ball reaches
him and flips back over upon the next hit. This piece is bright,
vivd, and complete - it also works perfectly. The spinners are in
good condition and all spin smoothly although they are pretty dirty.
The launcher mechanism seems to be working fine as well. If I'm reading
the dating information correctly on the front sticker this machine was
manufactured in 1972. It's a little hard to understand at first but
the
only page I found with dating information is here - worth a look if
you own or are going to purchase a pachinko machine.
I couldn't help myself and decided I'd
start cleaning up the machine, starting with the ball feed mechanism.
On my machine this is accessed by depressing a small metal latch located
below the playfield glass retainer door. I completely disassembled
it both inside and out. This was terribly caked with dirt but very
little rust on the metal parts. MAKE SURE THAT YOU KEEP TRACK OF
EVERY LITTLE PIECE. Although it was all held together with small
screws they were pretty much all of a different size and shape. Of
course that means they only go back to where they came from. The
last thing you want to do is strip out a cast threaded hole in any of the
plastic parts. Make a diagram if you must or lay the parts out in
a way you'll know how to reconnect them. The actual ball feed mechanism
on the inside of the door came off in one part with the removal of just
three screws. Remember that all pachinko machines are probably going
to be different inside, it seems that no two are the same. Although
you can gain experience from working on one chances are the next one you
see will be totally different - even if it's the same machine. After
getting the feed mechanism off I took the plastic parts from the front
that make up the ball reserve tray and launcher window outside and gave
them a good scrubbing. Although the dirt was caked on heavy about
90% of it came off just from using the garden hose and some good scrubbing.
I think used some windex to get off as much of the remaining grime as possible
and it's about 99% clean now, of course it's not going to gleam since it
was used in a pachinko arcade and is over 30 years old, but it looks really
good and won't get your hands dirty.
After that it was time to open up the ball
feed mechanism and clean it out completely. This part seems to get
extremely dirty on nearly every pachinko machine. It's a clear plastic
assembly that takes balls from the ball reserve tray and lowers them down
into a chute, the balls roll from there onto a lever that drops them down
another level into another cute and then the counterweight on the back
of the lever resets it back up to transport the next ball. This lever
smoothes out the speed in which balls will progress to the shooter so that
balls won't get backed up before  being
fired. The spaced out balls continue down into the bottom of the
ball feed assembly to where pushing down on the shooter assembly lifts
one ball at a time up and deposits it in front of the plunger, releasing
the shooter assembly makes the plunger strike the ball and fire it through
the machine. Pushing down on the shooter handle also triggers a pin
that lifts yet another pin which slides open a small door at the end of
the ball reserve tray, letting the next ball in line fall into the ball
feed mechanism. There's also a manual slider on the front of the
ball reserve tray that opens a side door and releases any balls in the
ball feed tray down to the payout tray below.
being
fired. The spaced out balls continue down into the bottom of the
ball feed assembly to where pushing down on the shooter assembly lifts
one ball at a time up and deposits it in front of the plunger, releasing
the shooter assembly makes the plunger strike the ball and fire it through
the machine. Pushing down on the shooter handle also triggers a pin
that lifts yet another pin which slides open a small door at the end of
the ball reserve tray, letting the next ball in line fall into the ball
feed mechanism. There's also a manual slider on the front of the
ball reserve tray that opens a side door and releases any balls in the
ball feed tray down to the payout tray below.
There were dead bugs and all kinds of dirt
and grime inside the ball feed mechanism. Also although it may look
to be completely plastic, all the bases of the chutes and chambers on this
machine were metal and needed to be cleaned and polished. There was
a tiny bit of rust here but it came off relatively easily with a little
scrubbing. I've heard you can use steel wool to remove the rust but
in the case of this machine it's simply not needed since the metal parts
are in such good condition - at least on the front. With the internals
of the ball feed mechanism nice and clean it became time for reassembly.
It's amazing that these parts that take such a beating from pachinko balls
are held in place with such tiny screws. There were about a dozen
screws between holding the ball feed mechanism together and securing it
to the lower door. Making a note of where they went and the order
of which I removed them made reassembly a snap. However I want
to stress that you take your time - restoring one of these machines requires
a lot of patience. Since you really can't pick up parts for these
units you have to use what you've got so restore components, not destroy
them. After everything was reattached the ball feed mechanism and
ball reserve / feed tray were looking pretty good...

At this same time I cleaned up the railing
around the playfield, the bad shot retrieval catcher, all of the chrome
inside the machine including the tulips was polished, and I gave the open
parts of the background a gentle washing with some water and windex.
I cleaned up the manufacturer and date sticker as well, so that they shine
and gleam as they did when the machine was built. The only real problem
I see is this damn store sticker in the upper right hand corner from "Pachinko
Palace Imports" that's probably been there since the mid 1970's.
I'll get rid of it sooner or later since it really seems to detract from
the over all appearance of the machine.
04-06-2005 Today I thought
I'd tackle the payout tray and shooter handle which are located below the
ball feed / reserve tray. Really there's no disassembly here, it
just needed a REALLY good clean out. I gave all surfaces a good scrubbing,
making sure to take off as much grime as possible and yet again it about
99% came off. I also cleaned up the ashtray that sits to the right
of the payout tray and I also scrubbed up into the payout chute as much
as possible. If I can at all help it I'd like to leave everything
on the back untouched. I may have to remove the outer chutes and
clean them up and I know the first few balls to go through are going to
pick up loose dirt but that's a given. I also cleaned up all the
chrome on the lower portion which again was virtually rust free.
The ball launch handle also got a good scrubbing and the results were very
nice. The inside part of the ball launch mechanism is pretty rusty
but it works fine and looks okay so I'm probably not going to disassemble
it if I don't have to. I might just scrub it down with some Lime
Away while it's fully assembled but that can wait until another time.

I also decided I'd tackle that structural
damage to the bottom of the frame today. There's no way around it,
I'm going to have to drill into the front of the machine. I drilled
a pilot hole through both the front and side panels in the best location
to replace the original nail. I made sure to drill a nice countersink
in the process since I plan on covering up the hole later on when I restore
the lower paint. I coated a screw in contractor's grade wood glue
and carefully drove it into the frame slowly, letting it grip the wood
and seat in properly. I then secured the whole thing with a bar clamp
and let it sit overnight to make sure there was a good strong bond.
I also pulled off the spinners that were heavily dirty and gave them a
good cleaning. I used some cotton swabs and water to clean between
the pins on the playfield and got rid of most of the dirt. The ideal
solution is to remove all the pins and targets but this takes a very long
time and runs the risk of severely damaging the machine, so I stayed away
from it. It doesn't look like it but the tip of each pin is threaded
like a screw instead of smooth like a nail, this only adds to the difficulty
of removing and reinstalling the pins - another reason I left them alone.
Upon cleaning a target at the top of the machine I noticed the sticker
on it was peeling away from its base, in other words the sticker was coming
apart from the center. I was really gentle with this part, cleaning
it only with a slightly damp paper towel but that proved to be too much
for the sticker to take. I ended up using a glue stick to readhere
the top part of the sticker to the base and plastic. This is something
to consider when cleaning plastic and paper parts of the machines.
Remember that most of this stuff is probably brittle or very susceptible
to damage. Mostly this is caused by age and sun or water damage -
take your time and clean cautiously. I also got that damn store sticker
off from the upper right of the machine, it looks 100% better now.
After the full clean up of the front things are looking pretty good...

04-11-2005 I haven't done
much work on the machine as of late except look at it and remove the locking
mechanism. The whole thing is one part that contains the lock, spring
loaded latches, and the mounting brackets. It took a bit of work
but I was able to remove it without any damage and gave it a clean up,
removing as much rust as possible. I removed the plate around the
lock from the front of the machine first so that it wouldn't get damaged.
The locking mechanism is held in place by an series of small screws as
well as a nut and bolt assembly that comes through the front. Again,
this probably varies by machine. I took the lock assembly to a local
locksmith in hopes that they can make a key for it. It's in their
hands right now and I'm waiting for a call concerning their success.
Really it all comes down to being able to find a blank that will fit into
the small stubby 30 year old lock. All said and done, if they can
make a key, it should cost about $25 - a steal considering that replacing
it with a new lock would require heavy modification to the latch mechanism.
04-13-2005 Well it took a
couple days but the local locksmith and alarm store was able to make a
key for the locking system on the machine. I actually brought it
to them late on the 11th so I figured they wouldn't start any work on it
until yesterday. After I didn't get a phone call from them I called
this afternoon. Turns out that no one in-store was able
to get a key made for it so they needed to wait for one of their outside
guys to come in to get it keyed and they'd call me tomorrow. About
four hours later they called back and said the job was done.
able
to get a key made for it so they needed to wait for one of their outside
guys to come in to get it keyed and they'd call me tomorrow. About
four hours later they called back and said the job was done.
A tiny part of the lock inside has been
burred off but I was expecting some slight modification to the lock was
going to be necessary since it's a non-standard lock. As soon as
I got home I reinstalled the lock assembly bar into the machine and replaced
the lock face plate. The locking mechanism works perfectly, basically
it's always hitched closed since it's spring loaded. Turning the
key in the lock turns a little tab up which pushes the spring loaded locking
bar up which pushes the two hitches down, allowing the machine to be opened.
The key is used as a handle to pull the machine open, it's a lot like a
giant coin box door you find on an arcade cabinet. The exception
is here instead of just a door opening, the entire machine swings open
out of its outer frame. Since the hitches are spring loaded you simply
push the machine closed and it locks into place. The lock itself
really doesn't do anything except lift the bar which releases the hitches
allowing the machine to be opened. I've never come across a pachinko
machine that actually has its keys. I suppose that they weren't included
when the machines were exported to the United States in the 1960's and
1970's since most of the time the machines were left open on the back.
However I want to box in my machine so that it's all enclosed, aside from
keeping the machine's internals clean (or not letting them get any dirtier)
it's also how these machines are supposed to be displayed. Losing
massive amounts of balls really doesn't have as much consequence when you
can just reach around the side to recover them from the lose ball tray.
When the machine is sealed YOU LOSE, there's no quick recovery. It's
also a lot easier since then I don't have to worry about anyone messing
with the internals or filling the win ball hopper improperly or dropping
the lose ball tray (and losing those precious and expensive pachinko balls).
Speaking of which, that's the next thing I need to order.
04-19-2005 I ordered 500 pachinko
balls from SlotUSA today. It was cheaper to go after one of their
constantly rotated eBay auctions than to purchase them directly and the
auction ended for a bit over $20, which after the $10 or so shipping and
tax still isn't bad at all. It's pretty much impossible to find "new"
pachinko balls so nearly all the pachinko balls you'll find for sale were
previously used in Japanese pachinko arcades. However SlotUSA cleans
and checks them to make sure there are no damaged balls in your assortment.
They should be here by the end of this week and then I can start testing
the inner workings of the machine.
04-29-2005 SlotUSA finally
delivered my order of 500 pachinko balls and while they did arrive in what
I guess could be called a timely manner, I still think it should have been
a little faster. It takes 72 hours to process your order (they say
this is the longest it takes - but it turns out this is how long it ends
up being no matter what) and then they ship via slow as molasses FedEx
ground. It was $7.75 flat rate shipping though no matter how large
the order, which is why I went for an auction of 500 instead of 250, so
I guess I can't complain. One thing to keep in mind, the box is going
to be HEAVY and it's going to sound like it's full of ammunition - this
could be why they don't use USPS. Just the same they arrived in a
sealed bag all cleaned and polished.

Now that the balls finally arrived it was
time to get testing the machine. First and foremost let me explain
how the win hopper works. You lock the ball purge mechanism and load
balls into the win hopper at the top. They'll begin rolling down
the chute and pile up at the center target, if there are enough balls so
that there's a solid chain of them all the way up into the win hopper they
will push down on an actuator plate just below the win hopper. This
plate allows the ball feed mechanism to load the balls into the machine
in front of the plunger. Basically this is so if the machine doesn't
have enough balls inside to pay off winners it won't allow itself to be
played. This is one of the reasons it is recommended you have at
least 500 or so pachinko balls minimum per machine. This will allow
you to have a good amount in the win hopper yet still have balls on hand
to initialize play with. If you really get into pachinko restoration
heavily you should have about 1000 or so balls in the win hopper at all
times, then you don't have to worry about it running out day to day.
Additionally all machines need a lose tray that sits inside the machine
at the bottom which catches all the lose balls (and there will be a LOT
of them). You can buy a plastic tray or use anything you like, I
have a reinforced shipping container as pictured above and it works great.
Well I loaded up some balls, set the machine
level and noticed my first problem, the tulips were jamming up. After
some adjustment and playing around with how the balls drop into them I
had this little catch resolved, although the left tulip still seems to
back up from time to time, I might have to remove it.. don't really want
to since it's the most buried part on my machine but I may have no choice.
After clearing that up I noticed another problem, the center target was
never paying out and balls were falling out of the chute from the win hopper
on the back left and right. After thinking about the problem I remembered
seeing nearly every other machine have some kind of cover over the chute..
a missing piece. Without a cover the balls bunch up on top of each
other and don't roll smoothly and put pressure to fill the payout target.
I had some heavy card stock I cut to fit and then taped it down over the
chute which solved the problem.

With that resolved the balls were no longer
dumping from the top of the machine and there was now the proper gravitational
pressure from the rest of the balls further up the chute to force the lower
balls into the center payout mechanism. However after playing for
awhile the machine was still not paying off when it should have been.
After looking over the center mechanism I realized the problem.

The part that triggers the target to refill
with balls from the win hopper has had a piece broken off. In other
words when the balls are paid out they hit a deflector on the bottom which
is supposed to make the center piece rock forward, pushing the top lever
up and triggering a refill of the center target. At the same time
the top lever moves the center piece back so that it pays off once rather
than leaving itself open. I rigged it so it would slide smoothly
and I was getting pretty good performance but it seemed like it was paying
off too frequently (since it wasn't closing itself properly). In
the picture above I've drawn what I'm guessing the part that is missing
would look like - it's the part drawn in black. There are a few ways
I can fix this. I can file down both plastic parts so they have easier
meeting tolerances but this risks the machine paying off too much.
I can build the missing part out of plastic and adhere it to the existing
part, which is probably what I'll do. Or I can find another center
assembly on another machine and swap them. I'm probably not going
to find another center assembly since finding pachinko machines around
here with ANYTHING on the back is hard to do as it is. I have some
old plastic storage cases (similar to VHS plastic storage cases) that I
can cut a replacement piece out of and then adhere it with plastic adhesive
which looks to be the best choice. The existing plastic is very brittle
so drilling through it to attach what it's missing is out of the question.
When I do fabricate the replacement I'll probably make it more robust instead
of just being a weak little tab, maybe extend it as far down the center
part as possible for added strength. Keep in mind this center part
was originally behind a cover for these reasons. Anyway, when it
lifts up and lets the load of balls currently being held in the target
out, they fall down into the tray below, hit the bell inside, and come
out the win hole on the front into the ball loading tray.
Aside from the problem with the payout
target it seems the machine is working fine. I have to tweak some
stuff with the shooter mechanism to ensure more reliable operation (from
time to time it loses connection to the spring pin) but aside from that
I'm impressed with how well the machine is working. I'm planning
on looking at the issue of the lights next but that may have to wait until
two weeks from now as there are other things to do next weekend.
At the very least I'll clean up the light switches and do a small write
up on them that should be up by next weekend's update upload as it seems
there really isn't much information out there on how the electrical systems
function on these machines.
05-02-2005 Alright, I spent
some time really looking over the mechanics of my machine today.
Turns out the damaged piece on the jackpot payout in my last post wasn't
as bad as I thought. Yes, it has been cracked down from its original
size but it's not as bad as I expected and drew in my estimated illustration.
Really it's only missing about an eighth of an inch so I fabricated a little
plastic nub and attached it to the end of the mechanism and everything
works fine. Really it just needed a little tweak so that when the
lever rocks up it can open up and dump the jackpot balls. At this
point I think it just needs a little lubrication. I'll probably use
some Kyosho (Japan's top R/C car manufacturer) hobby grease since it doesn't
attract dirt.
Additionally I got an e-mail with a link
to a pachinko page where the three wiring diagrams for the Nishijin Sophia
series machines can be found. I already have these diagrams but the
versions you can find at this
site here are cleaned up versions. (EDIT:
please note that the third diagram appears to have an error, please refer
to an update I posted here before attempting
to wire your machine) The site (Dan's Pachinko Data Page)
is an excellent resource as he has videos of key mechanisms functioning.
All the information on the page is excellent, but one correction - not
all Sophia series machines have four tulips. The links page there
has links to the few other pachinko sites on the 'net including the others
I've referenced but later on I'll post a list of links where I was able
to grab information. Really you should read that site over since
it will give you a lot of information. Remember this page here is
part of a larger site that I run and is really just to chronicle the restoration
of my machine in particular and offer the information to assist any other
restorations. Thanks to Jim for the link!
Actually I was able to grab some very important
information at that site concerning the payoff mechanism. For one
reason or another, the little curved latch part of the payoff mechanism
on my machine would simply not disengage. This made it so that when
the jackpot payout would dump it's winnings they would be diverted to the
lose ball tray rather than being paid out the front of the machine.
The only way around this I found was to rig the latch on the payoff mechanism.
The problem with this is that the seesaw that dumps win balls onto the
actuator lever that opens up the jackpot payout doesn't get reset, so payoffs
are delayed which ruins the momentum of the game. No matter how long
I tinkered with the mechanism I just couldn't figure out how it was supposed
to function originally and any pictures of this part I've seen have been
very small or blocked by the cover. Pretty much all that's been said
about it is "this is the most important part" which is no help. I
know how it's supposed to work, I just can't figure out how that latch
part is supposed to disengage and allow a payout. Well after viewing
a good picture of the mechanism as well as seeing video of one in action
I figured out what the problem was.

There's a little lever that pushes the
curved latch part forward, allowing the jackpot payout to pay jackpot balls
to the front of the machine. On my machine the lever was pushed back
so it would never push the curved latch forward, in other words the machine
was rigged to NEVER payoff. I loosened the screw, moved it to its
proper position and tightened it down. Now the mechanism works properly:
A ball enters a win target on the front and arrives at the seesaw (1),
enters, and pulls the seesaw down. When the seesaw goes down the
little lever that I fixed (2) pushes the latch forward, disengaging it
(3), and the ball leaves the seesaw into the lower chute where it will
go on to to hit the actuator pedal that pays out the jackpot. With
the latch disengaged the jackpot falls into the payout chute and triggers
the rod with the latch on it to jump up, which pulls on a pin that pulls
the seesaw back up into ready position (4). When that rod settles
back down the latch engages again and prevents a jackpot from being triggered
until another win ball enters the seesaw where the whole process begins
again. It's a huge weight off my mind to finally have this damn mechanism
working properly since I kept thinking I was missing a part but it all
seemed to be there. Turns out, as I stated earlier, that the mechanism
was rigged and just needed to be adjusted. I'd say that the lever
had just come loose but it was screwed in TIGHT in the improper position
so I'd say it was intentional.
With that I can get started on the electrical
system since most of the mechanics are now taken care of. I probably
won't get around to purchasing the needed electrical components until sometime
next week. I still plan on running the whole smash on a large 12v
battery since I don't want to have to be dependent on a power socket and
I'm going to have to rebuild the wiring completely anyway.
05-06-2005 I've been giving
my machine an hour or so usage a day since my last repair, just to see
if any other problems appear. Everything is working smooth however
there are delayed payouts with the right from time to time, however once
another ball follows it they both pay out so I'm going to attribute this
to the machine either having some restoration pains or that this is how
it's supposed to work. It could explain that little spring loaded
drop down lever that was stuck on the left tulip, the one I rigged to stay
in the mid position. Possibly the tulip is supposed to hold balls
that enter when closed or enter through the tulip open sinkhole at the
top until you get a ball in the open tulip - then it lets them all into
the chute to the payoff seesaw. The reason I think this is because
ever since I rigged the left tulip it pays off immediately no matter if
a ball enters through it open, closed, or through the tulip open sinkhole
at the top. Just the same when the balls are released to the payoff
seesaw they all pay out their jackpots, so the machine is still running
fair and paying out accurately and consistently. The machine is running
nicely, certainly well enough for trouble free home usage. Also the
more I use the machine the smoother everything operates.
10-09-2005 Been a long time,
hasn't it? Honestly I planned on doing some work on the machine this
summer but it was simply too hot or there were other things that occupied
my time. (imagine that) However I've gotten a couple e-mails this
last week concerning the modification I did to the jackpot mechanism at
the center. I posted a picture a long time ago with my estimate of
how large the part that broke off was, then later realized my assumption
was far too large and far less was missing of the mech. Yet I never
did show a picture of what my modification looked like or just how little
needed to be added. Well, here it is...

That's it, that tiny plastic tab, that's
all that was really missing from the center mech. Honestly it's supposed
to be a little smaller but structurally that was as small as the new part
I made could be to remain durable. As you can see I extended it to
run downward to give it a larger surface area to bind against, again, to
make it more durable. The problem before adding this was that due
to the mech being shorter than it should be, the base of it wouldn't close
up enough to keep balls from slipping out of the jackpot mech. (it
would remain rocked forward just enough to let a couple balls by since
the top wasn't making proper contact) Of course since they weren't
winners they would be dropped into the lose ball tray but it was draining
the win hopper and getting in the way of the flow of real jackpots.
Additionally from time to time a ball would get jammed at the back of the
jackpot mech. By adding the missing distance the rocker mech is pushed
back enough to hold balls in the jackpot payout until the bar above lifts
allowing a payout.
Due to the modification still not getting
the mech to exactly where it should be, as well as a heavily worn rocker
part itself, I had to attach a pachinko ball as a counterweight to the
back of the rocker. Before doing this the rocker would get stuck
in the open position but since attaching a pachinko ball to balance things
out it works perfectly. While I'm at it, a picture of the back of
the machine...

Looking good and nearly totally clean.
Every 30 hours or so of play the balls begin to pick up a bit of dirt and
rust so it's not totally clean. I do however clean the balls after
they start picking up dirt but they come back out of the machine with less
dirt and rust on them each time. Not bad though considering I didn't
do a full disassembly of the rear, just a few key (and somewhat easier
to access) parts. Make sure to also regularly clean the rail inside
the face of the machine that the balls travel up and around on after leaving
the shooter, it picks up a lot of grease and grime. I also replaced
most of the staples that held stuff on the back with small wood screws,
they're more durable and make it easier to disassemble the machine for
repair. Of course there's still no electrical system. I've
decided to box in the machine before going ahead with the lighting and
wiring as there's no reason to rewire the machine when it's open to become
damaged again. Currently I'm going over a few different ways of building
a back / cabinet for the machine, when that does happen it will be documented
here.
10-13-2005 Actually did a
good amount of work on the machine today, namely beginning to box in the
back of the machine itself. Now this is probably the first and more
than likely the biggest modification you will make to your machine and
you do have some options.
-
You can build the machine into a wall.
-
You can simply leave the back open but this
leaves it open to dust, dirt, damage, and allows balls inside the machine
to get away.
-
You can build a second matching frame to the
existing one and then panel them together with plywood.
-
You can build a larger frame over the existing
frame.
I want to stress that you plan this out before
going forward since you are getting right in there and altering the machine's
original frame itself. Of course there are other ways one can think
of however I went with the last option, building a second larger frame
around the existing frame. This way I can beef up the structure of
the original frame since it's not as strong as I would like it to be.
I decided to use 7 1/4" long 3/4" pine to build the larger frame.
Front to back seven inches or so is enough to clear the internal mechs
and ball hopper with plenty of space yet won't add so much extra material
to the machine as to make it bulky.
So I cut two pieces of wood for the top
and bottom, to the length of the machine plus the width of the two side
boards. This is a better option than making the side pieces longer
since now the massive weight of the machine and new frame is resting on
one solid long board at the base, instead of a short board with the sides
supported off it leaving all the downward stress to the screws at the bottom.
After that I cut two longer pieces of wood to the exact length of the sides
of the pachinko machine, they will be sandwiched in between the top and
bottom boards. (maybe that last sentence made this whole paragraph
make more sense)
The existing wood frame of the pachinko
machine had seen better days, heck, it was well over 30 years old.
On my particular machine a support board at the base had split and I had
to repair it earlier to stop the damage from continuing. (mentioned
in a far earlier post) The bottom board was chipped and worn down
which I assume is common on pretty much all machines of this era due to
being set down, moved around, rested on, etc. Additionally the board
that split made my machine not sit quite square so with the new outer frame
I would attempt to straighten the machine out.
Due to how old and brittle the existing
wood frame is, screws sink into it like it's made out of clay, there is
nearly no resistance at all. Still, make sure you drill very small
pilot holes before driving any screws. You'll soon see that you have
one big structural problem on your hands - the corners of the existing
frame have nails through them at every turn, so there's not much space
to drive a screw. Of course this would be the best place to screw
in but I had to step around the nails carefully. I started with the
bottom of the machine and coated the existing frame with a streak of contractor's
grade wood glue. (I know, I know, that means the machine really can't
have this new frame easily removed from it but if it wasn't for me restoring
it then it would probably be in a junk pile somewhere by now) After
that I was able to drill three holes in good structurally solid locations,
it's easier at the bottom since you have the front panel board to screw
into. I plugged each drill hole with a dab of the same wood glue
before driving the screws in. For the bottom I was using 2 1/2" wood
screws.
Time to flip the machine upright and put
in the top board and....... you'll notice your first problem. On
the left side you have the huge metal bracket that supports the hinge for
when the machine is swung open away from its frame. On the right
side you have the same nail-filled corner and this time there's no big
solid front panel to screw into. Instead you have the inch or so
thick top of the machine which has nothing below it except the ball hopper
and all the internals. I was able to find two strategic locations
at the top of the machine that had a clear shot for more 2 1/2" wood screws.
Again, a bead of contractor's grade wood glue, glue in the holes, and very
slowly turn your screws down and mate the new frame board with the old.
Next I attached the board on the right
side, the side where the shooter mechanism is on my machine. I put
a bead of wood glue on the new bottom board where it would meet and another
bead of glue on the top edge of the side board before sliding it into position.
Now this is the side where the machine doesn't stand straight, so I gently
albeit firmly worked the new side board straight and drilled my pilot holes
at the top. Then I filled them with glue and drove four screws down
into the new side board through the new top board. After carefully
flipping the machine over I did the same at the bottom, driving four screws
up into the new side board. This straightened out the machine no
problem and added far more structural support to the damaged base.
Now the biggest pain of framing in the
machine, the left side. A pain because you have the hinge brackets
and their screws to deal with if you want the board to sit flush.
I used a utility knife to cut out spaces in the surface of the board to
help it better mirror the hinge brackets and their screwheads. Then
I went through the same procedure as on the other side, putting a bead
of glue on both ends, drilling, putting glue over the holes, and slowly
driving in some wood screws. I didn't completely notch out the side
board to match the hinge brackets and screwheads, I just cut out for some
of the ones that stuck out more so it doesn't sit totally flush against
the side on my machine. However since there's also a gap on the other
side (since the machine swings open from there) it doesn't call attention
to itself and looks fine. I did finally cause one of the side boards
to start to split a little with the last screw I put in but I backed off
and moved its location. The split was just at the corner and I was
able to repair it.

The next step is to drive in some shorter,
inch or so long, screws along the sides through the new boards into the
old frame for added strength. (need to do that, I didn't have any
screws of that size on hand) I didn't coat the sides of the machine
in wood glue when installing the new panels but I will drop wood glue atop
the holes before driving the next set of screws in. Honestly this
is to give better support to the existing wood frame since it is so old.
I still recommend using long screws for the initial frame constructing
and linking to the old frame, you want to make sure it has a solid foundation.
It may not look like a whole lot but now
the machine stands completely and solidly upright on its own and I can
swing the machine out from it's frame to gain access easily (will be that
way once it's secured to a wall at the back anyway). Now you're asking
"where's the back?" I've cut a plywood panel to the size of the back
of the machine but I'm not going to install it until I get the wiring loom
and lighting system rebuilt. It'll be a lot easier to do the work
without a back panel attached. After that I'll predrill some holes
and attach the back panel with eight or ten wood screws, I probably won't
glue those in so I'd have the option of removing the back panel if heavy
maintenance is ever needed.
I was finally able to set the machine up
on a table, stand at it and play a game without having to brace the machine
against something or have it wobble around. Just the frame as it
is makes the machine far more practical and solid. So next up will
be to drive in some shorter screws along the top and sides for more support.
(probably won't document that) Then it's time to get to work installing
new lights, light sockets, rebuilding the wiring loom, rebuilding the light
actuators and installing a power source. At least now I don't have
to worry about the machine falling over in the middle of the night.
If you're playing the cost index game, it was about $20 for the wood for
the new frame and the quarter sheet for the back.
Consequently I guess you could totally
disassemble the machine down to nothing and completely rebuild an all new
wooden frame from the ground up and customize it to your needs, but honestly
restoring one of these is a bear to begin with, who would put themselves
through fully reconstructing all the woodwork?
12-05-2005
I finally sat down and began work on rebuilding the wiring harness and
installing lighting in the machine. When I bought this machine there
were no light bulb sockets, no wiring loom, no fuseboard, not much of a
junction board, and one of the switches was beat to hell. I had been
studying the wiring schematic for this particular series of machine for
a long time and finally got to work on building it. I picked up a
pack of four mini lamp sockets (vertical mount since my Radio Shack isn't
worth a damn - like most), two packs of two 7.5v mini lamps (originally
these machines used 10v lamps but 7.5v should work fine), and a spool of
rainbow wire as I just realized that I was out of solid core wire.

First things first, I had to bend the screw
mounts on the sockets since they were originally designed to be mounted
vertically, and were all that Radio Shack had - this resulted in me breaking
one of them, but I can just do the wiring now and install that socket later.
I will say that if you aren't comfortable with reading a schematic and
doing basic electronics repair, this is a step in the restoration you may
want to have someone help you with. If all your wiring is there and
is in good shape then you're lucky, in my case I had to rebuild it all
since it was nonexistent. An important tip
when refurbishing the switches is to remove the little copper
strips that comprise them, solder your leads to the strips, and then slide
them back into their plastic housing. It's nearly impossible to solder
new leads on properly while they are still attached to the plastic housing
and all you'll end up doing is melting and deforming it. I've seen
some people rig up arcade microswitches to replace the original contact
switches (which I'll probably end up doing with the ball tray empty switch
since it's near totally shot) or making new switches based on the original
strips. However if the wiring is there your switches are probably
good. After dropping in the refurbished contact switch strips, it
was time to begin rebuilding the wiring harness.
I simply followed the schematic and rebuilt
everything one part after another. To install the lamp sockets I
carefully secured them just enough to hold them in (remember the playfield
is on the other side of many of these) and then let them rest against their
original socket holders. Granted the new lamp sockets are much smaller
than the holders, but they still sit in place. Yeah, yeah, it doesn't
make the machine original but as I've said many times, if it wasn't for
me restoring this machine to play condition it would probably be in a trash
pile somewhere. Originally there was a fuseboard in the upper right
side of the back of the machine where the main leads met and would be tied
into the power source. On my machine this is missing completely so
I ran the wires up to it's location (middle, below) and then hardwired
them into a pair of leads that run all the way down to the bottom of the
machine where the power source will be located. Additionally the
machine had a junction board on the left side where wires that would spilt
to run to multiple locations (such as the winner lights) would be patched,
as you can see (right, below) only one of these tabs has survived on my
machine. So I used it where I could and directly hardwired any other
junctions inline.

Now I had the come up with a solution to
the problem of the socket I had broken. I decided that I would run
the wiring for the socket and next time I was near Radio Shack I could
pick up another pack of lamp sockets. That way all I'd need to do
is wire the socket and be done. Thankfully there is a non-critical
light on my machine, the one that comes on when the ball tray is empty.
Since I need to rebuild that switch still anyway, it's really not that
big of a deal. In the picture below you can see the two leads (one
of them off an inline junction, originally the leads for this light would
run off the junction board) that run down to the ball tray empty light.

I wanted to leave my options on how to
power the lights open. I honestly don't want to have to have my machine
plugged in, the location I have planned for it is away from any sockets.
Yet at the same time I want to leave that option open if later on I decide
I would like to use wall current. The answer to this problem is simple,
a pair of alligator clips on the end of the power leads, resting all the
way down at the base of the machine.

Here you can see the alligator clips connected
to a standard 9v dry cell. I can also connect them to a 12v lantern
battery, or to a model railroad transformer (recommended by many who have
e-mailed me as well as many pachinko forums) if I wanted to run it from
a power outlet. I'd recommend that everyone use this method for power
connection since it leaves your options open. If I want to change
batteries I simply disconnect and reconnect. If I want to use a transformer
I simply clip the leads onto the DC terminals. Nice and simple and
safe. So as things stand now I simply set the battery in the base
of the machine, it's on the side that the door swings to and there's a
little excess wire so I don't have to worry about pulling the battery out
or having the battery tug on its connections.
The wiring work isn't the cleanest I've
ever done but it's all secure and proper, nothing gets in the way, and
it all works. Sure it isn't as nice as the original wiring probably
was when the machine was built but I know what runs to where and considering
how little I had to work with, I think it's still a nice job for home use.
So that leaves the next steps being to install the ball tray empty light
(after I pick up a new socket), final internal cleaning before installing
the back panel, another sanding to the frame, painting the frame, replacing
the inner and outer glass and then bringing it in and installing the machine.
The sockets, lamps, and wire came to about $10 total. I think I'll
do a running tally right now before I forget...
$25.00 - Cost of machine
$25.00 - Locksmith cost for keying original
lock
$30.00 - 500 pachinko balls + shipping
from SlotUSA
$20.00 - Wood for new outer frame and
back panel
$10.00 - Components to rebuild lighting
system
$110.00 - Estimated cost to date.
Remember though that I've been working
on this machine now and then for eight months now, so that's really about
$14 a month on average up until this point. (EDIT:
the wiring work I did above sucks, please refer to an update I posted here
to see a more proper way to go about things)
12-13-2005 After cleaning
up the machine only to have it become dusty in storage over and over again,
I've finally decided to bring it in and mount it where it will remain for
normal use. I have it sitting on a shelving unit with the top of
the frame secured to the wall with a pair of L brackets. This is
very important as if the machine is not secured then it would fall forward
when opened. There's still a good amount of work to do but the mass
repair and rebuild stuff is done and outside of staining the new outer
frame it can stay where it is for the rest of the work.
Now that I really don't have to worry a
whole lot about the machine becoming damaged or getting dirty from being
in the garage, I gave it a full cleaning once again. This included
disassembly of the ball feed mech to clean it out, another cleaning of
the external parts on the back of the machine and the like. Additionally
I went ahead and lubricated all joints, rollers, springs, anything that
moves with some 3 in 1 oil. This is very important for your machine
to work at optimal performance and the oil will also help to remove and
keep rust away. Finally after a day or so of oiling alone, the machine
doesn't squeak anywhere. Take your time with the oil, just a drop
here and there and always wipe away the excess. Now the mechanisms
all move smoothly, the latches open and close easily, and the whole machine
works better. I also cleaned up the playfield as it never really
got a full cleaning. Granted my machine's playfield will never look
super gloss shiny due to water damage that existed when I picked it up.
However getting any loose dirt and grime taken care of so it won't be picked
up by the balls during operation is very important.
I also got around to a repair that was
my own idea that I kept putting off. The very bottom part on the
back of the machine, the deflector that dumps down into the payout tray,
has a metal plate atop it that the balls roll over. This metal plate
has always been extremely rusty as any moisture would collect down at the
bottom where this plate is located. I've scrubbed it down many times
but there's simply too much damage to the plate and when "cashing out"
balls or bad shot returned balls would come back they'd pick up rust.
The plate is riveted in place so I didn't want to even try to remove it.
So the solution I came up with was to coat the rusty plate (remember, I
cleaned it best as possible before hand) with a durable vinyl tape.
This allows the dimension and angle of the plate to remain in tact however
now balls can travel along it rust free.

Next comes the issue of a solid power solution.
The 9v battery I was using to power the machine before wore down after
a day or so. The draw of the always on light isn't bad but once the
winner switch gets hit and the two other bulbs come on it pulls more power
than the little 9v battery was meant to handle and there by drains it quickly.
I was unable to find a 10v battery at most local stores and I want an easy
to replace power source anyway. I still don't want to use plug in
power since the location of the machine is far from an outlet. However
6v lantern batteries can be found at nearly every discount or electronics
store, heck you can get them at most drug stores. So I decided to
use two 6v lantern batteries connected in series to provide around 12v
of power. It's amazing the price difference between brands of these
cells, I went for the cheaper ones since they were half the price of the
other manufacturers. I suppose I could always pick up a large rechargeable
cell from a hobby store later down the line but this set up should suit
my needs. Keeping with the theme of easy to replace and connect power,
I made a little jumper cable with another pair of alligator clips to connect
the two batteries together.

The batteries rest nicely inside the machine.
When not in use I simply disconnect the feed to the machine from the negative
lead on the second battery. Now with my particular series of machine
the lamp in the upper right corner is always on. I'm using 7.5v bulbs
so the constant draw to the always on bulb is tight but as the batteries
slowly wind down it should be less of a concern. Honestly I'm not
worried about it, with the setup as it is everything works a lot better
than when I was running the machine off a small 9v battery. Now when
the winner lights come on the always on light just barely dims instead
of almost going out as before. (EDIT: please
refer to an update I posted here before
using a battery configuration such as this on your machine, there is a
risk of power overload)

It cost about six bucks for both batteries
and as you can see above the light is bright and strong as are the winner
lights once activated. I still haven't gotten out to the electronics
store to pick up some new lamp sockets for the ball tray empty light.
I suppose I'll go over what is left to do.
-
Install new ball tray empty lamp socket
-
Either attempt to refurbish or replace ball
tray empty switch
-
Possible tweak to jackpot mechanism to prevent
occasional hangups
-
Sand entire outer frame once again
-
Stain entire outer frame
-
Replace inner plastic panel
-
Install outer glass panel
-
Purchase about 1000 more pachinko balls so
I don't have to screw around with filling the win hopper as often
Now that the machine is inside it's actually
getting some use. Since it's up kinda high I need to get myself a
folding stool at the level of the machine since standing in front of it
gets old fast, hehe. The only work, if any, that I'll do on the machine
until after the holidays will probably be to install the new ball tray
empty lamp socket and refurbish or replace the ball tray empty switch.
After that the machine will be fully functional, the rest of the stuff
that needs to be done is really just to get the machine looking restored.
Oh, and of course, constant cleaning and maintenance as things begin to
settle in the machine once again.
12-22-2005 I haven't done
much work to the machine, as I said in the previous update I won't be doing
a whole lot until after this week. However I did tweak the jackpot
mechanism to prevent it from hanging up and getting stuck occasionally.
Many updates ago I explained that the rocker part of the jackpot mechanism
on my machine had been cracked and damaged. To fix this I fabricated
a little plastic tab to make up for the small sliver of missing plastic
on the rocker. Although this allowed the machine to function it still
would get stuck every now and then as the rocker could advance too far
inward and get hung up on the jackpot refill / release assembly that sits
atop it. After studying what was happening I came to the conclusion
that the piece I fabricated was just a hair too short, originally the rocker
wouldn't be able to lean that far forward. So I got some rubber feet
that are common on things like clock radios and the like and stuck one
on the surface of the jackpot mechanism right where the rocker comes into
contact.

As you can see in the above picture, the
plastic piece I fabricated on the rocker makes contact with the rubber
foot and it prevents it from rocking too far forward. This actually
worked out perfectly as the travel distance is exact to the diameter of
a pachinko ball, so the jackpot falls out properly and the rocker resets.
Of course lubrication is the key to keeping this part running properly,
I may also fabricate myself a replacement cover for this mechanism as my
machine was missing one when I picked it up. Word to the wise about
this, originally when I was positioning the rubber piece it fell down into
the chute below that leads to the ball loading tray or ball lose tray depending
on if there is a jackpot target hit or not. I was fortunate as I
triggered a jackpot and the rubber piece came out the jackpot exit on the
front into the ball loading tray. After that I covered up the chute
below the jackpot mechanism before securing the rubber foot in place with
some super glue, didn't want it falling down there again, especially this
time while the glue set.
01-02-2006
A few things concerning the power system of my machine have come to my
attention this week. First off I had the "always on" lamp burn itself
out. I had some company over and the machine was being played when
I noticed the always on lamp flicker then go out. Upon inspection
it was extremely hot and once removed the bulb was charred black.
Moral of the story kids - don't push 12v through a 7.5v lamp running on
direct drain without a fuse. I've scaled back my power set up to
a single 6v lantern battery and after replacing the burned out bulb everything
works fine, not as bright as it was with 12v but bright enough. I'm
just glad none of the wiring failed or needed to be replaced. This
mistake was nothing but me being stupid and telling myself "it'll be fine."
Speaking of 7.5v lamps, I went into Radio
Shack to pick up another pack of sockets so I can wire up a lamp for the
"ball tray empty" actuator and they had everything but the part I needed.
So upon returning home I began to study the wiring of my machine and something
didn't look right. I had read over the schematic I had picked up
online a few times, drew it out myself, and built it in my head before
actually building the wiring system so I knew I built it as listed but
it still didn't seem right. So I connected the machine to power and
began to poke around with my multimeter, eventually figuring out that the
leads that will run down to the eventual "ball tray empty" light weren't
carrying any power. Reading the schematic over a few more times along
with checking different points with the multimeter probes revealed that
there was a wire running to an incorrect point on the schematic.
After redrawing the schematic and mapping out how power moves around it
I made the changes and now everything works fine.

Above you can see my revised schematic
with small red arrows mapping out the direction of power travel.
Of course this isn't verbatim how the machine is wired from the factory,
it's a schematic diagram, not a pictorial diagram. I've also went
ahead and cleaned up all three of the Nishijin Sophia series schematic
diagrams, you can find them here.
Please do not direct link to this file, download it and use it instead.
You have my permission to upload it and host it on another web site however
the image MUST remain untouched with the copyright data at the bottom,
thank you. If you have one of these Nishijin Sophia machines with
the original wiring intact and know how to read a schematic please check
my diagrams against the factory original wiring and let me know if they
are correct or incorrect. If they are incorrect I will update them.
All I know is my revised 4-light two switch schematic works properly as
that is how my machine is wired now.
Aside from that the machine worked flawlessly
through some heavy use among different age groups throughout the holidays
with only one jackpot payout mechanism jam the entire time and that was
due to me not properly preparing it.
01-05-2006 Radio Shack actually
had my screw type lamp sockets finally, I guess I should have went to this
particular store first since it really is the only well run store in the
area. In addition to the sockets they also had the 14v lamps in stock,
which is what I wanted to use in the first place. So I picked up
14v lamps to replace the 7.5v lamps the machine has been using up until
this point, they use the same sockets. This means I am once again
using a pair of 6v lantern batteries connected in series for a pull of
12v to run the lights in the machine, with lamps rated for 14v I don't
have to worry about overload with the increased power. 14v lamps
have a slightly elongated profile compared to the 7.5v lamps but actually
looks better since it gets the light closer to the front of the machine.
When I began on the wiring last month I mentioned that I had to modify
the vertical mount lamp sockets that most Radio Shack stores have for horizontal
mounting. Remember my machine had no wiring or electrical what so
ever aside from the two switches, so I had to install sockets as well.
Common lamp sockets don't match up to the holding tabs on the machine,
so I had to mount the sockets with some small screws. (ALWAYS hand
install / remove these with a screwdriver, never drill beyond extremely
shallow starter holes in the plastic) I did this by bending the mounting
plate.

Once the mounting plate on each was bent
straight then I was ready to go. This takes a gentle motion to prevent
from breaking the socket, as I did before. For the "ball tray empty"
light I actually curved the mounting plate up and around the top like a
sleeve that could slide onto the little metal mounting arm on the machine,
after properly insulating it with electrical tape. Additionally the
14v lamps draw slightly less amperage than the old 7.5v lamps, if anything
a little less strain on the wiring set up.
Installing the "ball tray empty" lamp socket
and lamp also allowed me to finish the wiring solution for the machine
and secure everything down and out of the way. It's a lot cleaner
than it once was, especially compared to the pictures I took after building
the first phase. I'll add some new pictures of the finish wiring
system in a future update. The "ball tray empty" switch was still
coming up a little short so I shoved half of a toothpick beneath the lower
contact to hold it at the proper height - not a good commercial solution
but fine for home use and it's been working all night no problem.

I also began working on the problem of
the right tulip not shutting. For some reason it's been really loose
and upon shutting would simply spring open again. Not a big deal
but it does make payouts on that side of the machine far too frequent since
it's always open. Upon comparing it to the left tulip I noticed something
I had overlooked before concerning a slight difference in how the actuator
inside was bent. I eventually worked the right actuator to match
that of the left and it shuts and opens properly now. However I did
notice something after doing this repair. If the right tulip is closed
and a ball enters it, it opens the left tulip as well. If the conditions
are the same and a ball enters the left tulip, the right one remains shut.
Now it's apparent what that little spring
loaded drop down lever that I rigged behind the left tulip was for, it
was a trigger to pop open the right tulip upon the left tulip being opened.
I'm not about to remove the screw I installed to rig that lever in the
mid position, as far as I'm concerned everything is working fine for home
use. There has to be a problem with that mechanism behind the left
tulip where it was hanging up, a part I still don't wish to dig out and
look at so I'm just leaving it as I rigged it. It may not open the
adjacent tulip, but it pays out in both positions and that's what I'm concerned
with. In a pachinko hall that would be total BS but again, this machine
is for home use and it's a minor hiccup that I can let slide. Heck,
I didn't even know it until today and I've had the machine for eight months.
With this update I can now say that the
functional restoration of the machine is complete, just need to keep cleaning
it as grime works its way out of the more hidden parts. By functional
restoration I mean that the machine works, pays out properly, operates
without any major problems, all the lights work and operate properly, playfield
operations run smoothly, the lock works and no moving parts squeak.
In other words the machine is fully useable. Mostly cosmetic things
left to do.
-
Sand entire outer frame once again
-
Stain entire outer frame
-
Replace inner plastic panel
-
Install outer glass panel
-
Purchase about 1000 more pachinko balls so
I don't have to screw around with filling the win hopper as often
I can't seem to get the deals on pachinko
balls I did before so I'll probably end up watching eBay. I really
want some blue and green colored balls mixed in with the standard silver,
maybe 250 or so of each, to accent the aquatic theme of the machine.
Yet it's been really hard to find any colored balls at all, let alone 250
of each. Most distributors sell colored balls in amounts of 100 each
and want crazy prices for them. Oh well, I can always wait.
I will admit that I'm nervous about taking the machine down and outside
to paint the outer frame. Even though I'd only be moving it about
twenty feet on a hand truck so much could happen. I'll probably pad
the bottom of it just to minimize any disturbance from movement - tilting
the machine is where my concern comes from, these machines are meant to
be upright at all times. As far as I'm concerned, after painting
and reinstallation, the machine isn't being moved until I change residence.
It's going to stay put where it is.
01-25-2006 This time I'm going
to go over some extra information and a few optional things you may want
to do. Since the functional restoration of the machine is complete
there are a few extra things that can be done to make things easier for
home use. However first I need to document a problem that has come
up a couple times.
My machine developed an electrical gremlin
in the "always on" lamp in the upper left. From time to time it wouldn't
come on unless it was tapped a couple times, then it would work fine.
At first I figured this was an electrical short since touching a conductor
to the side leads would cause it to light but I discounted this since the
other lights on the machine worked fine even when the "always on" lamp
wasn't functioning. Since power for everything is returned on a common
lead, if the other lamps were working then there wasn't a short.
Turns out that when modifying the mounting plate for the "always on" lamp
I must have bent something so that proper solid contact wasn't being made
inside. This was confirmed when simply tapping the back of the socket
caused the lamp to light. I repeated this with two other lamp sockets
and the same thing happened. I replaced the socket once more, leaving
the plate unmodified and the lamp simply sitting inside the light reflector,
and finally it worked problem free. I must have done something slightly
different with the other sockets when bending the mounting plates as they
work fine. I swear, these four light, two switch machines are an
electrical mess. That "always on" lamp forces you to make certain
decisions concerning the power source / level and constantly pulls power
form that power source as well as placing full load on its lamp at all
times. Additionally that lamp gets more wear as its power flow spikes
and drains depending on if other lamps are active since they all pull from
the same source. In other words when the "ball tray empty" lamp or
"winner" lamps activate, the "always on" lamp dims as power is being bled
off from it to run the other lamps - when they go off, power once again
spikes full tilt to the "always on" lamp.
The "always on" lamp also brings us to
my next modification. With most pachinko machines of this era you
only have "winner" lamps and a "ball tray empty" lamp(s). Both of
these lamps are function activated, meaning that they only light upon certain
circumstances - hitting a win pocket and draining the ball hopper respectively.
This means you can leave the power source connected, be it an adapter or
battery, and as long as you have the ball hopper filled the lights will
remain off when the machine isn't in use. This also means that one
of these machines framed can simply be walked up to and played whenever,
no need to worry about the power being off or on. Now with a four
light, two switch machine this is not the case. Leaving the power
on means the "always on" lamp is just that, always on - always under load
and if you're using batteries as I am, it is constantly consuming power
and draining them. This means that the machine must be plugged in
/ unplugged or have the battery connected / disconnected upon every play
session. Usually this leads to the machine always having to be opened
prior to play which means those with the key are the only ones who can
play using the lights. If you decide to frame your machine and always
have it loaded with balls and ready to go (as it should be) then you need
a solution so that you or anyone else can simply walk up, turn the machine
on easily and externally, play, and then turn the machine off afterward
just as easily.

The solution is a small externally mounted
switch of some type. In the case of my machine I decided to use a
simple pushbutton off / on switch. (if you do this make sure you
do NOT get a momentary switch, you need an off / on switch, a momentary
switch only connects when squeezed down) This was a better solution
than a toggle switch since the switch itself has a long profile (to reach
through the lower wood frame) and I think a small pushbutton looks nicer
than a toggle in this application. When drilling the hole to recess
the switch body I ran into a snag. I drilled directly into one of
the long screws that holds the hinge bracket of the machine to its original
frame - I hit the sucker head on. I didn't realize the screw was
there until I had already tried to drill the hole so I'll have to fill
this with a wood dowel and paint over it later, that's what the hole next
to the switch in the picture is. I moved over about an inch and drilled
the hole that would eventually hold the switch. Wiring it was simple
enough, I just broke the direct connection between the machine's negative
lead and the negative terminal of my power source (a pair of 6v dry cells)
and connected the switch between them. As the wood frame was thicker
than the nut threads on the switch extended I mounted it by simply filling
the hole with contractor's grade wood glue and let it set around the switch
overnight. Now when one wants to use the machine all they have to
do is walk up, push the switch, toss some balls in the load tray and the
machine is ready to go. Lastly on this topic, I put the switch where
it is to prevent its connections from getting hung up on anything inside
the machine. Also notice how the switch is local to the power connection
and directly below where the power leads run down the side of the machine.
I left enough slack in the leads so that the frame can swing open completely
without the wires being pulled on but not so much slack as to create opportunities
for snags. This is very important.
Next housekeeping addition if you would,
is that of a ball catch tray or lose ball tray at the back of the machine.
Most people tend to use coffee cans, plastic containers, small boxes or
the like to catch the stream of balls constantly evacuating out of the
back of the machine. Remember whether a ball is a loser or a winner,
if it's shot through the machine this is where it will end up - payout
balls only ever come from the ball hopper. When most of these machines
from the 1960's and 1970's were sold in the United States, if a ball catch
tray was included it was usually just a small plastic high wall container.
Some people choose to use large ball trays from Japan that are normally
used to hold winner balls (think of them as slot token cups in a US casino)
but they really aren't designed for this task and many balls find an easy
way to ricochet out of them. We all know the last thing anyone wants
to do is lose those valuable and overpriced pachinko balls, they're usually
the most expensive part of any home pachinko setup. I had been using
a small reinforced cardboard box as a ball catch tray which did a decent
job however balls would still work their way out of it. Once the
machine was enclosed this was less of a problem since stray balls would
simply be deposited within the cabinet but the risk of them bouncing around
and damaging something back there or causing shorts on the batteries was
a very real problem.

I ended up modifying my original reinforced
cardboard box by building another inside it. I used an extremely
rigid cardboard sheet and cut out four panels, forcing them into position
within the original box. I then secured the panels together and the
new structure to the old with high quality thick packaging tape.
The result is a large, strong, high sided ball catch tray. I designed
the new panels with a sloping contour that would build up around the sides
of where balls from the lose ball chute and winner mechanism exit the machine.
Additionally it's made to fit nicely inside my custom cabinet which has
a thickness of seven and a quarter inches. The low front allows the
tray to fit below the ball exit points while the gradually increasing height
of the sides keeps balls from ricocheting outside the area of the tray
as they exit the machine. The high back of the tray serves a few
purposes. The first is to provide stability of the tray inside the
machine, the whole thing rests back against the top of this panel so as
the weight increases it will lean back firmly due to the shallow channel
below it where the old frame is secured to the new. Second the high
back provides even more ricochet protection as any ball that happens to
bounce around in the tray will simply do just that, bounce around within
the tray. As the ball bounces around and deflects off the back and
sides it loses momentum and will eventually rest at the bottom, this is
the same principle applied in many modern firing ranges to prevent bullet
ricochets. Lastly the high back and angled sides make dumping the
lose balls into the ball hopper extremely easy as it gives a nice wide
ramp to dump the balls along, allowing even and smooth distribution into
the ball hopper. I may decide to transfer over this design and build
a few out of thin wood. If I decide to go that route I may offer
them for sale here. This design seems to be sound as after an entire
day of regular play, ball hopper filling, and ball purges not one stray
ball got away from the catch tray.
Lastly in this update I'll go over something
many may be asking themselves, how to purge all the balls in the machine
without having to manually do it from the back. Once your machine
is framed and set up with a good ball catch tray you can purge your machine
the way it was intended, from the front. If you're not going to be
using your machine for a couple weeks, are going to move your machine,
or are going to be doing basic maintenance and cleaning, it's a good idea
to purge all the balls out of the machine. This can be done at the
back by manually tripping the ball purge mechanism but then you need to
hold your catch tray beneath the ball lose chute. Purging the machine
while it is closed is a much better idea. To begin with you need
to make yourself a purge tool.

The simplest and best purge tool can be
made from a simple paper clip. You'll want to bend it open so it
makes a short rod a few inches long. You can curve over the end as
I did to make it better resemble a key of sorts. After you have that
taken care of look for a small plastic lined hole on the front of the machine,
it'll be located in the same area as the purge mechanism is on the inside.
Insert the purge tool, and push it in very gently. This will cause
the purge mechanism to trip and all balls in the ball hopper and upper
hopper chute to instantly evacuate down the lose chute into the ball catch
tray. The sound this makes echoing from inside the machine is really
hard to explain, it's very much like a metallic roar. I simply put
a pushpin on the inside of the cabinet to store the purge tool when not
in use. Open the machine and you'll notice that the jackpot mechanism
is still loaded with balls, in most machines there will still be about
two and a half jackpot loads left in the machine. To get these out
hold your ball catch tray below the lose chute, then very lightly lift
up and release the little metal paddle at the top of the jackpot mechanism.
This will cause the first load of balls to release and drop down the lose
chute and the next load to fill the jackpot mechanism. Repeat this
process until the jackpot mechanism no longer fills, about two and a half
times. Remember to reset the ball purge mechanism after you've cleared
out all the balls or you might forget to do so before filling the ball
hopper again. (this is very easy to forget to do in your early days
of pachinko ownership, trust me) If you don't do this then any balls
loaded will immediately drop out the lose chute. Developing a good
load / purge routine will keep things moving smoothly.
That's it for now but there's still lots
more to do and many more updates expected for this site feature as the
restoration continues forward.
01-27-2006 The electrical
glitch I had noted in my previous update as being a problem with the lamp
socket was incorrect. Eventually the changed socket began to do the
same thing so I took it out to look it over and what did I notice?
The lamp itself was manufactured incorrectly. The filament on a 14v
lamp is supported in the center by a little arm, this particular lamp's
filament wasn't held up properly so it became damaged. That's the
reason it would light if I tapped it, the filament would get agitated enough
to make contact and light. Well after I figured this out I went to
the trash can and retrieved one of the modified lamp sockets I had thrown
out. I prepared it for installation but as I looked at the upper
corner of the wiring system I began to notice just how messy it was.
I had been planning on redoing it eventually as originally I was building
it as I went along. (see the update from 12-05-05) Recently
I noticed little channels and pathways along the covers on the back of
the machine - this is where the wiring is supposed to go to keep it out
of the way. Also I originally ran the main connects up to the corner
as if there was a fuseboard there, that was my starting point as I followed
the wiring diagram. Well my machine was missing its fuseboard so
having the connectors tacked up there just to make contact with the feed
wires that run down to the power source was stupid. So instead of
looking at the mess of wires hanging all over the machine, I redid nearly
all of the connecting wire, pretty much everything except for the switch
leads and ball tray empty lamp.

Now the wires that run up from the power
source interface directly with the connections to the rest of the machine
at the "always on" lamp socket. I also repositioned how the lamp
socket is mounted so it's more securely attached and easier to get to if
the lamp needs to be replaced. The same was done with the "winner"
lamp sockets. I ran their wiring cleaner and more efficiently and
mounted them properly and securely in the exact proper locations.
All these little tweaks make the machine a lot more efficiently wired and
more stable, after all I expect this machine to last for many more years.
02-03-2006 Well the problems
with the side tulips have began once again. Although I was able to
move around the little legs inside the right tulip to get it to stay closed
when closed, it began to pop open or not shut at all again. I began
to mess with it and then I was getting sticking payouts. That issue
went away shortly thereafter though so I figure I must have just moved
something out of position momentarily. The plate inside the right
tulip doesn't set down as far as it should, which is why the tulip doesn't
shut. (and when it did shut it never shut properly) Since I
still really don't want to fully disassemble the machine, I'm not going
to worry about it. Payouts seem to be working fine again and that's
honestly the only thing I'm concerned about - that and not having any jams.
Listening carefully I know that balls from each win pocket and smoothly
rolling down to the jackpot mechanism without any obstructions. It
may seem crazy with the amount of money tossed into the machine to accept
little problems like this as nothing but to me the machine is fine and
in my experience, messing with it will only make things worse. There's
something mechanically askew with the left and right tulips common trip
mechanism (one opens the other, and the sink holes at the top are supposed
to open both) which makes me think one of the reasons this machine, that
really has nothing else wrong, was at the flea market is because of this.
Eventually that must have been a big enough problem that the machine found
its way to a reseller that took it to the flea market.
Also an odd ball came out of the machine
last week. It's not one of the ones I ordered (they're all the same
except five or six but I know their designs) and it was pretty dirty compared
to the others. I'm guessing that it came out of a non-ball path in
the back. In other words somehow it got knocked off one of the pathways
and ended up in a nowhere zone behind the main cover before I bought it.
For one reason or another it finally found it's way out of the machine.
Upon some inspections of the back with a flashlight I noticed what appears
to be a ball in one of these nowhere zones, again, behind the main cover
which makes it pretty deeply buried. It's not blocking anything or
in the way of any mechanisms so I'm just going to leave it alone.
However I could have swore that the machine missed a payout over the past
couple days, that's probably the ball. Unless a bunch begin to backup
in that area I'm not going to worry about it. I need to get in my
head to quit being so particular about this machine. I'm going to
stain the outer frame, replace the glass panels, and that's it. It'll
be done after that. A common problem I have with restoration and
repair is that I just don't know when to walk away. I never honestly
planned on having this machine 100% clean and perfect, just in playable
condition - and that's where it is now. I honestly didn't know what
I was getting myself into when I brought it home but its been interesting
and challenging. As long as balls aren't backing up in a winning
pocket or tulip (as was the case at one time) I'm happy and all is well.
Since I talked about a dirty ball that
came out of the machine perhaps I should take a moment to go over some
cleaning procedures. The high tech solution, especially if you have
thousands of balls, is to use a rock polisher with some light abrasive
such as crushed walnut shells and use that to polish your pachinko balls.
The low tech solution, which many pachinko importers in the 1970's used,
is an old sock. Basically you take a clean old sock, throw about
25 pachinko balls in it, and toss them around. Roll the pachinko
balls in the sock between your hands vigorously, shake them around, basically
you're trying to use the inside of the sock as a mild abrasive surface
to remove any gunk and light rust. It sounds crazy but it works.
Of course if you have any pachinko balls that are rusted or have pits and
damage then you'd be better off simply throwing them away. It's important
to inspect your pachinko balls for damage every now and then.
Aside from that I removed the ball hopper
last night and cleaned it out, as well as the top chute that runs down
from it and the actuator pedal that sits beneath it. All were very
dirty still but cleaned up relatively easily. Now that the ball hopper
has been scrubbed down it can simply be wiped out when it gets dusty, although
since the machine is enclosed this isn't a big problem. I had cleaned
it out a long time ago but I still wanted to give it a good soaking to
remove any embedded grime.
I've been looking at some modern pachinko
machines and if I buy another anytime soon I think that's where I'll go.
Don't get me wrong, I love my vintage machine but now days many dealers
of modern pachinko machines completely shop and refurbish them before the
sale. Also the machines are solid state and less mechanically reliant,
which means while they're more complex in design and presentation, they're
a lot simpler in terms of operation. It's the same way with modern
slot machines - while modern slot machines are infinitely more complex
in design than models from the 50's and 60's, they're far simpler when
it comes down to the physical components that make them work.
So with that, the next update will more
than likely have to do with painting the outer frame.
02-26-2006 It's been awhile
since the last update but I've done quite a few things since. I'll
begin by addressing the problem of the right tulip refusing to close that
I brought up in the last update. As I said before, the plate inside
the right tulip doesn't set down as far as it should but this isn't what
is preventing it from closing. Looking at the tulip from the backside
I noticed there's a little finger that extends from the plate at the base.
Atop this finger there's a little plastic claw that is connected to a system
of plastic rods that runs to a seesaw. This is the trip seesaw that
causes the adjacent site tulip to open when another is hit (the one I rigged
on the left side) or both tulips to open when one of the top sinkholes
is hit. When the seesaw is hit the plastic rods push the little claw
down, which pushes the finger on the back of the tulip down, which moves
the plate inside the tulip up, causing it to open. I tried to stick
a number of objects into the tulip to reach back there and push the finger
down more but just couldn't get to it. On the left side of the machine
there is a place where the main cover has a small hole cut into it.
It was only recently I noticed that it was right where the finger on that
tulip sits. Perhaps this is a common problem with these machines
and that was a way to adjust it without disassembling the machine?
I really didn't care, that was the solution. So I slowly drilled
two small holes into the main cover near the finger on the right tulip.
Drill slowly so that the coils of plastic you're drilling out will exit
the machine with the flutes of the drill bit rather than fall inside.

After getting a space made large enough
so I could get in there and work, I took a pair of small needle nose pliers
and gently bent the tulip finger down just far enough so it wouldn't press
against the little claw when closed. This allowed the tulip to shut
tightly enough to no longer vibrate open. At the same time the finger
is still close enough to the little claw to be triggered open when the
upper right sink hole is hit. (it doesn't open when the left tulip
or upper left sink hole is hit because the seesaw on that side is the one
I rigged into the mid position with a screw long ago) This fix has
worked great and the tulip has been opening, closing, and paying off perfectly
for weeks. If I was to fully disassemble the machine I'm sure this
could have been resolved with some internal cleaning but I've said many
times, I'm trying to avoid that.
Next comes something that I've been dreading
for awhile, painting the outer frame. Dreading it because it means
I'd have to move the machine outside and into the shop for painting.
After putting it off for a long time and rain being in the forecast for
next week, I finally bit the bullet and decided to paint it. First
things first, I removed the L brackets atop the machine securing it to
the wall, and carefully took the machine off the shelving unit it was resting
on. I put an old towel on the bottom of the dolly and carefully maneuvered
the machine outside, around the corner, and into the shop. Before
painting the frame I needed to finish up work with the back panel of the
cabinet. Up until this point I had it temporarily attached with four
screws I simply had on hand. While the back panel is really only
to enclose the machine, I still want to make sure it is attached securely
and flush to the outer frame. Remember, I built my frame to rest
atop something, not to be free hanging from a wall. So I removed
the four temporary screws and replaced them with short inch and a half
long wood screws that would sit in flush. I used four screws on each
side and two along the top and bottom. Nice and secure yet easily
removable if I need to do heavy maintenance to the machine that can't be
done indoors while it's installed. Speaking of which, the main advantage
to having an easily removable back panel is that I can work on the machine's
internals without having to brace the swing out part against something.
Again, if I ever need to do heavy work on the machine this makes it easy
to take it out and gain access. Here's a picture of the machine with
the back panel removed.

As you can see, the wiring is a lot cleaner
now and with the back panel removed I can easily get access for larger
repairs while the frame keeps the machine stable. With the back panel
reattached with the proper screws it was time to begin painting.
I had always planned on painting the outer frame flat black, which would
match the two support trim pieces that run along the bottom front of the
machine. I used a multipurpose latex based paint and painted the
outside left and right, the entire back panel, top of the frame, front
edges of the frame and repainted the original black trim on the front as
it was pretty scratched up. I didn't worry about painting the bottom
of the machine as no one would ever see it and I really didn't want to
turn the machine upside down or on its side and risk damaging something
internally. Since I had sanded the boards before building the frame
I applied a healthy smooth coat of the paint, going back over it again
lightly as it began to dry. The finish result looks pretty nice,
the paint did a great job at making the outer frame I built look solid
and since it ties into the trim at the bottom it looks like it's an original
part of the machine. The paint also helped fill in the small gaps
at the front of the new frame since after years of leaning against something
the machine had de-squared itself at the bottom slightly, something the
new frame helped to correct. It also filled in much of the corner
wear the machine had at the front from years of sitting on the ground and
being moved around as well as surface damage to the trim.

After that it was time to move the machine
back in and reinstall it. That pretty much leaves only a few things
to do before the restoration is totally complete...
-
Fill and paint over the two small holes on
the bottom front wood panel
-
Replace inner plastic panel
-
Install outer glass panel
-
Purchase about 1500 more pachinko balls so
I don't have to screw around with filling the win hopper as often
Amazingly, the restoration is nearly finished.
In researching the Japanese text on the front of my machine, on the plastic
piece above the center target, a friend of mine translated it as Saru Kani
Kassen or "Monkey-Crab Battle." Upon further research it turns out
there's more to what is on this machine than random characters and items.
 Saru
Kani Kassen or "The Feud of the Monkey and the Crab" is a traditional
Japanese children's folk tale. Many of the key things from the story
can be found on the front of the machine, the picture to the left should
help illustrate them. The story goes like this: One day a monkey
carrying a persimmon seed noticed a crab with a rice ball. The monkey
was very hungry and wanted to get the rice ball from the crab so he offered
the crab a trade for his persimmon seed. The crab refused but the
clever monkey told the crab that the seed could be planted and would grow
a persimmon tree that would bear a never-ending supply of fruit.
The crab was taken by this and traded the monkey her rice ball for the
seed. (notice the monkey's face on the upper center target and
the crab holding a rice ball at the middle of the playfield)
Saru
Kani Kassen or "The Feud of the Monkey and the Crab" is a traditional
Japanese children's folk tale. Many of the key things from the story
can be found on the front of the machine, the picture to the left should
help illustrate them. The story goes like this: One day a monkey
carrying a persimmon seed noticed a crab with a rice ball. The monkey
was very hungry and wanted to get the rice ball from the crab so he offered
the crab a trade for his persimmon seed. The crab refused but the
clever monkey told the crab that the seed could be planted and would grow
a persimmon tree that would bear a never-ending supply of fruit.
The crab was taken by this and traded the monkey her rice ball for the
seed. (notice the monkey's face on the upper center target and
the crab holding a rice ball at the middle of the playfield)
The crab planted the persimmon seed and
waited for it to grow. She watered it daily, telling it, "If you
don't bud quickly I'll dig you up with my hoe." The frightened seed
quickly sprouted. Then the crab said, "If you don't hurry up and
grow, I'll snip you in half with these scissors." The bud quickly
grew into a big tree. Finally, the crab threatened the tree, "Bear
fruit or I'll chop you down with an axe." The frightened tree promptly
bore fruit. By the time the fruit had ripened the monkey returned,
climbed the tree and began to eat the ripest fruit. The crab, unable
to climb the tree asked the monkey if he could bring some of the fruit
down to her. The monkey agreed but instead threw a hard, unripe fruit
down at the crab, hitting her on the head and injuring her. (note
that when a pachinko ball comes down the center of the upper target and
hits the crab, the crab spins upside down as if hit over the head)
The crab's children (shown on the upper
center target in the middle inside) cried so much that a bee (shown
on the upper center target), a chestnut, a sewing needle (shown
on the upper center target as being carried by the bee), and a stone
mortar (shown on the upper center target) got together to help the
baby crabs get revenge on the monkey.
While the monkey was away from his house
the chestnut hid in the ashes of the monkey's fireplace, the baby crabs
in the water tub in the kitchen, the bee in the bucket of miso paste (a
traditional seasoning made with soy beans), the needle in the monkey's
bed, and the mortar above the doorway. Then they waited for the monkey
to return.
In the evening, the monkey came home.
"I'm so cold," he exclaimed, and just as he plopped down next to the fire,
the chestnut burst up from the ashes, scalding the monkey's behind.
The monkey ran yelping into the kitchen and dunked his hands in the tub
to gather water to dowse his burning pain. The baby crabs jumped
out and snapped at him with their claws. The monkey then picked up
the pail of soft miso to spread over his burn. The bee sprung out
promptly and stung him left and right. The helpless monkey then retreated
to his bed, but jumping into it, he was poked all over by the needle buried
under the covers. Screaming "Ouch! Ouch!" the monkey finally tried
to flee the house but just as he got through the doorway, the mortar slammed
down on his head. Groaning with pain, the monkey cried, "I promise
I'll never misbehave again!"
Honestly I didn't know of this story until
now. My friend had translated the text on the front of the machine
almost a year ago when I first bought it but I didn't look it up until
recently. To me this makes my machine even more priceless since there's
something to go along with the theme. It's not an underwater theme
as I had thought before but a Japanese folk tale recreated.
Also before I forget, I removed the counterweight
from the jackpot payout rocker a month or so ago. I used a small
rotary tool with a mini sanding drum and restored the smooth curve to the
top of the rocker which had been damaged before I purchased the machine.
This allows it to move smoothly and not stick as it did before.
There probably won't be another update
until I replace the window panels or fill the holes on the front.
That's really all that is left to do on the machine. I'm also going
to post some pachinko related links here at a later date.
10-07-2006
Eight months since the last update but not a whole lot has changed.
I have yet to replace the glass panels or fill the holes in the front (although
that's next) but I have done a few things to the machine recently.
First of all the machine has been operating wonderfully since my previous
update back in February. I've been leaving the machine filled and
in ready to play status and it's worked perfect with not a single jam or
missed payout. Over the summer I was gone for a number of weeks on
business which was the only time I had purged the machine. Once I
got back I filled it up again and it worked fine.
I've was looking at the wiring in the machine
and became unhappy with how it looked. The areas of colored electrical
tape were originally put in to attempt to keep the wires from hanging out
freely. The colors were supposed to code what each block of wiring
related to. However this was honestly a lot of overkill and made
the machine look ugly and unprofessional inside. So I removed the
colored tape and a good amount of the black tape that I was originally
securing the wires with. I then better sorted out the wires and secured
them with clear sealing tape. This keeps everything out of the way
yet allows each wire to be seen so if problems develop it's easier to follow
the lines around. Hot glue was out of the question since it makes
removing and replacing wires far more difficult. I did leave some
black tape in place in areas where it was doing it's job fine and wasn't
in the way. The wires aren't color coded (although originally I intended
to have them be) since there were so many changes and rebuilds over the
course of me building the wiring loom.
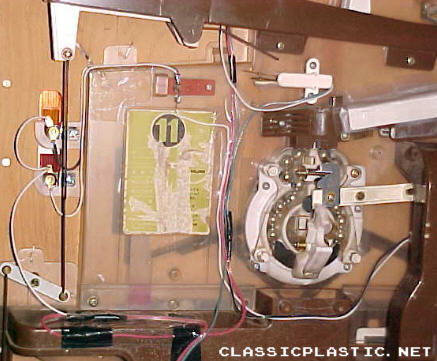
Crystal clear wire mounting
makes things easier to follow.
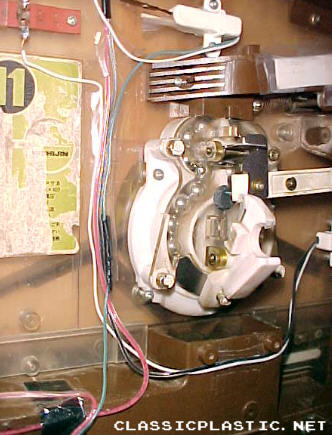
This is the main path of
wires that run along the side of the jackpot mech.
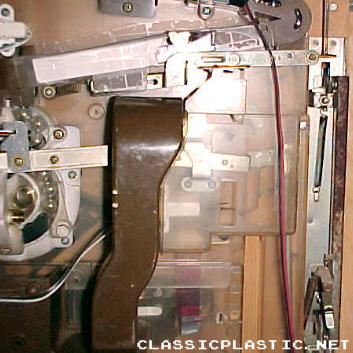
It looks like there's no
tape there, but there is. Now the "winner" switch and
tray purge mech are visible
through their cover since there's no tape in the way.
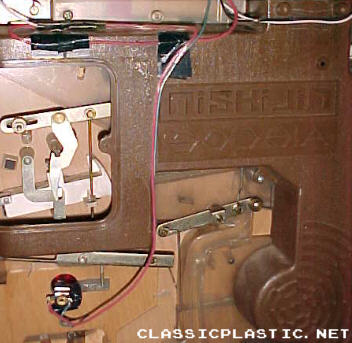
Even the lines down to the
"ball tray empty" light have been remounted
with clear sealing tape.
Still plenty of give for bulb replacement and maintenance.
With these last small modifications to
the wiring, the insides of the machine are pretty much finished.
(unless I happen to come across the missing panels from another machine)
It's clean as it's ever going to be and if you ask me, my wiring work looks
better than some of the original stock wiring setups I've seen. It
really was the last part of the machine restoration that was still bothering
me but now it's up to a level I feel good about. Now to put some
wood filler in the holes in the front, repaint that panel, then the glass.
It's been nice being able to enjoy this project more and work on it less
but I will admit that once it's done, I'm going to miss having it as something
to analyze and work on when there's nothing else to do. I've actually
been thinking of restoring another machine if I come across one in decent
shape. Now that I know what to look for and what to test and what
I'm getting myself into. The next update won't be for awhile but
should be sooner than this one was. By that time the machine should
be right on the edge of completion.
02-04-2007 It's been quite
awhile since my last update but this one is important. I've finally
replaced the glass on the front of the machine, bringing the restoration
almost to a close. There are a lot of questions about replacing the
glass: what glass to use, what size, how many panels and so forth.
To begin with, the size that nearly all machines will take is 16" x 16"
x 1/16" thick. All machines will have grooves for two panels, an
inner panel that contains the balls as they move inside the machine, and
an outer panel that protects the inner panel from outside forces.
The inner panel should be some form of plexiglass no matter what, since
the balls will be ricocheting around against it at all times. The
outer panel can be pretty much anything as the only abuse it has to take
is any force outside of the machine. If you have kids or players
that are pushing against the glass a lot, I would stay away from standard
glass for the outer panel. I chose to go with plexiglass for both
panels as it looks as nice as glass and is shatter resistant. Many
decide to use one panel plexiglass and one panel regular glass but personally,
if you pick the right type of plexiglass, two panels of plexiglass is the
way to go.
Most home improvement stores will sell
three types of plexiglass, categorized by manufacturer grade. Optiplex
is low grade plexiglass used for light duty applications. While it
looks nice and is strong, it bends a little too easily to be used in a
pachinko machine as it will give and curve as balls bounce against it.
The next step up is Duraplex, this is a medium to high grade plexiglass
used for heavy duty applications. While Duraplex is strong, it is
also crystal clear, making it perfect for this type of usage. Lastly
is Lexan, super heavy duty plexiglass. If anyone remembers the short-lived
Battlebots series, this is what many of the robots were clad in.
It's super strong, about 150 times stronger than standard plexiglass, and
should be considered extreme overkill for pachinko machine usage.
It's also very difficult to cut. Duraplex is the best route to go
for replacing your pachinko glass. Most home improvement stores will
also cut it on site for you for free. Make sure to inspect each panel
for scratches in the protective plastic sheet on both sides before accepting
it. Once you get home, remove the plastic protective sheet from each
side of each panel and slip them in.

My machine now finally looks parlor ready.
Still have to fill in those holes on the front, but that can wait.
However I noticed there was a problem developing with the feed chute that
divides the balls into the jackpot mechanism from the ball hopper.
Balls were piling up and not being distributed into the jackpot mechanism
evenly, causing there to be too little weight to set off the jackpot mechanism
properly. This chute is supposed to be covered by a plastic panel
that seals it off at the top, keeping pressure on the balls and forcing
them to stay in single lines. Problem is that my machine never had
one of these panels, I had been using a makeshift cover I built out of
some heavy cardstock to replace it. Well over time the cardstock
began to bend and flex, allowing enough of a gap for balls to pile up.
In a somewhat poetic notion of using the
old plexiglass panel to solve a new problem, I came up with a more permanent
solution. I removed my cardstock cover and cut a piece from the old
beat up plexiglass panel to the same size. Unlike the cardstock this
will not flex, it will remain rigid and seal off the top of the chute.
I anchored it in place with a few carefully trimmed pieces of heavy duty
duct tape.

This new method of covering up the chute
works perfectly and even better, since it's clear, I can see if there are
any jams below it. Since replacing the cardstock the machine has
run much smoother and the jackpot mechanism fills much faster for quicker
fast succession payouts.
I will say that since replacing the plexiglass
the machine runs a lot quieter. It's really amazing how quieter things
are with two panels of brand new plexiglass on the front of the machine.
Don't get me wrong, it's still loud and sounds like a pachinko machine
should, but there's a lot less rattling around. Ball motion is a
lot more true and unobstructed now as well, since the new panel is solid
without any cracks or nicks in it, which the old one was full of.
Even if your vintage machine has it's glass panel, it is certainly worth
replacing it and adding a second, the whole thing will run you about twenty
five bucks. I still need to fill in those holes in the front and
may replace the shooter spring but there's no two ways about it - the restoration
is nearly finished.
09-28-2007 Been awhile, hasn't
it? Lots of unrelated stuff has come up and the machine has been
done for a long time but it's just now that this documentation gets wrapped
up. All that was left to do was to fill the holes on the front of
the machine, one caused by adding a screw for structural reinforcement
and the other from a bungled switch installation. I filled these
by plugging the holes with round stock of equal size, held in place with
some contractor's grade wood glue. Instead of attempting to match
the paint of the lower panel, I simply painted it flat black, the same
color as the outer frame. It now looks as if it always came like
that and the former holes are no longer visible.

For quieter and smoother performance of
the shooter mechanism, I decided to replace the spring that gives it tension.
Nothing complicated here, I simply purchased a spring of the same diameter
and feel, cut it to size and installed it. This has made a huge difference
in the consistency of each shot and besides, that rusty original spring
needed to go.

After replacing the spring I stepped back,
took at look and realized something - the restoration was complete.
The machine had been completely restored and was fully functional. (with
the exception of that one tulip not opening when the adjacent one is opened)
Both the mechanical and cosmetic rebuild were complete and the machine
was running 100% reliably. This project was finished.
It has been a pleasure restoring the machine,
no matter how much work has gone into it, no matter the frustrations that
came with it. These wonders of simple mechanics deserve to be preserved
for how complex they are in their simplicity. That and of course
they're a lot of fun to operate and make a nice addition to a room with
their unique look. A big thank you goes out to all those who have
e-mailed me concerning pachinko restoration with comments, advice, or just
to talk about these vintage machines and share stories about their heyday.
I will continue to respond to these e-mails, as I do to every e-mail I
am sent, so go ahead and contact me if you feel the need. There probably
will be no further updates to this page but if there are expect them to
be very minor.

The machine at the time
of this final posting.
There is nothing on the planet like a vintage
pachinko machine. How these machines accomplish their operations
without motors or electronics is their largest appeal in my mind.
Remember, the main functions of these vintage machines are powered by gravity
and gravity alone. Sure, add a couple batteries and you get some
lights but they're not required for operation. They truly are a great
conversation piece and I have yet to find anyone not interested in my machine
once they see it.

Remember that ongoing maintenance is the
key to keeping your machine running properly. Lightly oil all moving
parts on a regular basis and repair or replace any worn or damaged components
as soon as possible to prevent further damage. Also never forget
to keep an eye on the condition of the pachinko balls going through the
machine, keep them clean and dispose of any that are excessively worn.
Thanks again to everyone, I hope this part
of my site continues to inspire people to restore vintage pachinko machines.
03-07-2009 Seems that this
project isn't complete. Since the last update I have moved and the
machine has moved with me. I'll be honest in saying that moving the
machine was a little tedious since I was terrified that I'd drop it or
something. However my fears of damaging my years of restoration never
came to pass and the machine easily made it to its new location (strapped
into the seat of a car, I might add). Aside from the usual maintenance
and oiling I did notice one thing on the machine that I wanted to remove
and properly clean. That part was the jackpot mechanisim, the circular
part at the center of the machine on the back. The jackpot mechanisim
holds balls from the hopper until a payout is triggered. When this
happens it dumps the balls it is holding down the chute to the front.
While it is dumping the payout balls, it also prevents more balls from
rolling into the mech. After it is emptied out it resets and fills
with more balls from the hopper. My jackpot mech had always been
a little dirty but it was passable, until now when I have the time to fix
it and nothing else on the machine that requires attention.
Removing the jackpot mech is pretty easy.
The first thing you want to do however is to cover up the chute below it
with some tape to prevent screws and other debris from falling down inside.
After that basically all you do is carefully remove the individual screws
and linkages for the jackpot mech. Everything is externally mounted
and should come off, so if you find a screw or nut that is covered up,
you probably missed something earlier. There are also a few C-clips
on some rods that will probably need to be removed. Just carefully
slide them away from their rods. The jackpot mech should come off
in one large piece that will later be further disassembled away from the
machine.
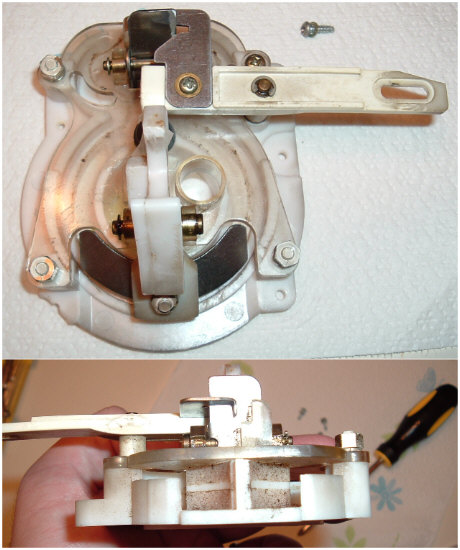
As you can see, it's pretty dirty inside.
The removed mech is disassembled away from the machine as stated above.
It comes apart in two players and the lever that triggers the jackpot to
dump is removed via a C-clip. There are a lot of pieces for this
mechanisim, be sure not to misplace any.
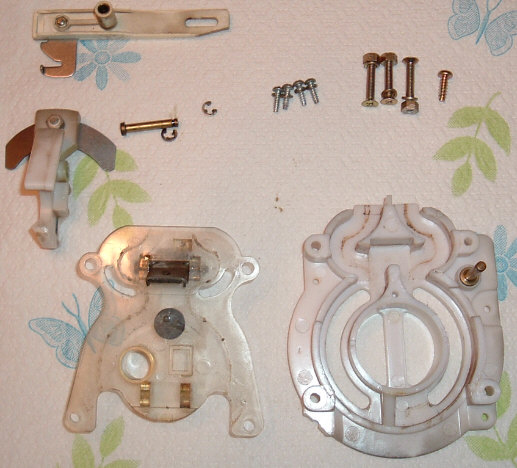
Before continuing I want to take a moment
to show what the machine looks like behind the jackpot mech since it's
a good way to understand how pachinko machines have multiple layers.
There's of course the playfield, then a space in the middle where balls
travel from win pockets down to the payout mech, and on the outside back
there are all the chutes and mechanisms. Behind the jackpot mech
on my machine you can see some of the internal middle ramps which guide
balls from win pockets down to the payout mech. This further hammers
the point home that these machines should never have balls "hidden" inside.
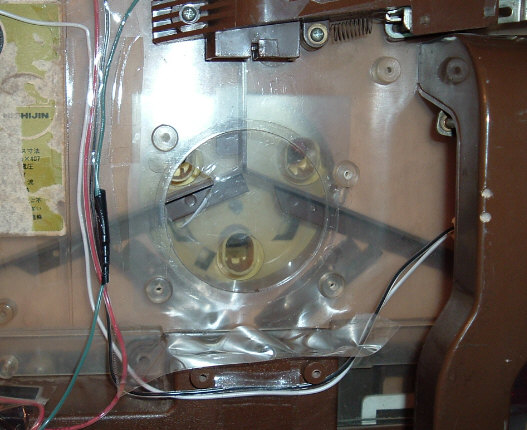
With the jackpot mech removed and disassembled,
I gently cleaned all the surfaces and made sure any gunk was cleared from
the pathway the balls follow. It was far dirtier than I had expected
and I'm glad I decided to remove and service it. Upon reassembly
I lightly oiled all the moving parts, including the sleeves the rods slide
within. After that it was only a matter of reinstalling the entire
assembly.
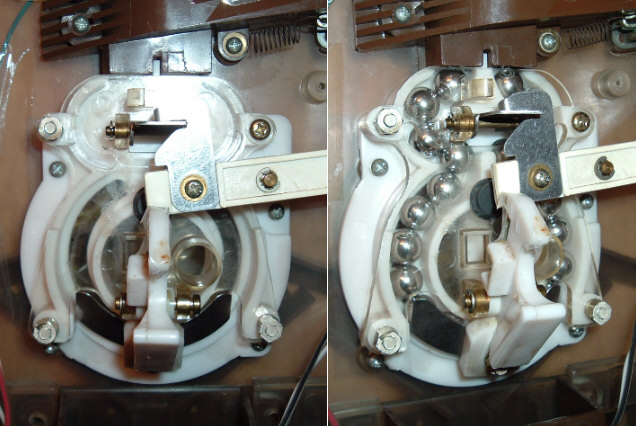
Once the assembly was fully installed I
removed the tape over the chute and refilled the hopper. It's amazing
how much better things look and how much more efficient the mech works
with the paths cleaned. Of course it also helps keep the balls cleaner
since they're not sitting in grime. This is a part that should be
removed and cleaned as needed since it's a point where the balls will collect
and deposit any gunk they have picked up.
02-21-2012 Wow it's been a
long time since making an update here! The machine is still functioning
fine, just as in the above couple posts. However due to the volume
of e-mails I still receive about vintage pachinko restoration and maintenance,
I wanted to go over a few things that I've been slacking on - for quite
some time.
First and most importantly is giving credit
where credit is due. Above I did this but it kind of got dissolved
into a regular update. Vintage pachinko restoration owes everything
to a small community of enthusiasts who maintain independent websites and
answer e-mails. While modern pachinko has a much larger community
and many spectacular resources due to its wider popularity, it really is
more or less a footnote for many pachinko enthusiasts. It really
is the smaller part of the pachinko community that keeps the vintage buzz
going. Of course there are a few professional vintage pachinko restoration
companies and dealers and of course a full on restoration from them will
carry a boutique price. This is to be expected and is the same for
another one of my hobbies, vintage arcade games. You either do the
work yourself and save a bundle or pay a premium for a professional to
do it for you soup to nuts. I've nearly always taken the former approach
and learned to repair and maintain things for myself. That's why
being able to share information online about vintage pachinko (and modern
pachinko, and arcade games) is such an incredible resource. A reply
from a modern pachinko message board lead me to an enthusiast site which
has been the single most useful resource in my restoration. That
site is Dan's Pachinko Data Page.
Dan's
Pachinko Data Page is the best jumping off point for vintage pachinko.
Like many of us in the hobby, Dan picked up a machine for twenty bucks
at a flea market with the intent to clean it up and get it working, having
a background in mechanics. Whenever there was something on my machine
I didn't quite understand I could find pictures and video on Dan's pachinko
page that would lead me in the right direction. Heck, watching a
video there is how I figured out that my payoff mechanism was set up improperly.
Additionally Dan hosted cleaned up versions of wiring diagrams for the
three most popular Nishijin "B" models. The original diagrams had
been changing hands for awhile but Dan's digitized versions were much easier
to follow than (if I'm remembering right) the hand drawn and scanned originals.
Eventually I further cleaned the diagrams up including fixing what I believed
to be an error in one of them. I was later contacted by Dan Reed,
the creator of the page, and had my updated diagrams posted on his site.
However I stupidly never gave credit for the original source on the actual
diagrams when I uploaded them to my site. Something like six years
later I've finally corrected this. So now the rework of the rework
of the diagram I made and host here, has a proper credit to Dan Reed and
Dan's Pachinko Data Page on it. You
can find the diagrams here. Please download and distribute freely,
as always. Also be sure to check out Dan's Pachinko Data Page as
he has the best pictures and videos for getting you acquainted with your
vintage machine, how to set it up, and most importantly how everything
works. It really is the best vintage pachinko resource online.
While having a key made that will replace
the long gone vintage original is next to impossible, you can still have
a key made for your machine. Any locksmith worth their salt can disassemble
the original lock, re-pin or dummy out the cylinder, and get you a key
that will work. As long as a key can be found that will slide into
the lock cylinder (usually based off a filing cabinet or mail box key),
the lock can be made to work. Many modern pachinko enthusiasts dummy
out the lock cylinder so that any key that fits into the cylinder will
turn it and operate the mechanism. The locksmith that made a key
for my machine performed a combination of these two - blowing out the lock
pins and then re-pinning the cylinder to a simple custom cut pattern.
It took them awhile to find a key that would fit but then again that's
why locksmiths exist.
If you've reached this page through an
external link or search engine, it is only a small part of a much larger
site. If the above content interests you then please take a look
at the rest of ClassicPlastic.net
and David's
Video Game Insanity!!
This Special feature is maintained by David,
insanedavid@classicplastic.net