 [Mod
Files] SPECIAL FEATURE cleaning your PS2 read
laser from the inside!
[Mod
Files] SPECIAL FEATURE cleaning your PS2 read
laser from the inside!

[Mod
Files] SPECIAL FEATURE cleaning your PS2 read
laser from the inside!
Eventually, your PS2 will reach the magic point in it's life where it no longer wants to read all formats, or becomes hit or miss in what games it will read. This is an extremely common problem, and while blowing out your PS2 with a can of compressed air or running a CD cleaner inside may fix the problem temporarily, you're going to have to clean the laser manually to really fix the problem. Personally my PS2 began to switch between reading ONLY the DVD titles, to reading everything but the DVD titles. Having no problems before and owning one of the launch PS2's, I knew it was time to give my deck an internal cleaning.
I want to stress that performing this operation
WILL
VOID YOUR WARRANTY and I will be IN NO WAY RESPONSIBLE FOR ANY DAMAGE
THAT MAY OCCUR during this project, even though when this problem strikes
your warranty has usually already ran out. Please, make sure to
read each project through completely before beginning or purchasing any
new items, David's Video Game Insanity!! will not be held responsible for
any damages incurred during modification of your video game systems or
items. Remember, in most instances opening or adding / removing components
will void your manufacturer's warranty. Before a project is listed
it's gone though several times to ensure that it is safe to perform, however,
modify your video games at your own risk. The PS2, regardless
of what many may think, is a delicate piece of precision technology and
you can cause serious damage to your console while performing this project.
Even though, as long as you take your time and don't do anything overly
stupid, it is extremely hard to hurt anything inside your PS2... but it
always could happen. Sony charges upwards of $140 to perform this
same operation, so just read over the directions a few times, and have
confidence that you can do it yourself and save a substantial amount of
money.

Okay, lets start by making sure the PS2
is disconnected and then turned on for a couple minutes to make sure all
immediate power has dissipated from the unit. Then turn the main
power switch back off. Make sure you have a work area roughly three
times the size of the PS2 as well as a place to put screws and screw caps.
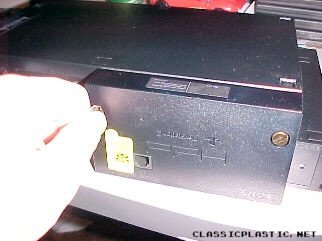
Remember to remove your PS2 network adapter
if you have one. Take a coin and loosen the two screws on either
side and then gently pull it off.

Now you should be ready to open your PS2.
Flip it over so that it is upside down with the controller ports facing
away from you. The amount of screws you need to remove varies with
which model PS2 you have. Anywhere you see a little square (rubber
or plastic) remove it gently with the backside of your blade, your fingernail,
a butter knife, or any similar tool. Remove each screw that was hidden
behind the square screw caps, make sure to note on a piece of paper where
the long screws go. This will be very important when it comes time
to reassemble your PS2.

You will want to flip your PS2 back over
upright again now. Take your knife and cut through the warranty sticker
located by the main power switch on the back of the console. Just
follow the groove of the upper shell down and then to the side. Now
that you have that cut made, you're going to want to turn the PS2 so the
controller inputs and CD tray are facing you.

Gently but firmly wiggle the upper shell
of the PS2 forward a bit, you're trying to get the top shell far enough
forward so that it clears the CD tray. The most important thing here
is not to pull upward hard on the right side, after getting the top off,
fold it over to the right so it opens like a book. At this point
you can see why I said to go easy on the right side, the reset and eject
buttons stay on the top shell and the wires that link them to the PS2 run
along the right side.

What you have here is pretty basic, there's
not a whole lot inside the PS2. To the left are all the power components,
the controller ports, and memory card ports. The black box on the
right is where the laser is contained, removing that is the next step.

There are four screws to remove this panel.
Two are on the top then toward the bottom there is one on each side.
This is where your precision screwdriver comes in, since the screws are
quite small. Remove the screws then gently lift up the lens cover.

Under the lens cover you will find the
CD tray and the laser. At this point you may want to gently spray
out your PS2 with a can of compressed air. This will completely remove
any and all dust from your PS2 from the inside. If you are spraying
out your PS2, remember to get around the fan at the back especially.

Take a cotton swab and coat it with rubbing
alcohol, make sure you have no excess dripping off. Gently yet firmly
clean the lens (the little blue glass part) in a sweeping circular motion
for 15-20 seconds or so. Then with a clean cotton swab, buff back
over the lens in the same way, this will make sure no alcohol is left on
the lens. That's it, your PS2 is now clean. Time to reassemble
your console. Start by putting the lens cover back on with the four
screws. Then flip the upper shell back over and slide it into place,
you should find this much easier than removing it.

Carefully flip your PS2 back over and
put all the screws back into place, paying special attention to where you
noted the long ones go. Then put your PS2 network adapter back on
if you have one. Then connect your PS2 back to power and your television.

And there you have it. No more read
errors and no more skippy audio. Now don't you feel a lot better
than if you would have sent your PS2 to Sony and been $140 lighter?
Truthfully, there is no reason to send
your PS2 to Sony to have this "repair" done. It only takes about
30 minutes tops and that's if you're going really slow and being extremely
cautious. Eventually it seems that all PS2's will run into this problem,
mine did and it was behind glass and I cleaned where it was weekly.
Remember how small that little lens is, it doesn't take much to obstruct
it. You really don't have to be mechanically inclined in the least
to perform this operation, just take your time and your PS2 will be running
like new in no time.
The tools needed for this modification
are:

1 xacto knife or similar blade
1 phillips head screwdriver
1 jewelry or small precision phillips
head screwdriver
1 small coin (if you have a PS2 network
adapter)
1 butter knife (optional)
2-3 cotton swabs
Rubbing alcohol
Written on 12-23-02 by David, insanedavid@classicplastic.net
Last amended 03-02-06 by David, insanedavid@classicplastic.net