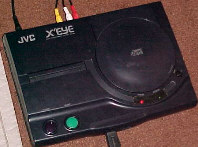
 [Mod
Files] JVC X'Eye installing a US/JPN cartridge
region switch.

 [Mod
Files] JVC X'Eye installing a US/JPN cartridge
region switch.
We all love the JVC X'Eye and if you are a frequent visitor to David's Video Game Insanity then you know of my long relationship concerning repair and analysis of this prized console. Among the capability to play both Sega Genesis cartridges and Sega CDs in one sleek package the X'Eye also sports an import-friendly cartridge slot. Japanese Mega Drive (what the Genesis is known as in the rest of the world) games are of a wider shape than their US counterparts and with most Genesis consoles you have to grind down the cartridge slot for them to fit, but not with the X'Eye. While this is fine for many Mega Drive games there were also quite a few that were released with region lockout chips onboard, preventing them from running on foreign consoles. The solution to this, of course, is to switch the console into Japanese mode. Most Sega boards have jumpers that can be reconfigured for different regions as they all came from the same sources but the JVC X'Eye only ever had a US release. That's only technically speaking however.
See, the X'Eye was a repackaged and slightly redesigned version of a console released in Japan as the JVC Wondermega 2. The Wondermega 2 had all the features of the X'Eye plus wireless controllers, MIDI support and more. Even though there was some redesigning under the hood (removing stuff that controlled the extra features) and the CD drive components were moved to a separate daughterboard, the heart of the system remained the same. The JVC X'Eye is based around Genesis 2 / Mega Drive 2 architecture. This means it uses a 315-XXXX chip as its central processor (they should all be 315-5660's but I can't confirm that at this point) and because of that it must abide by the same rules as the Genesis 2. With a Genesis 2 pin 107 of the 315-XXXX chip controls if the console is in US or JPN mode, run this pin to +5v for US mode, GND for Japanese. While this involves a bit of cutting and slicing to install a switch in a Genesis 2, doing the same in a JVC X'Eye is surprisingly easier.
The following information has been out there at one time but it has never been very detailed. At the date of the original writing of this feature said information was nonexistent, there were those out there that would perform the mod but would not share the knowledge outside of basic theory. Due to my own research and the extremely helpful assistance of a few users of the Digital Press forums I was able to bring the information below to light. Please note that this is for the cartridge slot ONLY, not the CD drive. You'll have to look elsewhere for that information and from what I have read it's still in it's infancy concerning the JVC X'Eye.
But first, our disclaimer... Please, make sure to read each project through completely before beginning or purchasing any new items, David's Video Game Insanity!! will not be held responsible for any damages incurred during modification of your video game systems or items. Remember, in most instances opening or adding / removing components will void your manufacturer's warranty. Before a project is listed it's gone though several times to ensure that it is safe to perform, however, modify your video games at your own risk. Additionally I must stress that in my opinion this mod is rated intermediate-advanced as it requires good soldering skills and novice electronics experience working in a small space. I wouldn't want you killing an X'Eye due to inexperience.
To begin with, make sure that your X'Eye is in working condition. Given how many of these consoles are found with problems you want to make sure everything is working before you attempt the mod so you won't go around in circles if there's a problem. If everything is fine remove any games you may have in the cartridge slot or CD drive, turn the system over, and remove the six screws at the base. Turn the console back over and carefully lift the top shell up and off, setting it aside for the time being. VERY GENTLY pull the power (purple) and reset (teal) buttons up off their switches and set them aside as well. The large part of the system covered in a plastic sheet is what we need to get to, there are two screws holding this down, remove them and gently peel the plastic sheet to the right.
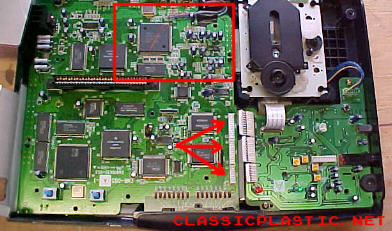
You should now see what is pictured above. The rest of the work will be concentrated on the area in the red square, the large chip there is the 315-XXXX processor. At this point remove the mainboard by removing the screws holding it down. Don't forget to unsnap the three socketed connectors that run to the daughterboard, shown by the three red arrows. Gently lift each of these up to disconnect them. Once the mainboard is out set the rest of the console aside. Now let's take a closer look at the 315-XXXX chip.
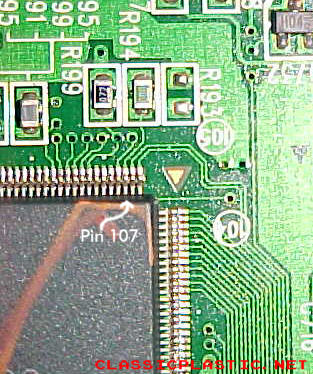
Each side of the 315-XXXX chip is labeled with its starting and ending pin identification, the part you're looking for is at the top, starting with pin 105. The third pin on this side is pin 107 which controls the region setting. If you trace the pin you'll notice it runs to point R194 where via a surface mount jumper it eventually connects to +5v. The open pads to the right at R193 are more than likely the default setting for a Wondermega 2 as the upper pad runs to GND. (I don't have a Wondermega 2 to compare this with) If your X'Eye doesn't look like this here then stop and contact me.
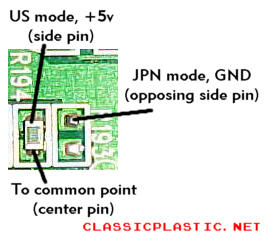
The picture above describes it all. Following with the theory and rules of the 315-XXXX chip, if pin 107 runs to +5v the console will read US cartridges and if it runs to GND then it will read Japanese cartridges. That's just how we're going to wire it. First the jumper at point R194 must be removed, which will leave you with two nice solder points. A SPDT switch will be used to control the region setting. Solder a wire from the lower pad at R194 to the center pin of the switch as it is the common point leading to pin 107 of the 315-XXXX chip. Then solder a wire from the upper pad at R194 to one of the side pins of the switch, completing this circuit will put the cartridge slot into US mode. Lastly solder a wire from the upper pad at R193 to the other side pin of the switch, completing this circuit will put the cartridge slot into Japanese mode.
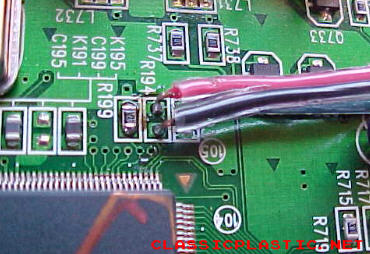
As one can see there's not a lot of room for error. The solder points are relatively small and you're going to be working close to the 315-XXXX chip as well as many other components. Also be sure not to singe the PCB while soldering the wires which is relatively easy to do. If you look closely in the picture above you'll see that I charred mine just a little when working with the lower pad of R194. (the wire running from the upper pad of R193 is hidden behind the other wires)
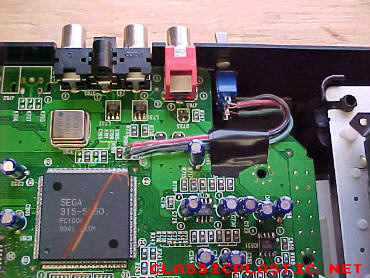
After getting everything soldered you'll want to install your switch. There are a number of places this can be oriented such as the back, side or top but remember to keep it clear of any obstructions. You may want to secure the wires with some tape or hot glue to prevent them from moving around. Personally I wanted to keep the switch close to the RCA jacks on the back of the system, however this caused a problem. Since I had never physically seen a US/JPN switch on an X'Eye I didn't have any preconception of what the ideal location for the switch would be, so I just put it where I wanted. Later when I went to put the top shell back on I realized that it wouldn't fit.
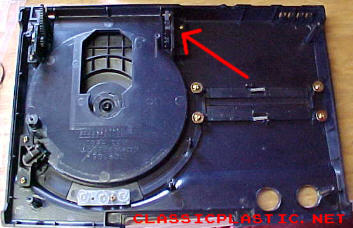
The left fin (when oriented above the console) on the bottom of the CD lid, on the top shell, sat right where the switch I installed is. Not wanting to move the switch, I came up with a solution in modifying the lid fin. Basically I just cut it down.
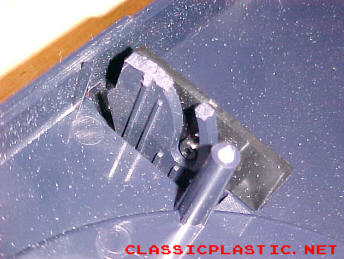
It's really not needed since the lid itself is well anchored and guided by a pair of tabs and the gearing that causes the lid to open is situated on the other fin but I wanted to keep as much as possible. Using a small rotary hand tool with a fiberglass cutting wheel I carefully trimmed down the fin until the top shell sat properly once again. If you go this route make sure that you smooth out the cut and wipe down the top shell before reinstalling it, wouldn't want sharp plastic flakes or dust inside the console. After everything internally is taken care of reinstall the mainboard and secure your switch if you haven't already done so. Screw the plastic sheet back down over the mainboard and reconnect the daughterboard. Snap the power (purple) and reset (teal) buttons back on their switches and gently set the top shell back on. Don't force it, if it doesn't fit effortlessly then there's something blocking it. Check for obstructions, clear any, and once you have the top shell on turn the system over and replace the six screws at the bottom.
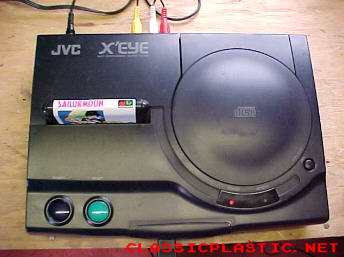
Time for testing. Insert a Mega Drive or Genesis game into the cartridge slot and turn the system on. It's best to test this with a cartridge that has a lockout chip, a common Genesis cartridge that does is Streets of Rage 2. If the region switch is set in the incorrect mode you should get a message after the splash screen that reads something like "Warning! This software is authorized only in Japan..." depending on the region and game. Shut off the X'Eye, flip the region switch, turn it back on and it should load no problem. Do not change regions while the system is running, ONLY when it is powered off.
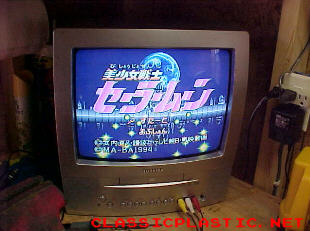
After switching to the proper region setting everything works perfectly. Congratulations you now have a JVC X'Eye that is truly import-friendly. Concerning the CD side of the X'Eye, that is controlled by a CD BIOS and has nothing to do with the cartridge slot import mod. However I would recommend to always make sure that your X'Eye is switched to US mode before powering on with no cartridge inserted.
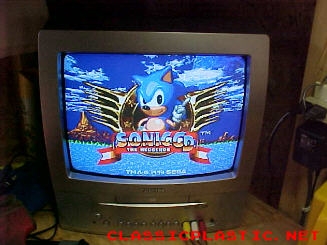
With the cartridge setting switched to US mode the X'Eye operates normally, since nothing is any different than it was when it was manufactured. My experience with Sega Genesis 1 / Sega CD 1 mods is if you have a Genesis 1 in JPN mode connected to a US Sega CD, the CD drive won't load it's BIOS screen and you'll get an error message. Yet since the X'Eye has an integrated boardset this isn't something I'd want to try. It may simply give you an error message but worst case scenario is that it shorts something out and no one wants to kill an X'Eye.
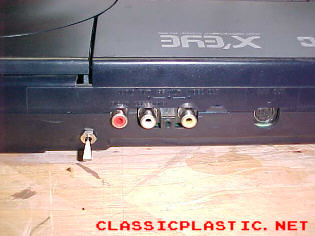
This is a nice clean mod that doesn't detract one bit from the visual design of the JVC X'Eye. In fact you can't even see the region switch except from the back. I set it up so that up would be JPN and down would be US. This makes it so I can blindly reach behind the console and feel if the switch is down (US mode) before booting the system for Sega CD games. Although that's the end of the modification tutorial there is one other interesting point to bring up.
Since the JVC X'Eye (and probably the Wondermega 2) use the same 315-XXXX chip that the Genesis 2 does, then the 50Hz/60Hz mod may be a possibility as well. Mega Drive games released in Europe used the US mode setting but ran at 50Hz, the PAL video standard. The 50Hz/60Hz mod with a Genesis 2 involves running pin 46 of the 315-XXXX chip to either +5v (US/JPN default) or GND (UK default) to switch between 60Hz / 50Hz - so it may work here since the chip is the same. The Wondermega 2 / X'Eye never had a UK release but if the chip is in fact the same you may be able to force a 50Hz mode. I honestly don't care for this since I never plan on running any PAL games but it is an interesting possibility. Of course since there was never a UK release of the X'Eye or the Wondermega 2, finding a suitable source to pick up the pin 46 lead from could prove to be difficult. Yet since it's the same 315-XXXX chip a Genesis 2 has then it's a 315-XXXX no matter what and should abide by the same rules that the Genesis 2 has regardless of the board it's on.
If you happen to complete this mod I
would like to hear your opinions, problems, comments, additional information
or the like.
The tools needed for this modification
are:
1 phillips head screwdriver
1 soldering iron (low wattage or variable)
1 SPDT switch (toggle or slide)
Rosin core solder
Needle nose pliers or electronics tweezers
Insulated Copper wire
Drill and/or small handheld rotary tool
Written on 01-17-06 by David, insanedavid@classicplastic.net
Last amended 10-21-07 by David, insanedavid@classicplastic.net