 [Mod
Files] JVC X'Eye addressing and repairing disc
lid sensor issues.

 [Mod
Files] JVC X'Eye addressing and repairing disc
lid sensor issues.
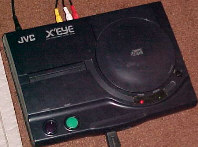
Let's be honest here, the Sega Genesis was only successful in the United States because NEC made a critical error in delaying the release of the PCEngine in the US (called the TurboGrafx-16 over here) by two years, allowing the Genesis to get a stranglehold on the US market. In Japan the Mega Drive (what the rest of the world calls the Genesis) was an abysmal failure due to NEC already dominating the market with the PCEngine long before the Mega Drive launch. Just the same JVC (who assisted Sega with the development of the Mega CD / Sega CD) was given license to develop their own version of the Mega Drive and Mega CD but instead of having two separate units they would develop an all in one machine called the Wondermega. The Wondermega could play both Mega Drive and Mega CD games without an expansions or special accessories, it could also play CD+G karaoke CD's. Although sales weren't stellar the Wondermega sold enough to warrant a redesign and the Wondermega 2 was born. Since the Genesis market was in overdrive in the United States, JVC thought to capitalize on the tail end of the 16 bit era and the idea of melding the Genesis and Sega CD into one. So they redesigned the Wondermega 2, removing pricey features such as built-in wireless controllers, renamed their console the JVC X'Eye and brought it to the United States. Retailing at $499 it became more of a piece of electronics entertainment equipment for the wealthy thirty-something as opposed to a console for an adolescent. Only about 10,000 units were produced before JVC discontinued manufacturing the X'Eye and the console disappeared into the halls of video game collector obscurity.
However due to it's rarity, style, ease of use, and just plain convenience of having one connection and one sleek unit to play both Genesis and Sega CD games, the JVC X'Eye became valuable not as a collectors item but as a functional video game console people want to buy to use. Yet there is one tiny problem that seems to creep up over the years with these systems. Eventually most X'Eye consoles will seem to stop wanting to read Sega CD's. The problem rarely is with the CD drive itself but something far less complicated yet just as critical, the little pinswitch that tells the X'Eye that the disc lid is closed. If you have a bit of electronics know how and some decent soldering skills you can overcome this problem however. Also knowing how to fix this problem will allow you to pick up "broken" JVC X'Eye systems for next to nothing and get them running like brand new.
But first, our disclaimer... Please, make sure to read each project through completely before beginning or purchasing any new items, David's Video Game Insanity!! will not be held responsible for any damages incurred during modification of your video game systems or items. Remember, in most instances opening or adding / removing components will void your manufacturer's warranty. Before a project is listed it's gone though several times to ensure that it is safe to perform, however, modify your video games at your own risk.
So you've just gotten back from a yard sale or flea market with the sacred Sega system of you fantasies. Most X'Eye systems look to be in pretty good condition when found so one would assume that it would work perfectly. You get it home, connect it to your TV, plug it in, pop in a Sega Genesis cartridge, hit power and boom - it works perfectly! What about that CD drive though? After turning the system off and removing the cartridge you open the CD lid, drop in a copy of Sonic CD, close the lid, flip the power on and...
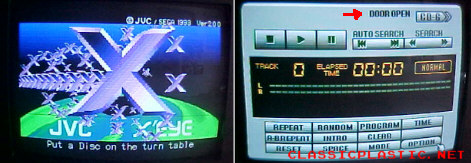
You see the JVC X'Eye BIOS splash screen (which plays the Japanese Mega CD BIOS music in the background by the way) with a message across the bottom to "Put a Disc on the turn table" even though you do in fact have a disc in the CD drive. The green "Access" light on the top of the machine is flashing like it's trying to read the disc however the disc itself just isn't spinning. So you go to the control screen and notice "DOOR OPEN" up at the top. Wait, the disc door isn't open, the lid is shut with your game inside. Chances are that the door open pinswitch is failing.
The problem here is a tiny little pinswitch on the CD laser assembly daughterboard that is pushed down with a cheap plastic plunger (connected to the top of the shell) which is pushed down by a little tab beneath the disc lid. Really you can't see it unless you're looking for it, in fact it took me a long time to find it only to realize I had been staring right at the damn thing. When the disc lid is closed the pinswitch is pushed down which tells the X'Eye "okay, the lid is closed, initialize disc spin / read" however for one reason or another the pinswitch in your system is not being pushed down, so even though the door is physically closed the X'Eye interrogates the switch which is still open and goes "I can't initialize the disc spin / read - the door is still open."
Now the simplest fix is to make sure that the little plastic plunger is contacting the pinswitch properly, sometimes these break or wear down and I've been told adding a bit of material to this will fix the problem. However in my case the pinswitch was toast. Let's begin by getting to the pinswitch and seeing if it needs to be replaced or not. Flip the X'Eye over and remove the screws, allowing the top shell to be removed from the bottom shell.
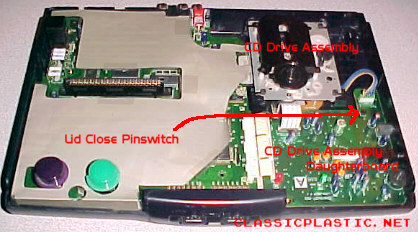
This system is laid out nicely for maintenance so I'll just go over the parts we're going to work with in this repair. The CD drive assembly is easy enough to spot, it's the spindle that CD based games sit upon. Below it is a circuit board that is smaller than the main one, this is the CD drive assembly daughterboard and where the lid close pinswitch is located.
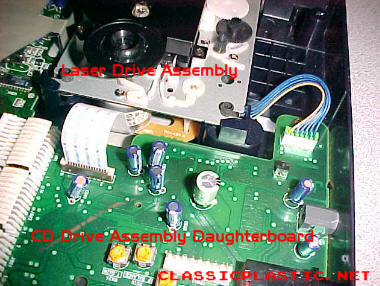
Here is a close up of the CD drive assembly daughterboard inside the X'Eye. CAREFULLY unplug all its connections and remove it from your X'Eye. The plug with the blue and yellow wires pulls upward and out (the green part unplugs from the white socket), as does the flat ribbon cable. The three flat cables that run from the left side of the daughterboard to the motherboard are unplugged by gently prying them up from the far left side, they snap in and out like buttons. After removing the daughterboard, set the rest of the X'Eye aside.
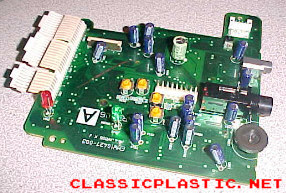
Basically this part handles the back and forth video and data read between the CD drive and the rest of the unit as well as lets the X'Eye know the disc lid is closed, which is our problem. (does other stuff too but that's not important right now) On the daughterboard, up where the board sticks out and has a white plug socket (the part in the upper right, where the yellow and blue wired plug that runs to the CD drive was removed) you'll see a little black boxy deal just below where the white plug socket is. That's the lid close pinswitch...
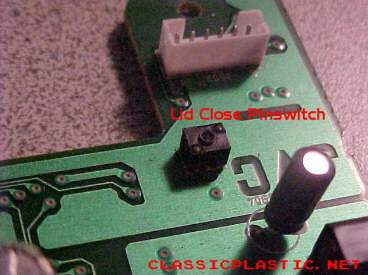
As you can see, mine is shot. At this point there are two ways to go about repairing your JVC X'Eye. The first is to simply override the pinswitch so the system will always think the lid is closed. The problem with this is that if you were to open the CD lid while the system was on without a Genesis cartridge inserted the CD spindle would always try to spin. If you were playing a CD game and opened the lid with the power on, the CD drive would continue to operate, allowing the disc to slip and bounce off the spindle which usually causes damage to the game as well as the X'Eye itself. Now if you can discipline yourself to insert CD games and close the lid before powering on and to always power the system off before opening the disc lid, then you can get away with this - still not a proper fix but it will allow your X'Eye to work. The second and proper way to fix the pinswitch is to replace it with a similar one, usually recovered from other electronic devices or purchased at an electronics component store.
If you're going to simply override the
lid close pinswitch, keep reading.
If you're going to replace the pinswitch,
allowing the X'Eye to function properly, then
click here.
DO ONE OR THE
OTHER, NOT BOTH.
If you're going to override the switch with a jumper then flip the daughterboard over and find where the pinswitch makes its connections on the back side. Do not remove the pinswitch if you're going to override it, you need its leads in place to allow an area large enough for your jumper to solder to. Solder a small piece of wire between these two points to override the switch - this way the X'Eye will ALWAYS think the lid is closed...
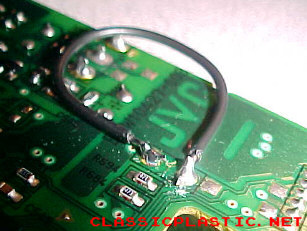
(not my best work, but it got the job
done)
Now when your turn your X'Eye on it will think the lid is closed (EVEN WHEN IT IS OPEN) so you have to remember to always have the lid closed when using your system. In other words put your CD game inside, close the lid, THEN turn the power on. Also if you open the lid while the system is running it will NOT disengage the disc motor / laser assembly (since it always thinks the pinswitch is being pushed down by a closed lid) so make sure to turn the system off before opening the disc lid and removing your game.
With the jumper installed replace and reconnect
the daughterboard to the rest of your X'Eye and reassemble the system.
Then
click here to rejoin the repair walkthrough.
The ideal solution is to replace the pinswitch
itself with a comparable one. Although I didn't have an exact matching
pinswitch on hand when I replaced mine, it was close enough to still do
the job. The pinswitch I used to replace the bad one was out of an
old VCR, one of the buttons behind the front control panel on the deck.
What you're going to do here is basic electronics repair 101, you're going
to remove the old original pinswitch and replace it with the alternate
working one. As always, be careful when heating the circuit board
and take your time, when properly heated the old pinswitch should pull
out easily as it's only held in by its two leads. Then you want to
position your replacement pinswitch so it will slip into the holes in the
circuit board that the leads from the old one used. This can be a
little tricky and you're going to want the pinswitch to be firm against
the daughterboard (may want to use a dab of hot glue beneath if you have
to position the pinswitch a little above the surface) as the lid close
plunger is going to be firmly pressed against it when the disc lid is closed.
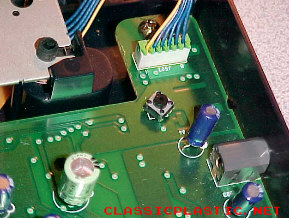
On the particular replacement pinswitch
I used there were four leads however they were connected as two and two.
So I bent away one from each side and after some work got the two remaining
leads threaded through the existing holes in the circuit board. After
that flip over the daughterboard and carefully solder the new pinswitch
leads to the solder points the old pinswitch leads once used. After
the solder has cooled replace and reconnect the daughterboard to the rest
of your X'Eye and reassemble the system.
Now that everything is back together let's
just take a quick look at just how small this pinswitch is since until
you see it yourself you'll probably think it's a lot bigger than it is...
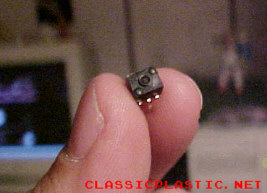
That's right, it's TINY. To quote Back to the Future Part III, "Unbelievable, that this piece of junk could be such a big problem." In the repair pictures it looks much larger than it is in reality. If you don't have them, a pair of electronics tweezers is a wise purchase if you're going to be replacing the pinswitch since due to its size it gets hot fast when removing it. Also slipping one side of the tweezers beneath the pinswitch and gently prying it out as you heat the solder points on the other side is one of the simplest approaches to removing it. Also if you replaced the pinswitch you may need to do a little fine tuning to ensure that the plastic plunger in the top half of the shell is contacting the new pinswitch firmly. Personally I had to install a tiny sliver of an eraser atop the plunger inside the disc tray to make up for the slight gap my replacement pinswitch left between itself and the plunger.
Okay, now everything is back together. You've either installed an override jumper (in which case you already have a disc inserted and the lid closed) or replaced the pinswitch itself so it's time to see if your repairs were successful. Turn the power on and you should see...
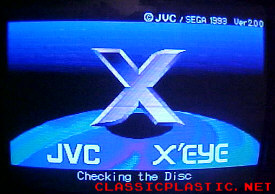
"Put a Disc on the turn table" should now be replaced with "Checking the Disc." After the disc is read the X'Eye should switch over to the control screen where the "DOOR OPEN" message should be gone. Additionally in the upper left of the control screen you should see "GAME" if the disc is a Sega CD game or "MUSIC" if the disc is an audio CD. Select which one it is and if a Sega CD game you should next be met with the familiar Sega CD initialization screen with Sonic the Hedgehog and the Sega logo. After the game starts up, if you replaced the pinswitch then open the disc lid and the CD should stop spinning, confirming the that pinswitch is working properly. (DO NOT DO THIS IF YOU USED THE OVERRIDE METHOD INSTEAD)
That's really about it, welcome to the
ranks of JVC X'Eye ownership. Figuring out how to fix this problem
was very much a learning experience and it allowed me to get my JVC X'Eye
working as intended. Not bad for only paying $3 for it at a flea
market. During my search for information on this console I noticed
that the pinswitch going awry was a very common problem and no one had
stepped up to write a walkthrough on how to repair it. If any information
was ever given at all it was that a sensor wasn't working properly.
To me that just isn't enough information for the average gamer attempting
to restore one of these systems. Hopefully this expanded walkthrough
will allow more of these unique consoles to continue to survive.
However I want to stress that if you really aren't competent with a soldering
iron and electronics repair then PLEASE let someone else fix this problem
for you. As I said at the top, there aren't all that many of these
and it would be a shame to take another one out of existence by mistake.
Also if you have a dead X'Eye I would be interested in picking it up (mainly
for the AC adapter and accessories), please e-mail
me if you have an X'Eye in your possession that is well passed its
prime.
The tools needed for this modification
are:
1 phillips head screwdriver
1 soldering iron (low wattage or variable)
Rosin core solder
Small length of threaded copper wire (if
using override method)
1 comparable replacement pinswitch (if
using replacement method)
Written on 08-22-05 by David, insanedavid@classicplastic.net