The cabinet on the night
I brought it home. The amount of empty space inside makes it perfect
for MAME.

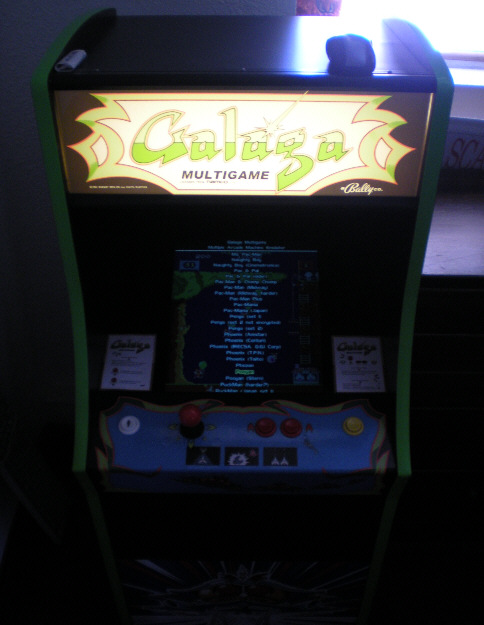
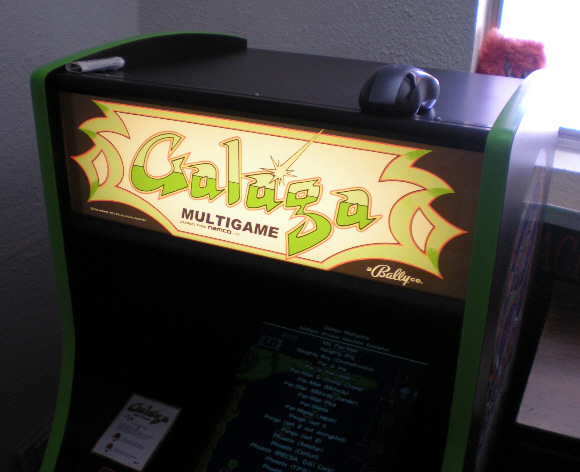
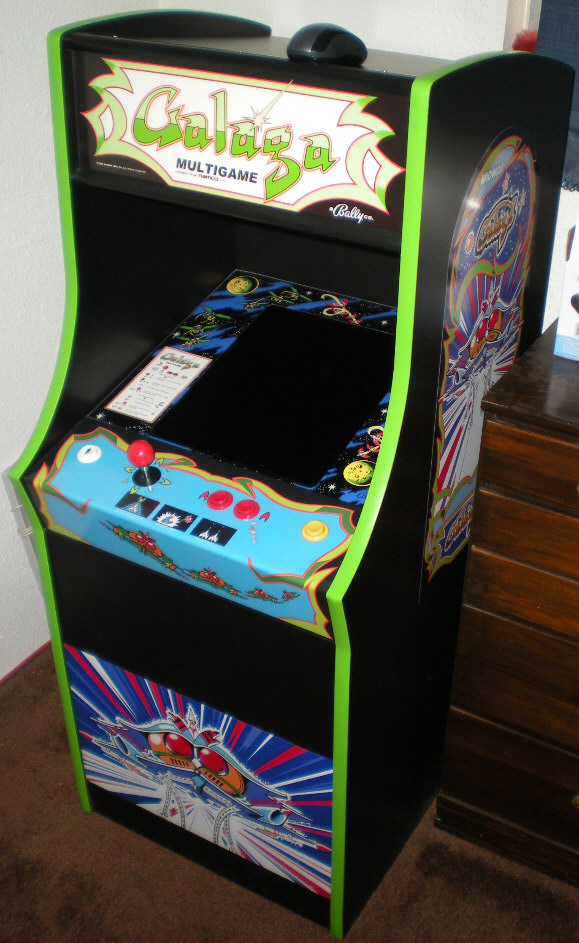
Mini Galaga Multigame
MAME cabinet information and service log
Over the Summer of 2009 my girlfriend mentioned that there were a few arcade cabinets at the school she teaches at. On the way to California Extreme 2009 in July we stopped by and I took a look at them. Basically they're Jakks Pacific TV Games joysticks built into half size replica arcade cabinets. Two are Galaga replicas and one is a Pac-Man replica. One of the Galaga cabinets was totally dead but the other two worked fairly well. I guess they've been there for a few years and were donated to the school for one of their media rooms. A couple months after the school year started up again she mentioned that the other Galaga quit working and that the Pac-Man would periodically reset.
A month or so passed and I asked if anyone had fixed the cabinets and she said the school had asked a couple places and they were told it would cost more than it would be worth. TV people didn't want to touch them because of the non-standard case, amusement repair people didn't want to touch them because it's not really an arcade cabinet. I offered to take a look at the cabinets and repair them in exchange for taking one of the Galaga cabinets home. Everyone at the school jumped on the opportunity, the principal herself replying "He just wants one of them? He'll fix the others for free? He can have it!" They were all pretty enthusiastic about getting the other two machines repaired.
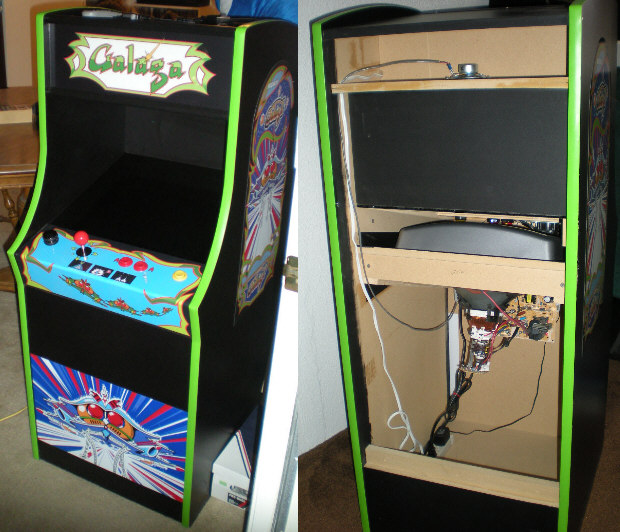
By early December a Saturday was agreed upon when I could service the cabinets. I was there for about four hours working on the machines. Each one has a Jakks Pacific TV Games plug and play gutted and mounted inside, with the inputs running to arcade controls. The Galaga cabinets feature Pole Position, Galaga, Mappy, Ms. Pac-Man, and Xevious. The Pac-Man cabinet has Pac-Man, Super Pac-Man, Pac & Pal, Pac-Man Plus, New Rally-X, Bosconian, Dig Dug, and Galaxian. The Galaga cabinets have the parts from the rotating joystick (for steering) mounted to a little spinner adjacent to the joystick. A 13" CRT TV with the back removed is mounted inside each, using the standard AV jacks. The TV's are securely fastened to a TV shelf that slides out for access to the game electronics.
The cabinet construction is arcade quality as are the controls. The TV audio has been relocated to a professionally mounted speaker above the display area, beneath the marquee, as is done on an actual cabinet. The marquees light and are vinyl sandwiched between two pieces of glass. The TV area is covered with a piece of smoked plexi and the controls are standard arcade fare. The joysticks are selectable between 4 and 8 way (via pulling up and twisting or using a slider on the underside) proving that if Jakks would spend a little more Xevious and Bosconian would have proper 8 way movement, the game can do it, it's a control blockade. The plug and play is hardwired to use the AC adapter. The plug and play AC adapter, TV power, and marquee light all plug into a power strip inside the cabinet which is then hardwired to a fused socket and switch on the back of the cabinet. From the outside a standard three prong PC power cable is used, keeping everything safe and secure. Official artwork is used on the sides, front, marquees and control panels.
Problems with the cabinets were mixed, covering blown fuses, loose grounds, broken connections, worn switches - pretty much the standard wear and tear. Figuring out the order things have to be taken out (remove back, disconnect speaker, loosen bracket and slide out smoked plexi, unscrew TV shelf, slide TV out, disconnect plug and play, etc.) took up most of the time as did testing things as I went along. This was made far easier by rolling in a separate TV facing back at me while I stuck my head through the cabinet to check control connections. Absolutely nothing was labeled or properly color coded. Really these weren't designed to be worked on with how buried the control panels are. However I was able to get them all fixed and tuned up to 100% functionality. I also replaced all the switches in each one, made sure the connections were sound, retuned the picture on the TV's and performed other basic maintenance and cleaning. Then of course it was time for me to collect my cabinet as payment (and just get the sucker to fit in the back of a Camry). So after four and a half hours of hybrid arcade repair I became the owner of a 3/5th size Galaga cabinet.
The cabinet on the night
I brought it home. The amount of empty space inside makes it perfect
for MAME.
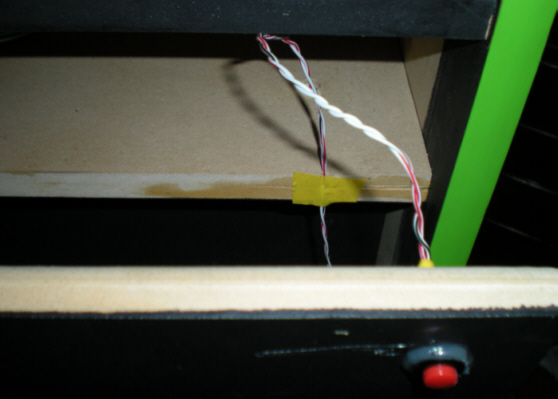
Yes, I got this one working too, just needed a new fuse for the external power connection after my internal repairs. They really are beautifully made, I couldn't make one nicer if I tried. With the graphics and T-molding, it really does look like an authentic Galaga cabinet, just much smaller.
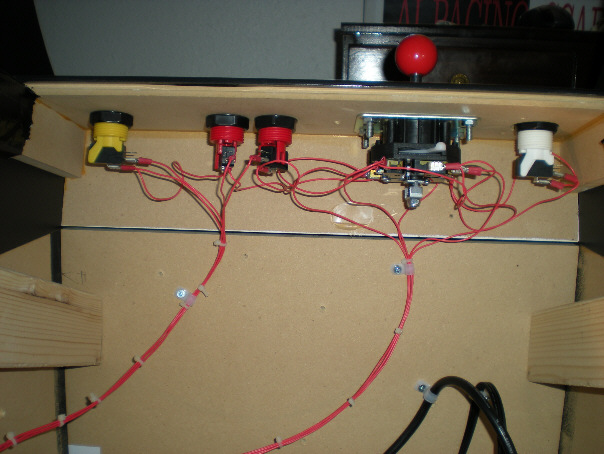
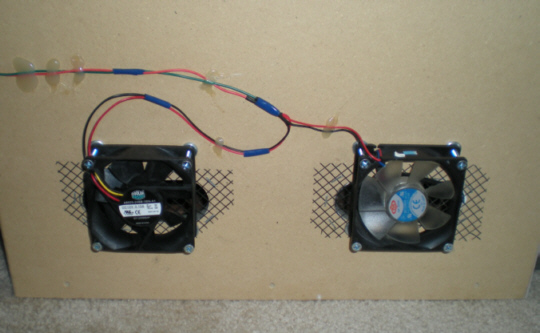
The wiring hackjob pictured above was the quick fix to get it working until I brought it home (although the original wasn't that great either). I wanted to at least have something that worked for awhile before I could get around to doing the MAME conversion. The Jakks TV Games board is mounted and an AC adapter is hardwired to it. The connections run to a CAT5 cable, through a coupler, to another and then to the controls. The menu, fire 1, fire 2 and joystick directions are wired to arcade components. The original Jakks TV Games joystick assembly is mounted to the left side and a knob is attached to it. This particular Jakks TV Games version is the one with the twist joystick handle for Pole Position - that's what the faux spinner was used for.
My plans for it were to haul it to my parent's house to put it into storage since I really don't have the space for it. It was now or never though so I had to pick it up when I did. My eventual intention was to turn it into a classic vertical MAME cabinet. Pretty much everything I need is already on the cabinet. I planned to rework the control panel a little (remove the "spinner" which is useless for anything other than what it's being used for now) and cut a new monitor mount for a vertical PC monitor but that's about it. Wire up an encoder, wire the speaker to a little computer speaker amp and it's ready to go.
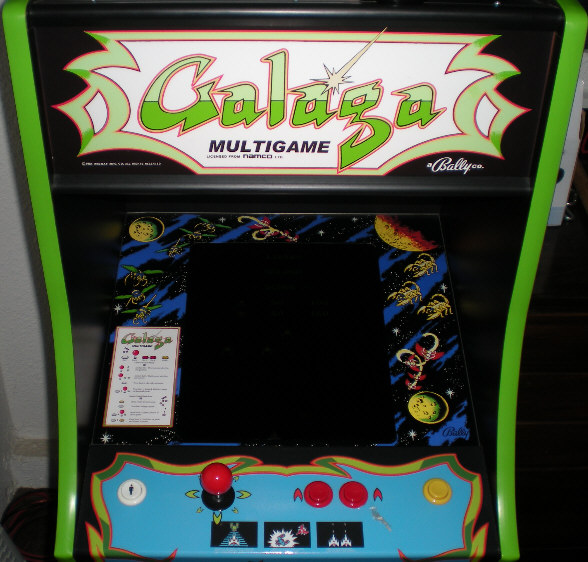
As one can see, while
the cabinet looks full size from close up pictures,
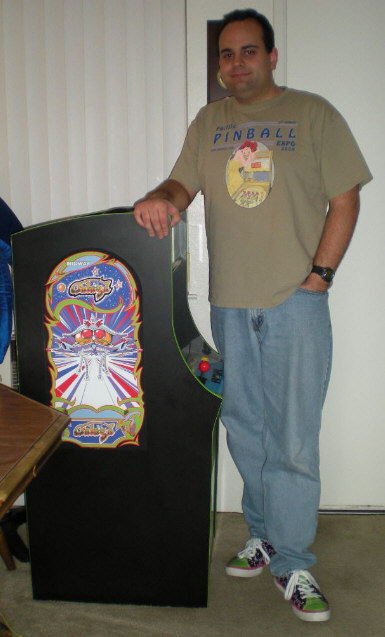
it really is about 3/5ths
the size of a normal Galaga.
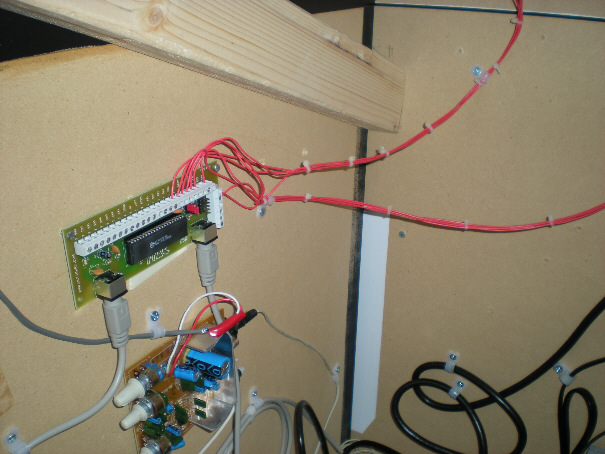
The origin of these cabinets is really the biggest question I still have. It's hard to say where they came from, no one at the school seems to know anything about them other than "they were donated years ago." I'm guessing they were probably made in small batches since each cabinet has pencil writing on the inside and back door that correspond to the phonetic alphabet. Pac-Man is Charlie, the Galaga still there is Hotel and the one I have is Golf. The work inside is pretty damn professional. They mounted the boards from the plug and plays inside and then ran all the wires to a CAT5 jack. The arcade control side runs to another jack and then they are tied together via a coupler. If I was to guess I'd say it was someone doing small custom jobs. However one would assume there would be some kind of maker's mark somewhere on the cabinet but there's nothing anywhere. If this work looks or sounds familiar to you and you have more information, please e-mail me!
03/08/2010 - Conversion To MAME
On Christmas Eve, 2009, the cabinet was once again loaded up and hauled to my parent's house. The ten minute journey to my apartment with the cabinet in the back of the Camry had nothing on the two hour drive to my parent's. Aside from sitting sideways in the front passenger seat with my hand on the machine to keep it stable (as well as the seat belts around it), the trip was rather uneventful. I set the cabinet up adjacent to my Pole Position MAME conversion and over the next couple months I would head out for a weekend every three weeks or so to work on the cabinet. Also during this time I began to disassemble the Pole Position cabinet for reasons explained in the project page for that machine. I would end up using the computer parts out of Pole Position DX to power the Galaga MAME cabinet. Work was done a little at a time, setting up and configuring the MAME installation one weekend, getting the control panel reworked and wired on another and so on. I worked very hard to make sure I used what limited time I had to my full advantage. About three months after starting, at the beginning of March, I finished up the conversion.
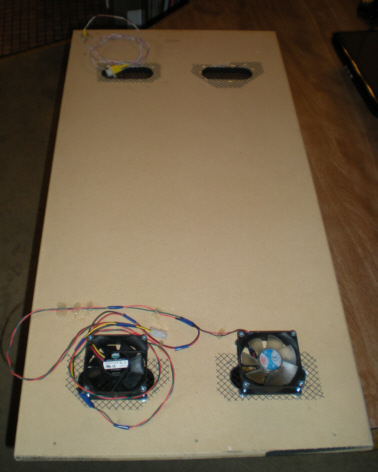
A very early picture
from when the computer and controls were installed in the cabinet.
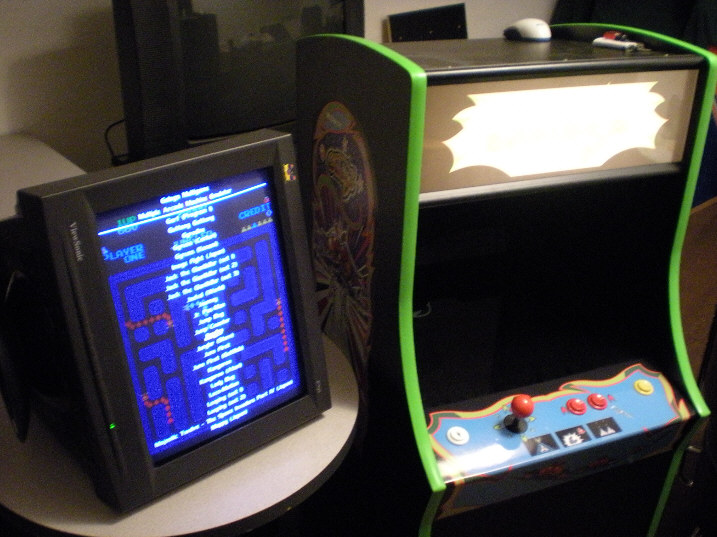
Here the system
is being tested on an
external monitor before the final LCD display would be mounted in the cabinet.
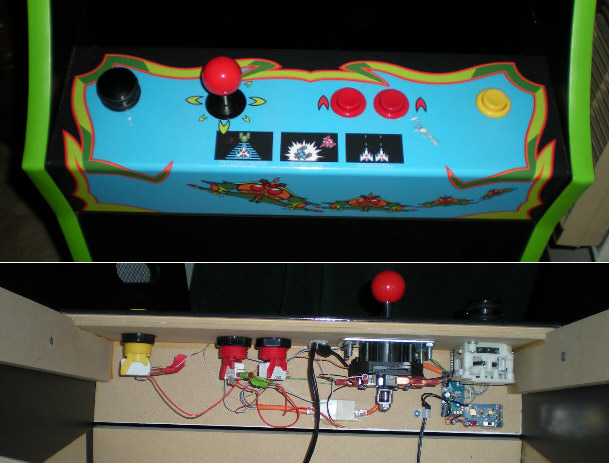
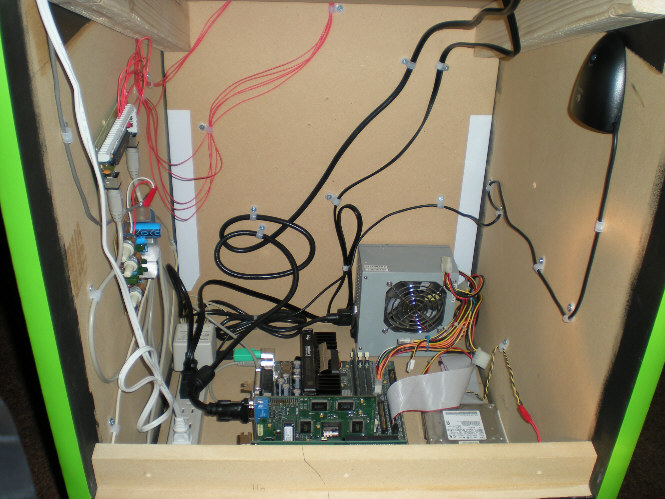
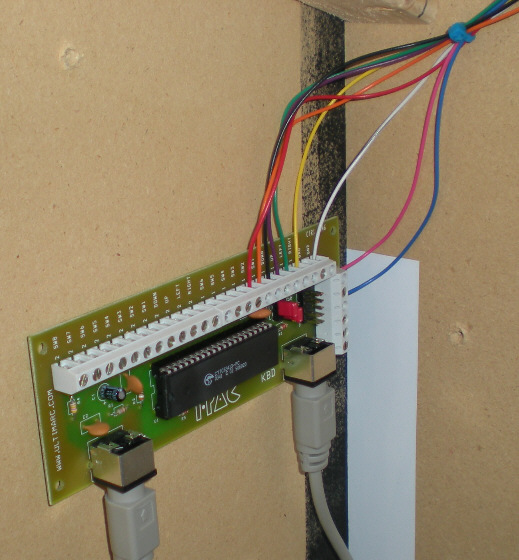
In the three month span I removed the TV and Jakks Pacific electronics and turned the machine into a mini vertical MAME cabinet. I decided to use the hardware that was in my previous MAME cabinet (Pole Position DX) simply because it was super stable and would do exactly what I needed. I used an Ultimarc I-PAC for controls interface. The display is a 17" LCD panel that I picked up on craigslist.org for $35. Originally I wanted to use a CRT but a 17" CRT was simply too deep to facilitate clean work inside the cabinet. The display is coated with a panel of smoked glass which works out great, as I don't need a monitor bezel - all you see is the screen. The LCD panel is mounted to the original TV monitor shelf with plumbing strap and surrounded with black duct tape - again, totally invisible beneath the smoked glass. Awesome idea to the credit of whoever designed and built these cabinets to use the glass they did, the display couldn't have worked out better.
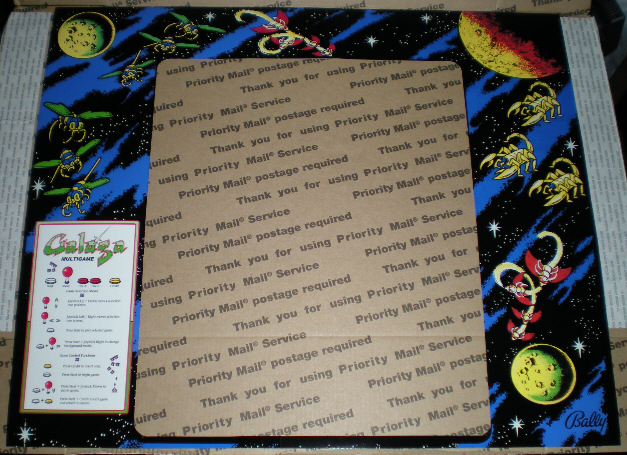
I designed a custom marquee
to be as close to the original arcade version as possible yet
unique to the cabinet.
"MULTIGAME" replaces "by MIDWAY" but doesn't look out of place.
I'm running Win98SE but I'm using DOS MAME v0.60 and the DOS build of Game Launcher as my front end. I tried things different ways but the current setup is what worked best and the cabinet is 100% solid. I ran the cabinet constantly for 36 hours without a single problem. A wireless mouse is used to load Game Launcher and also to shutdown the computer via a "Shutdown Windows98" icon on the desktop. Due to this, a keyboard isn't required for regular usage of the cabinet. However if I do need use of a keyboard (to edit a configuration file or something similar) I installed a PS/2 socket on the back of the machine that interfaces with the keyboard encoder / computer. That way I don't have to open the computer up to plug in a keyboard whenever I may need one. Along with the PS/2 socket I also installed a large pushbutton to turn the computer on. This is connected to the power pins of the mother board and works exactly the same as a power switch on a computer tower.
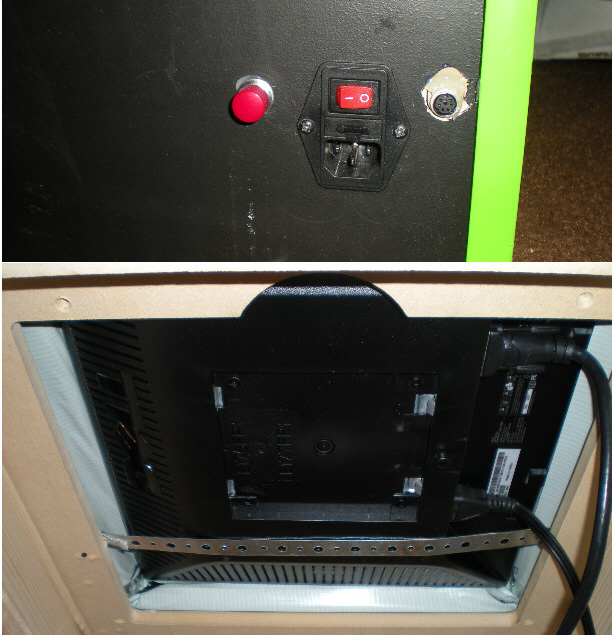
The back of the cabinet:
PC power, main power / power cord, PS/2 keyboard socket.
Underside of monitor:
a strap bridges the original CRT opening while two more straps secure it
across the top.
The marquee was custom printed from EMDKAY.net for $20.75 shipped. Turn around time was less than one week, no extra charge for custom size. I simply removed the original paper marquee and slid the new one in its place. However I sliced up my fingers pretty bad on the marquee glass without even realizing it. Actually there's a very small blood stain on the marquee from this incident however I seem to be the only person that sees it.
The display is absolutely as large as will fit in the cabinet and fills the display area nicely. It looks like there's a lot of space in a couple pictures but there really isn't. I ended up using the original speaker, just hardwired to the amp board out of a set of computer speakers instead of the original TV. It sounds great and provides full, rich sound.
The original "spinner"
was removed, the mounting hole widened, and a Start button installed
in its place. The
yellow button, originally used for menu, now functions as a credit button.
I really wanted to put a CRT in there all along but a 17" tube really did make the working environment in the cabinet too tight. I also got a little worried about having to beef up the monitor shelf with the added weight, which would kill the modular slide out design. The cabinet is built so that removing two screws allows the control panel runners (which run the entire length of the cabinet and support the bezel glass) to pivot down, allowing the smoked glass to be removed. Then two more screws are removed and then entire monitor shelf slides out. It's a pretty ingenious way to lock parts against one another and secure everything 100% with minimal fasteners. Considering not a single thing budged when finessing the cabinet in and out of the back seat of the car (not to mention hauling it two hours away), I'd say it's going to hold up for a long time.
I'm shocked the picture looks as good as it does considering I'm running DOS MAME on an LCD panel. I miss the scanlines but they just don't look right with the old MAME via LCD and the smoked glass does a good job of making up for it in the authentic display department. The fact that it weighs about a quarter of what the equivalent CRT would have is another big plus.
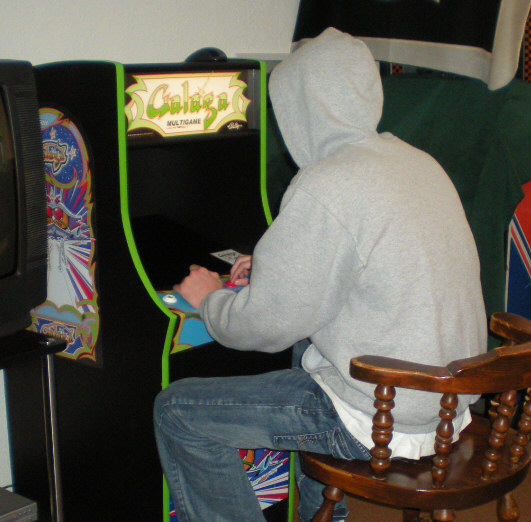
My brother gives the
cabinet a through play testing on the first night of its competition.
04/06/2010 - Final Adjustments
About a month after getting the cabinet up and running, I performed a few adjustments to the cabinet. This mainly consisted of tightening a few things on the control panel, making sure all the switches were contacting properly, things like that. I made a full backup of the MAME setup and put in the new instruction cards. I also moved the cabinet to the space that the Pole Position machine previously occupied. Lastly I decided to permanently install a floppy drive inside the cabinet for the purpose of easily backing up the high score directory.
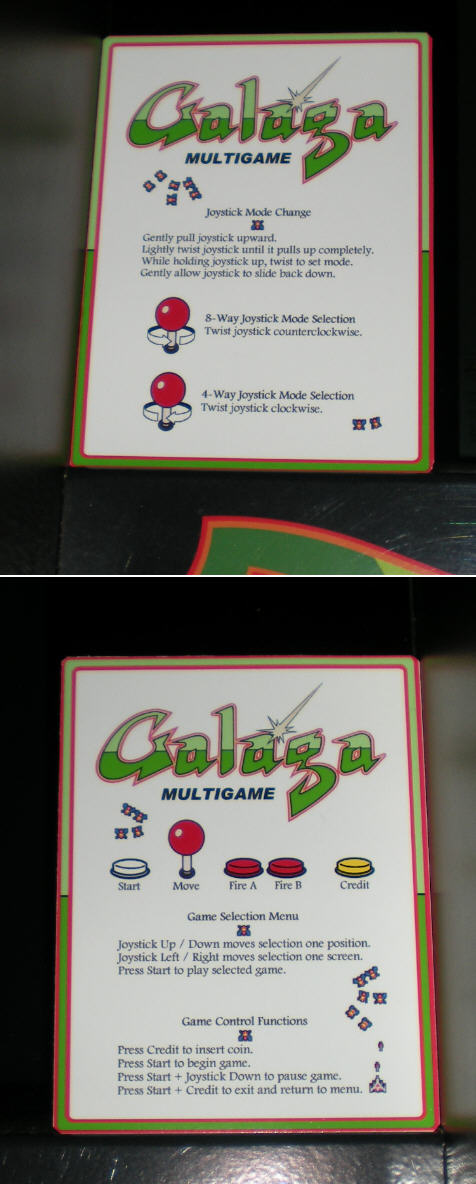
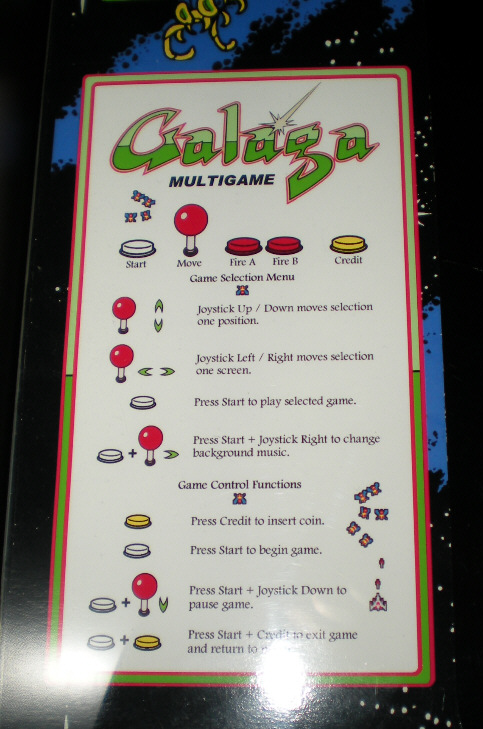
Although operation is
straightforward, these instruction cards fully explain everything.
Cable management was also something that needed to be taken care of. The last time I was out I ran out of cable clips so I wasn't able to tie everything down how I wanted. Cable management is something that is often overlooked with MAME cabinets but is very important to facilitate easy maintenance. It's even more important with this cabinet since everything is packed in so tightly. Proper cable management also keeps air moving freely inside so that components can run as cool as possible.
This is before the floppy
drive was installed. It was attached to the lower right side
between the cable for
the mouse receiver and the cable for the power button.
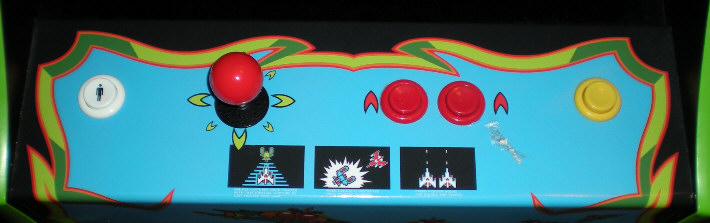
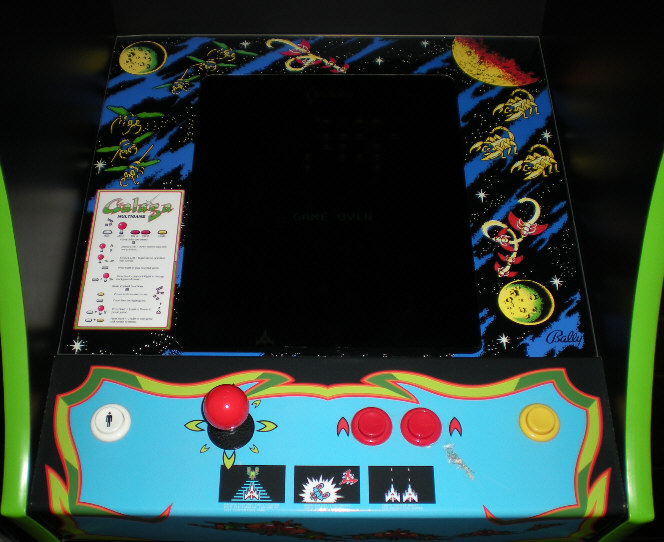
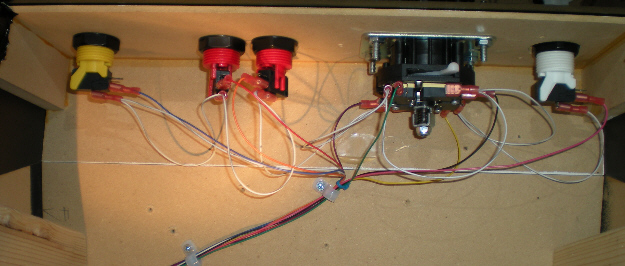
Revised control panel:
Start, Joystick, Fire 1, Fire 2, Credit. Holding Start and pressing
Credit exits to the game menu.
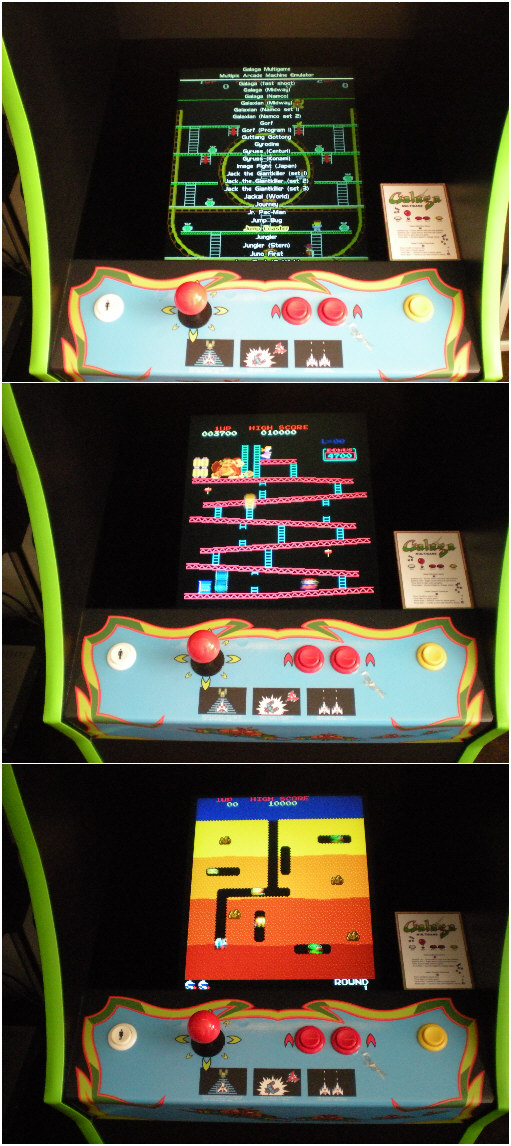
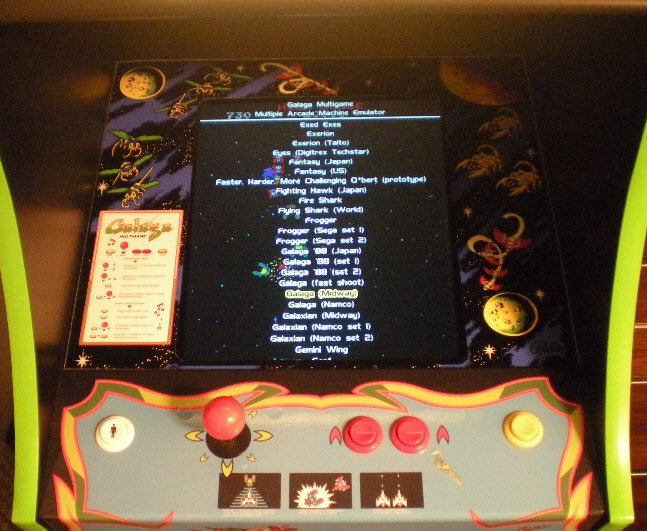
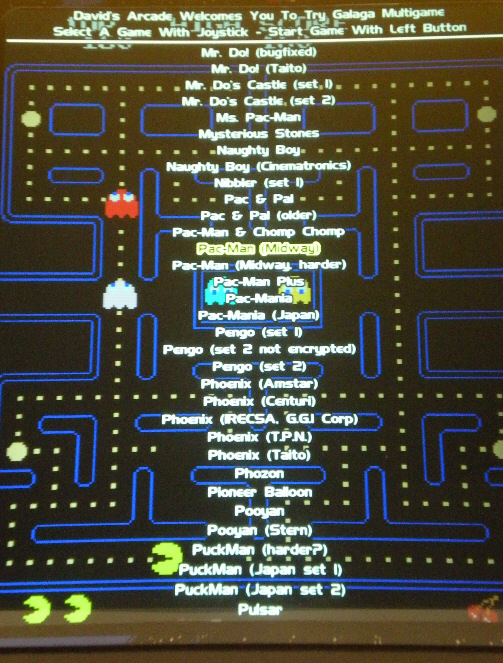
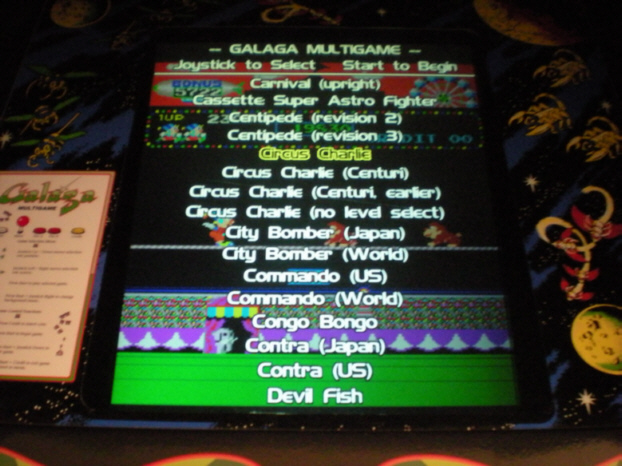
The cabinet plays over a hundred games under MAME v0.60. Here is the full list of the files along with their title names. Keep in mind that not all these are available from the menu as some games require alternate romsets to run. Only the romsets that are playable will be available from the menu.
1941 "1941 - Counter Attack (World)"
1941j "1941 - Counter Attack (Japan)"
1942 "1942 (set 1)"
1942a "1942 (set 2)"
1942b "1942 (set 3)"
1943 "1943 - The Battle of Midway (US)"
1943j "1943 - The Battle of Midway (Japan)"
1943kai "1943 Kai"
aerofgt "Aero Fighters"
aerofgtb "Aero Fighters (Turbo Force hardware
set 1)"
aerofgtc "Aero Fighters (Turbo Force hardware
set 2)"
amidar "Amidar"
arabian "Arabian"
arabiana "Arabian (Atari)"
argus "Argus"
astrob "Astro Blaster (version 3)"
astrof "Astro Fighter (set 1)"
bagman "Bagman"
bagmans "Bagman (Stern set 1)"
bagmans2 "Bagman (Stern set 2)"
blueprnt "Blue Print (Midway)"
bnj "Bump 'n' Jump"
bombjac2 "Bomb Jack (set 2)"
bombjack "Bomb Jack (set 1)"
brubber "Burnin' Rubber"
btime "Burger Time (Data East set 1)"
btime2 "Burger Time (Data East set 2)"
btimem "Burger Time (Midway)"
centipd2 "Centipede (revision 2)"
centiped "Centipede (revision 3)"
circusc "Circus Charlie"
circusc2 "Circus Charlie (no level select)"
circuscc "Circus Charlie (Centuri)"
circusce "Circus Charlie (Centuri, earlier)"
citybmrj "City Bomber (Japan)"
citybomb "City Bomber (World)"
commando "Commando (World)"
commandu "Commando (US)"
congo "Congo Bongo"
contra "Contra (US)"
contraj "Contra (Japan)"
csuperas "Cassette: Super Astro Fighter"
devilfsh "Devil Fish"
digdug "Dig Dug (set 1)"
digdug2 "Dig Dug II (New Ver.)"
digdug2o "Dig Dug II (Old Ver.)"
digdugb "Dig Dug (set 2)"
disco "Disco No.1"
dkong "Donkey Kong (US)"
dkong3 "Donkey Kong 3 (US)"
dkong3j "Donkey Kong 3 (Japan)"
dkongjo "Donkey Kong (Japan set 2)"
dkongjp "Donkey Kong (Japan set 1)"
dkongjr "Donkey Kong Junior (US)"
dkongjrj "Donkey Kong Jr. (Japan)"
docastl2 "Mr. Do's Castle (set 2)"
docastle "Mr. Do's Castle (set 1)"
dspirit "Dragon Spirit (new version)"
dspirito "Dragon Spirit (old version)"
elecyoy2 "The Electric Yo-Yo (set 2)"
elecyoyo "The Electric Yo-Yo (set 1)"
exedexes "Exed Exes"
exerion "Exerion"
exeriont "Exerion (Taito)"
fantasy "Fantasy (US)"
fantasyj "Fantasy (Japan)"
fhawk "Fighting Hawk (Japan)"
fireshrk "Fire Shark"
frogger "Frogger"
frogseg1 "Frogger (Sega set 1)"
frogseg2 "Frogger (Sega set 2)"
fshark "Flying Shark (World)"
galag88b "Galaga '88 (set 2)"
galag88j "Galaga '88 (Japan)"
galaga "Galaga (Namco)"
galaga88 "Galaga '88 (set 1)"
galagads "Galaga (fast shoot)"
galagamw "Galaga (Midway)"
galaxiaj "Galaxian (Namco set 2)"
galaxian "Galaxian (Namco set 1)"
galmidw "Galaxian (Midway)"
gemini "Gemini Wing"
gorf "Gorf"
gorfpgm1 "Gorf (Program 1)"
grobda "Grobda (New version)"
gutangtn "Guttang Gottong"
gyrodine "Gyrodine"
gyruss "Gyruss (Konami)"
gyrussce "Gyruss (Centuri)"
imgfight "Image Fight (Japan)"
intrepid "Intrepid (set 1)"
invaddlx "Space Invaders Deluxe"
invaderl "Space Invaders (Logitec)"
invaders "Space Invaders"
invadpt2 "Space Invaders Part II (Taito)"
jack "Jack the Giantkiller (set 1)"
jack2 "Jack the Giantkiller (set 2)"
jack3 "Jack the Giantkiller (set 3)"
jackal "Jackal (World)"
jackalj "Tokushu Butai Jackal (Japan)"
journey "Journey"
jrpacman "Jr. Pac-Man"
jumpbug "Jump Bug"
jumpcoas "Jump Coaster"
jungler "Jungler"
junglers "Jungler (Stern)"
junofrst "Juno First"
junofstg "Juno First (Gottlieb)"
kangaroa "Kangaroo (Atari)"
kangaroo "Kangaroo"
kikikai "KiKi KaiKai"
ladybug "Lady Bug"
lnc "Lock'n'Chase"
locomotn "Loco-Motion"
looping "Looping (set 1)"
loopinga "Looping (set 2)"
lwings "Legendary Wings (US set 1)"
majest12 "Majestic Twelve - The Space Invaders
Part IV (Japan)"
mappy "Mappy (US)"
mappyj "Mappy (Japan)"
mikie "Mikie"
mikiehs "Mikie (High School Graffiti)"
mikiej "Shinnyuushain Tooru-kun"
milliped "Millipede"
monsterb "Monster Bash"
mooncrsa "Moon Cresta (Nichibutsu, old
rev)"
mooncrsg "Moon Cresta (Gremlin)"
mooncrst "Moon Cresta (Nichibutsu)"
moonqsr "Moon Quasar"
mrdo "Mr. Do!"
mrdofix "Mr. Do! (bugfixed)"
mrdot "Mr. Do! (Taito)"
mspacman "Ms. Pac-Man"
mystston "Mysterious Stones"
naughtyb "Naughty Boy"
naughtyc "Naughty Boy (Cinematronics)"
nibbler "Nibbler (set 1)"
pacman "Pac-Man (Midway)"
pacmania "Pac-Mania"
pacmanij "Pac-Mania (Japan)"
pacmod "Pac-Man (Midway, harder)"
pacnchmp "Pac-Man & Chomp Chomp"
pacnpal "Pac & Pal"
pacnpal2 "Pac & Pal (older)"
pacplus "Pac-Man Plus"
pengo "Pengo (set 1)"
pengo2 "Pengo (set 2)"
pengo2u "Pengo (set 2 not encrypted)"
phoenix "Phoenix (Amstar)"
phoenix3 "Phoenix (T.P.N.)"
phoenixa "Phoenix (Centuri)"
phoenixc "Phoenix (IRECSA, G.G.I Corp)"
phoenixt "Phoenix (Taito)"
phozon "Phozon"
pooyan "Pooyan"
pooyans "Pooyan (Stern)"
puckman "PuckMan (Japan set 1)"
pacman "Pac-Man (Midway)"
puckmana "PuckMan (Japan set 2)"
puckmod "PuckMan (harder?)"
pulsar "Pulsar"
qbert "Q*bert (US)"
qbertjp "Q*bert (Japan)"
qbertqub "Q*bert's Qubes"
qix "Qix (set 1)"
qixa "Qix (set 2)"
qixb "Qix (set 3)"
raiden "Raiden"
retofinv "Return of the Invaders"
roadf "Road Fighter (set 1)"
roadf2 "Road Fighter (set 2)"
rocnrope "Roc'n Rope"
rocnropk "Roc'n Rope (Kosuka)"
route16 "Route 16"
sbagman "Super Bagman"
sbagmans "Super Bagman (Stern)"
scobra "Super Cobra"
scobras "Super Cobra (Stern)"
scontra "Super Contra"
scontraj "Super Contra (Japan)"
scramble "Scramble"
scrambls "Scramble (Stern)"
scregg "Scrambled Egg"
sectrzon "Sector Zone"
seicross "Seicross"
shollow "Satan's Hollow (set 1)"
shollow2 "Satan's Hollow (set 2)"
sindbadm "Sindbad Mystery"
sinista1 "Sinistar (prototype version)"
sinista2 "Sinistar (revision 2)"
sinistar "Sinistar (revision 3)"
skyadvnj "Sky Adventure (Japan)"
skyadvnt "Sky Adventure (World)"
skyadvnu "Sky Adventure (US)"
skyfox "Sky Fox"
skylancr "Sky Lancer"
skyshark "Sky Shark (US)"
smooncrs "Super Moon Cresta"
sonofphx "Son of Phoenix"
sqbert "Faster, Harder, More Challenging
Q*bert (prototype)"
ssi "Super Space Invaders '91 (World)"
starforc "Star Force"
stinger "Stinger"
stinger2 "Stinger (prototype?)"
superpac "Super Pac-Man"
superpcm "Super Pac-Man (Midway)"
sxevious "Super Xevious"
szaxxon "Super Zaxxon"
tankbatt "Tank Battalion"
tazmania "Tazz-Mania"
terracra "Terra Cresta (YM2203)"
terracrb "Terra Cresta (YM3526 set 2)"
terracre "Terra Cresta (YM3526 set 1)"
theend "The End"
tigerhb1 "Tiger Heli (bootleg 1)"
tigerhb2 "Tiger Heli (bootleg 2)"
timeplt "Time Pilot"
timepltc "Time Pilot (Centuri)"
todruaga "Tower of Druaga (New Ver.)"
todruago "Tower of Druaga (Old Ver.)"
tokiob "Tokio / Scramble Formation (bootleg)"
tp84 "Time Pilot '84 (set 1)"
tp84a "Time Pilot '84 (set 2)"
triplep "Triple Punch"
turpin "Turpin"
turtles "Turtles"
tutankhm "Tutankham"
tutankst "Tutankham (Stern)"
twinbee "TwinBee"
twincobr "Twin Cobra (World)"
twincobu "Twin Cobra (US)"
uniwars "UniWar S"
upndown "Up'n Down"
upndownu "Up'n Down (not encrypted)"
vulgus "Vulgus (set 1)"
vulgus2 "Vulgus (set 2)"
vulgusj "Vulgus (Japan?)"
warpwarp "Warp & Warp"
wiz "Wiz"
xevious "Xevious (Namco)"
xeviousa "Xevious (Atari set 1)"
zaxxon "Zaxxon (set 1)"
zaxxon2 "Zaxxon (set 2)"
zzyzzyx2 "Zzyzzyxx (set 2)"
zzyzzyxx "Zzyzzyxx (set 1)"
Everything runs 100% with the exception of City Bomber and Raiden which run slow and Zzyzzyxx which runs inconsistently, however Zzyzzyxx runs inconsistently on about everything from what I've seen. The PC specs are similar to what was in Pole Position DX since that's where most of the parts came from, however I did triple the RAM...
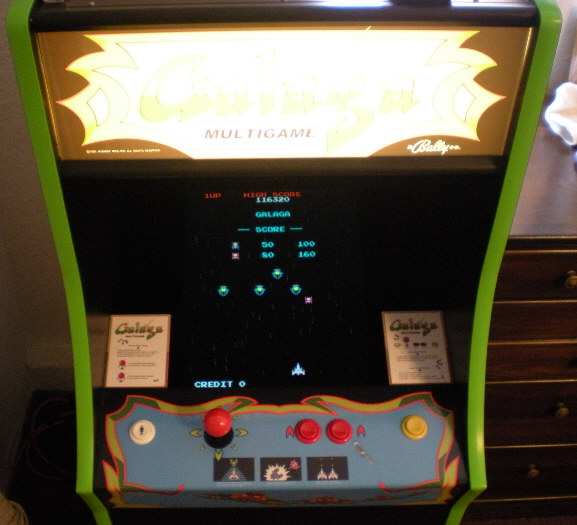
Running the cabinet's
premiere game.
I am totally pleased with how this project turned out. Without a doubt it is one of the finest MAME cabinets I have ever known of. If it wasn't for all the time working on the Pole Position MAME cabinet I probably would have never been able to do such a solid job on this one.

Galaga Multigame inhabits
the same space that
Pole Position DX did,
although it takes up far less of it.
The cabinet gets constant usage and has proven to be stable. I look forward to playing it each and every time I visit my parents and plan on moving it to my residence once space allows. While the cabinet is much smaller than a standard size machine, it still provides full functionality and full size controls. The control panel height is perfect for sitting at the cabinet in a chair. At this point there are no further changes or updates planned as the cabinet is pretty much completely finished.
07/24/2010 - RAM Upgrade And Harness Rebuild
Three months had passed since wrapping up the project and the cabinet continued to perform without any problems. Usage dropped off a little due to the increasing temperatures in the Central Valley but cooler temperatures at night allowed some play time. Back in Silicon Valley, while throwing out some trash, I spotted a large CRT monitor on the ground next to the dumpsters. Upon disposing of my trash I noticed a beat up computer tower down in the empty dumpster. Being an electronics picker by nature, I rescued the tower and gave it a look over. The hard drive had been removed and the casing and power supply were pretty beat up, but everything else looked fine. I went back up to my apartment, grabbed a screwdriver and returned to the trash area. I disassembled the computer, inspecting each board to see if it was anything worthwhile. After about ten minutes of disassembly I ended up with a few decent older computer components and returned the rest to the trash. I took the sound card, a value edition Sound Blaster Live! - nothing incredible but a sound card is a sound card and I have experience figuring out the driver scheme for this series. Additionally I grabbed the motherboard, complete with a 600MHz Pentium III and 384MB of RAM. I honestly don't have much use for the motherboard and processor but I couldn't pass it up. However the 128MB RAM sticks would provide a nice and free upgrade to the Galaga cabinet.
Granted, the motherboard and processor I recovered are almost twice as fast as the setup currently in the Galaga cabinet but I have no idea how stable they run. The set up as I have it now is nearly bulletproof and I don't want to trade that away for anything. The Pentium II that powers Galaga Multigame provided years of outstanding service in the Pole Position MAME cabinet before it and the motherboard has a small profile that makes it fit perfectly along with the other components. Upgrading the RAM from 128MB to 384MB on the other hand has done nothing but give the cabinet a little more breathing room. Games like City Bomber and Zzyzzyxx are now much more stable and Galaga '88 has lost nearly all of its bad tendencies (still a hair of audio stutter during the Galactic Dancin' stages). Raiden still plays very slow but Aero Fighters and Majestic Twelve are absolutely solid now. Again, the big thing is it gives some breathing room to games that worked fine with the original 128MB of RAM.
The other thing that had been weighing on my mind was the haphazard way I assembled the control panel harness. See, originally when I was converting the cabinet over to MAME from the Jakks TV Games configuration, I was very clean with my control panel wiring. I had two Ultimarc I-PAC encoder boards that I purchased, each one from a different era in production. The I-PAC is basically a controller interface that translates arcade controls input into keystrokes that the computer and emulator can easily understand. I put one in the Pole Position cabinet (for a planned upgrade that I ended up not going through with) and used the other for Galaga Multigame. When I went to test out the control panel on Galaga Multigame I was getting nothing on Fire 1 and having problems with the shift function, used to give a secondary control function to each button. In the case of Galaga Multigame the shift button is Start. This is used to exit a game to the menu by holding Start + pressing Credit. None of this was working right, even after troubleshooting the problem by moving things around (buttons, switches, wires, connection points on the I-PAC) I wasn't making any headway. Additionally the button configuration utility was seeming to have problems communicating with the I-PAC and retaining configuration settings. At this point my control panel was pretty hacked up. Eventually I reached up in the Pole Position cabinet, pulled the other I-PAC encoder out, quickly wired it up in Galaga and tested it out. It worked correctly and the button configuration utility worked fine with it. It seemed the other encoder was bad so I packed it away to work on later and finished wiring up the Galaga control panel. As I had burned about three hours messing around with the encoders at this point, I rebuilt my control panel wiring harness as fast as I could. I was tired of messing around with the interface, it was working now, my quickly assembled harness was decent, I was ready to move on to something else. That messy harness worked fine but it was always in the back of my mind as something that needed to be replaced, if anything then as preventive maintenance.
Since I was going to head out to upgrade the RAM I figured I'd rebuild the harness as well. The main problem was wire length. There simply wasn't enough in between each quick disconnect on the ground line and far too much between the encoder and each switch. I also wanted to flow a little solder into each quick disconnect in addition to crimping them. In arcade machines and MAME cabinets connections are everything. That simply cannot be stressed enough. Without solid connections on your control panel you'll have all kinds of problems and will spend more time working on your controls than using them to play games. The first thing I did was remove all the connections and flow solder into each quick disconnect, replacing and recrimping those that I wasn't comfortable with. Then I threw away the original ground line and got to work and building a new one. I put even distance between each daisy chained quick disconnect on the ground line and made sure that distance was enough to allow comfortable space for connection. I then parted the lines to the encoder into two bundles - one with the ground, Credit, Fire 1 and Fire 2 and the other with each joystick direction and Start. I could have combined everything into a single bundle as with a standard arcade harness but since I was only using one color of wire I figured splitting them would make any future work easier.
The new harness at the
control panel. Each connection is clean and the ground line has plenty
of space between each
connection, this allows easy access for button work or replacement.
Connections at the encoder
are far cleaner now as well. This makes it a lot easier to tell what
is connected where.
I then kept the bundles together with a series of zip ties every couple inches. After pulling the wires over to the encoder I then cut them down to size so they would perfectly reach their connection points. I still left just enough slack so I could work on the lines at a future time if required but still kept the wire length to a minimum. This also got the length of each wire pretty consistent. I actually ended up removing about three total feet of excess wire between all the connections over the old setup, there really was a lot of waste before. Each bundle was then secured to the cabinet with cable clips.

Full shot of the cabinet
inside with the monitor / monitor shelf removed.
After reassembly I have a lot more piece of mind that the control panel is now solid and should be trouble free. A solid hour of playing Time Pilot was testament to that. In a couple months the cabinet will be making a trip back to Silicon Valley as I will have the space to bring it back home. I may temporarily beef up how the power supply is secured with some plumbing strap for the journey back, same thing with the floppy drive, since the cabinet will have to make the trek on its back - not to mention climb a flight of stairs. Everything else should be okay, the power supply being essentially upside down for two hours on the drive is the only thing I think I need to take precaution against. I was also thinking about installing a couple of cooling fans on the vented back door but that can wait until I have the machine back here.
10/31/2010 - Change Of Plans
Due to a few issues I was unable to move the cabinet back home. In fact that will have to wait until sometime in the early Spring of 2011. Disappointing but not a huge deal. In the mean time I performed the usual maintenance on my visits out to the machine. Last time out upon bootup the motherboard caught a bunch of errors. It turned out that the onboard battery had died, wiping out all the motherboard settings which caused problems all over the place. After about an hour of resetting everything I got the settings restored to how they were before. The motherboard is pretty old and it had been years since I had to go through the setup options, which is why it took so long. After replacing the battery and getting the settings restored it was smooth sailing from then on. I played a few games of Gyruss and it was time to go. However I did take a couple more pictures of the marquee illuminated since I realized that I hadn't posted many here. These pictures are actually from a couple months before this update.
The cabinet powered up
with some back lighting. Pooyan is always a popular choice.
The marquee at an angle.
I'm still really pleased with how it turned out and as
I've said before, it
really brought everything together.
With the recent system restore repairs that should be the last of the updates unless a problem creeps up. Sometime early next year when I move the machine back to my residence I'll post another update as well - hopefully the journey will be uneventful.
02/20/2011 - Game List Expansion, Update To Galaga Multigame v2.0.5
A few months of some underlying issues rolling around in my mind finally built up to the eventual solution. Reading over entries at various online arcade game databases, watching some youtube videos and just my general tinkering around in MAME lead me to realize there were some games I was missing. A few games such as Gaplus, Valkyrie no Densetsu and Dr. Micro don't seem to work under MAME v0.60 but there were many other great titles that do work that I forgot to add. Son of Phoenix, Disco No. 1, Astro Blaster and Kiki Kaikai come to mind as games I really enjoy but forgot to add to the cabinet's lineup originally. All in all, I added about a dozen or so games to the listing along with their matching screenshots and a couple missing audio samples. The game list further up this page has now been updated to reflect the game listing as it is now. If there's one thing that this last update added, it was a lot of variety.
Another problem that came up a long time ago was the background audio in GameLauncher. See, GameLauncher allows the use of an MP3 playlist to play audio files in the background when browsing the game list. Originally I had this set up but the audio was prone to getting garbled, skipping songs, and actually prevented the frontend from loading at one point. Browsing around issues people had with GameLauncher lead me to to the problem - MP3 files with variable bitrates. It seems due to the age of GameLauncher it doesn't handle variable bitrate audio files. So I went through my playlist, removed all the files that were variable and ripped fresh MP3's of the files that needed to be replaced. Additionally I changed out my original audio mix, removing almost all of the 1970's and 1990's songs. I went through various top 80's music lists as well as what songs were at the top of the Billboard 100 each year during the decade. (Not to mention the entire Pac-Man Fever album) I ended up with a couple hundred songs and then ran the playlist through a randomizer and repeated three times. This gave me a playlist file that was three different randomized sets of the original playlist. After reactivating the playlist function in GameLauncher everything worked fine without a single problem. This means when a game isn't being played on the cabinet it acts as an automatic jukebox, all great music. It's also a nice filler while browsing the menu.
With the game list update and the audio fix, I created what I call the version 2.0.5 setup of the cabinet. At this point, with all the loose ends tied up, I'd say I'm done with working on the software side. The possibility of adding more songs to the playlist will always be there but as things are now, I'm pretty happy with the setup as it is. Also over the course of two days the cabinet ran rock solid.
03/13/2011 - Bezel Printing
For a long time I've envisioned making an overlay bezel to cover up the expanse of black around the visible area of the screen. Although the monitor itself is pretty much as big as I can go, especially in a vertical orientation, the smoked glass makes it appear as if there's a bunch of wasted space in the cabinet. This makes the monitor look smaller than it is. When playing a game it's not bad at all because the monitor is quite large and is actually over scale compared to the size of the cabinet. However the cabinet over all really does look a tad bit odd with all that black glass. Bezel graphics would take up the empty space the same way they do on stock arcade cabinets. There really isn't much empty space anyway, as became more apparent when designing the bezel - not a ton of space to work with.
I wanted to base the bezel off an original Galaga bezel to tie into the design of the cabinet. I also wanted to integrate the instruction cards into the bezel and consolidate them into one. The only high resolution Galaga bezel to be found online is a scan of a damaged bezel that was scanned in pieces and then stitched together. In addition to the original bezel damage and wear, the scan also had some big color matching problems between the different parts. I used this as a starting point and over a few weeks I was able to not only resize and modify the bezel for my cabinet size but also fix the damage and color problems. It's not perfect by any means but it does look pretty spectacular. I had planned on using an online printer to print the bezel for me but the job was declined by a few sources. I have a local place in mind but decided to attempt to print it myself first, using gloss photo paper and a high end printer. I had to print the bezel as four pieces so that I could use normal sized paper but it still came out really nice.
The printed bezel art,
protected and ready for transport and installation.
I made sure that the bottom overlapped the top so that the white edge of the paper wouldn't be visible where the sheets would meet. The only place where size compression really came into play was at the top. The invader swirl up there as well as the first squadron of dragonflies were squished down a little but it doesn't look out of place, especially given the pitch of the bezel glass. I was careful to keep deformations to a minimum, in other words if something had to be stretched or compressed it wouldn't effect the rest of the artwork. The moons and planet were originally compressed down and then later stretched back out to make them round once more. The screen edges are the exact rounded pitch of the original, after resizing the original corners were brought into the modified image to retain their proper aspect. Working out all the damage of the original scan took a long time as well. There was quite a bit of missing paint and scratches that needed to be worked out. Some of the scratches I left in place to lend a little authenticity but I fixed nearly all the missing paint and scan artifacting. I also had to redraw a couple of the dragonfly wings and completely overhaul the Bally logo in the lower right. Color matching was another adventure in itself but I think it came out really nice. The original scan had many different shades of the blue / purple streaks as well as non matching colors on the invaders. I cleaned all that up.
I'll be installing the bezel art next week. I plan on setting it atop the current black glass and then setting a sheet of plexiglass atop that. This should keep everything in place and protected yet allow easy removal for glass cleaning. At this point I don't think I'll need to secure the plexiglass but if that becomes and issue I'll think of a fix when I get to that point.
03/26/2011 - Bezel Installation, Artwork Completion, Finishing Touches
Transporting the bezel art to the cabinet, while adventurous due to heavy rain, was completed without issue. I purchased a piece of clear plexiglass and cut it to the size of the visible part of the original smoked glass. I then set the printed bezel atop the smoked glass and rested the plexiglass atop it. The slope of the cabinet, the ridge created by the control panel, and weight of the plexiglass all work together to keep the plexi from sliding away. This keeps the bezel artwork protected and honestly you can't even tell there's something resting atop the cabinet, it all looks like one piece. The key to this was cutting the plexiglass to the perfect size so it would lock together when resting atop the smoked glass. In fact the only way to remove the plexiglass for cleaning is to catch it on the top edge with something small like a thin screwdriver and lift it out.
The printed bezel art,
installed and protected beneath a sheet of plexiglass.
With the bezel installed the cabinet display looks much larger, due to all the empty black space being taken up by beautiful bezel artwork. The older instruction cards have been combined into one and moved over to the left side, tied in with the artwork and printed on the same sheet. Additionally I added visual representations of each control function, again making the cabinet as easy to use as possible. Information regarding rotating the joystick to change between 4-way and 8-way mode was removed from the instruction card due to never really being used.
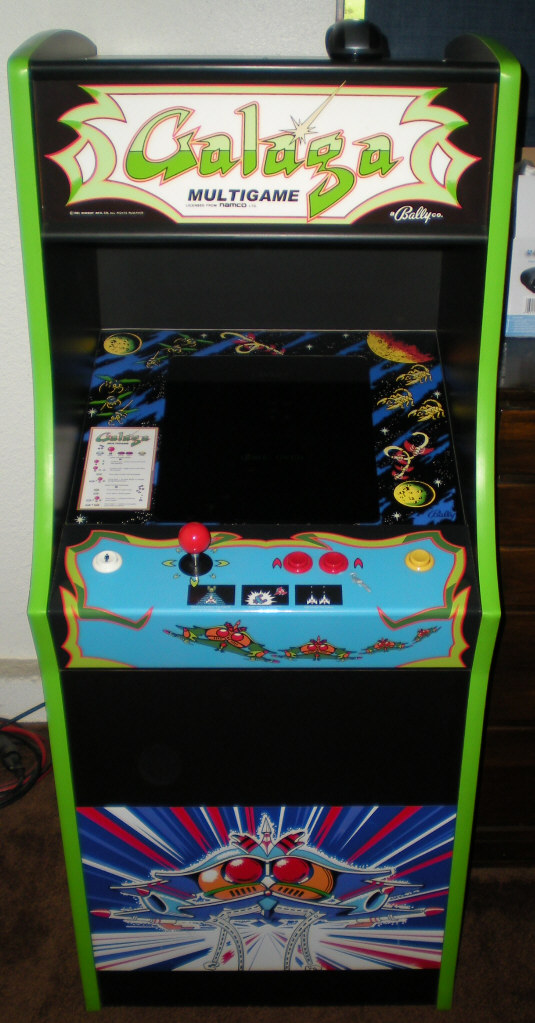
With the bezel artwork
in place, the cabinet really does look like a miniature stock Galaga cabinet.
Looking down into the
cabinet from the proper viewing angle.
In addition to installing the bezel I also added over another hundred songs to the background music jukebox that plays at the game selection screen. Three more games were added as well - Eyes, Levers, and Pioneer Balloon. That should round out the game listing for the foreseeable future. Before working on this cabinet I didn't have much experience with the old Rock-Ola games but these days they're some of the titles I play most.
GameLauncher has proven
to be a solid frontend, both for performance and ease of use.
I'll have to say that this project has come a very long way from its humble beginnings. I can actually remember at one point early on doubting if I should convert it to MAME. I was actually going to keep it as a hacked Jakks Pacific TV Games cabinet. There was just something about the charm and quality and simplicity of it. However as with the Pole Position conversion, the more small steps I took toward making it into a MAME cabinet, the more confidence I had that it would turn out great. I still really enjoy the charm of the original concept but at this point I wouldn't trade this machine away for anything.
A one of a kind project
comes to an amazing conclusion.
I did catch one problem when working on the cabinet this last time however. I was attempting to relocate the audio amplifier and ended up blowing it out. I had to make a quick dash to the local office supply store and purchase a cheap set of computer speakers to salvage another amp out of. Ironically the set of speakers I bought was the same kind that I used in the old Pole Position MAME cabinet years ago. The new amplifier isn't as nice as the one I had in before but for these old games through a single speaker, there really isn't much difference. So all that remains really is to transport this thing home when I relocate in a few months. After that it can go into regular service and I'm sure I'll put many hours into playing games on it.
Remember, I'm still looking for information on who made the original cabinets. I don't want this to sound like it's an America's Most Wanted bulletin or something but there has to be more of these cabinets out there somewhere. There are two more at the location where I got mine from, one a Pac-Man and another Galaga. They are both in original condition, still running a Jakks Pacific TV Games joystick connected to arcade controls and a small television. The Galaga one is using the Ms. Pac-Man plug and play while the Pac-Man is using the Super Pac-Man plug and play. Both these cabinets are in good shape and were recently given another look over and some minor service by me. These are the two cabinets that I repaired in exchange for receiving the Galaga cabinet to convert. Since the cabinets each had a letter of the phonetic alphabet written on their interior panels, I'm still assuming that someone manufactured these in small batches. My Galaga is marked "Golf" and the other Galaga is marked "Hotel" with Pac-Man marked "Charlie." This would lead one to assume that the Pac-Man is the third built, my Galaga is the seventh and the other Galaga the eighth. Since the cabinets all have the same shape except for the control panel layout, I'm going to assume they all came from the same template. If you have any information on these, please contact me via the e-mail link at the bottom of the page.
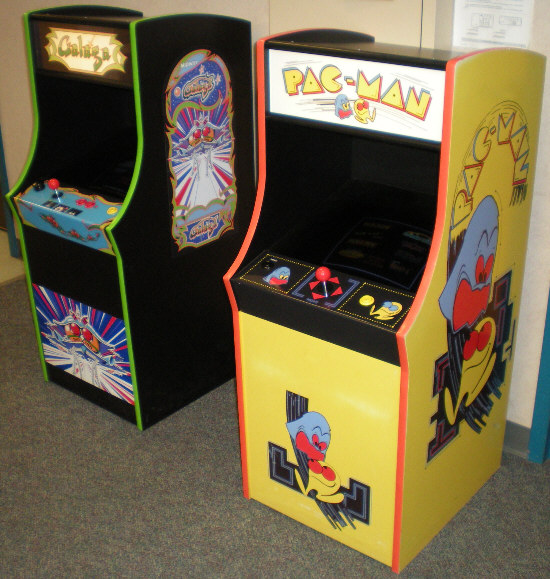
The other Galaga cabinet
and the Pac-Man cabinet at the location where I received my Galaga from.
Although this project is pretty much wrapped up, any additional work on the cabinet will still show up here. Essentially this will now move to being a repair log from this point forward as I'm considering the cabinet to be complete. If anyone has any general questions or comments, as always, please contact me via the e-mail link at the bottom of the page.
02/28/2012 - Almost A Year Later, Basic Improvements Throughout 2011
Although in March of 2011 I finished the cabinet, more or less, there was still some work to be done. Most importantly the quick and dirty audio amplifier I replaced the original with really wasn't all that great. I messed up the original amplifier board due to being stupid, plain and simple. Relocating the volume adjustment to the front of the cabinet was a dumb idea and it's completely unnecessary. See, once the base audio volume is adjusted with the volume dial on the amplifier it can be fine tuned with the Windows volume control panel. Additionally if a game is too loud or too quiet it can be adjusted in MAME via the audio settings. On my cabinet this hidden adjustment is triggered by holding down Start and pressing up on the joystick. Then the in-game volume can be adjusted by pressing left or right on the joystick and holding Start and pressing the joystick up again closes out the adjustment.
I use the term audio amplifier like it's some specialized piece of equipment but really all I'm talking about is the amplification circuit out of a pair of computer speakers. The cheapy amp from the speakers from the office supply store really wasn't cutting it. At the spectacular (if you're into sourcing and scraping electronics components) Silicon Valley Electronics Flea Market I was able to find nice set of PC speakers for something like $12.00 - roughly half the price of the garbage ones from the office supply store. The gentleman I bought the speakers from seemed a little apprehensive when I explained to him I would be disassembling the speakers as I packed them away after paying. Thankfully the speaker housing was easy to remove. I swear, one of the most difficult things to disassemble is a set of PC speakers, there's usually a ton of hot glue anchoring the amplifier board to the speaker. Once free, I did a little rework on the board, hardwiring the Galaga cabinet speaker leads to the board. The sound from the new amp is excellent, much more full and rich than the cheapy amp. It might even sound slightly better than the amplifier I was using originally. Although I scrapped the speaker housings I did keep the speakers themselves for possible use in something else later on down the line.
Sometime in June I embarked on another retrofit that I had been planning for a long time. For as versatile as the Ultimarc Mag-Stik Plus joystick is, the stock microswitches that it comes with are pretty terrible. They have a clunky motion, require a very hard press, and have a tendency not to provide consistent performance. Problem is that the microswitch actuators for the joystick are shorter and wider than most common stock joystick microswitch actuators. The solution I came up with was to transplant the Mag-Stik actuators to my preferred microswitches, the standard Zippy microswitch that I swear by. However the cheapy microswitches that come stock are riveted together, making removing the actuators somewhat of a pain. I ended up crushing the stock microswitch housings in a vise to get the actuators out. Transplanting them into the easily opened Zippy microswitches was painless as was reinstallation into the Mag-Stik. One comment I do have for Ultimarc is that the screw threads on the base of the Mag-Stik that anchor the microswitches should either be machined metal inserts or sturdier plastic as they strip out really easily. After replacing the microswitches the joystick functionality is MUCH smoother and more responsive. As a plus when the microswitches wear out it will be far easier to transplant the actuators.
After getting the joystick switches all updated and squared away I decided to yet again rebuild the control panel harness. Although the most recent rebuild was critical in getting the wiring organized, I really wanted to use more flexible wire and color code the whole thing. So once again I pulled the harness out and rebuilt it start to finish. This time I also used insulated quick disconnects as the clearances are a little tight and also it's just more standardized.
Cleaner and more standardized
control panel harness and connections.
Connection at the I-Pac
is clean with excess wire length kept to a minimum.
With that final wiring clean up I decided to go through all the connections in the cabinet. I made sure everything was secured and that the cable management was as efficient as possible. Even though the cabinet is quite small there is an amazing amount of space in the bottom due to how clean I have everything spaced out and anchored down. The amount of internal space is the reason I originally thought I could fit a large CRT in the cabinet. Unfortunately the monitor neck of the size I would like to use would come into contact with the back of the cabinet, not to mention the extra space the CRT bezel would take up.

The monitor shelf and
glass has been removed in the picture above. The cables hanging down
to the
right are the power and
VGA connection for the monitor. The audio amplification board can
be seen to the left.
Speaking of the monitor, another change had to be made. The default resolution setting that GameLauncher likes to use for the vertical menu setup was one that the monitor I was using really didn't agree with. Due to this you could see a little flickering line here and there across the display when on the menu. I ended up changing the menu resolution to an optimal resolution for the monitor which made the problem go away. This makes the game list text a lot smaller but the background screen shots show more detail. I suppose I could simply change the font size in the GameLauncher options to get the larger text back but it wasn't a concern. Actually, thinking about it, next time I'm out where the machine is I think I'll increase the font size since I'm not crazy about how huge it makes the list look on the screen. It makes it look too computer like since you have to scan and read instead of just "look" and the games you can play. Small bites of information are easier on us than huge amounts. Once I try some different font sizes I'll do a comparison picture.
Running at a native resolution
on the menu makes everything a lot clearer but the text is a lot smaller.
It didn't even occur
to me at the time I could simply set the font to be bigger, which I'll
soon do.
One last thing since I got a request for it and never took a close up picture, the instruction card on the bezel is an extremely simplified and condensed version of the dual instruction cards I used at an earlier time.
It looks like a lot of
information but since cabinet usage is very intuitive the
instruction card is really
more of a source of reference.
So that's about it up until this point. As for usage there hasn't been a single problem with the cabinet. Unfortunately I was unable to relocate the machine to my residence due to a number of things but it's doing fine in its current home.
08/05/2013 - Playing Catch Up, Mouse Elimination, Air Circulation
It's been over a year since last update but there have been many subtle things done to the cabinet over the past year. First and foremost I set up a new shift button function that is to remain hidden to anyone other than myself or someone starting up the cabinet. My goal was to remove the need for a mouse for basic start up and shutdown. A mouse isn't needed for anything beyond that so why not try to eliminate it completely? I played around with using batch files to start up MAME and shut down the computer but Windows really wants a few moments to get settled before running a program. Additionally the computer seems to like a couple moments to get settled after exiting MAME before the shutdown icon is clicked. The answer was to set up the "Fire 2" button to act as pressing "Enter" on the keyboard as a shifted function. With this setup, after the computer boots the joystick is used to select the icon that loads GameLauncher, then the "Start" button on the control panel is held to activate control shift, then "Fire 2" is pressed to act as "Enter." This loads up GameLauncher without a mouse. As this combination should never be entered during gameplay or usage, and even if it was it wouldn't hurt anything, it's a great solution. On the flipside, after exiting GameLauncher the joystick is used to select the shutdown icon and the same control panel command is given to click on it, shutting the cabinet off properly. With this simply remedy the mouse is no longer needed for regular game usage and since the wireless receiver is still plugged into the cabinet, Windows doesn't freak out that there's no mouse. Now the mouse and keyboard are both packed away, only brought out when doing work on the cabinet.
In the last update I mentioned changing the resolution of GameLauncher to better match native resolutions of the monitor I am using. This eliminated the display flicker on the menu but had the side effect of making the menu text really small. I didn't think of it at the time but I could have simply made the font size bigger in GameLauncher to correct this. Well I eventually got around to playing around with some different font sizes until finding one I was happy with. It gives me less horizontal character space but I made sure that nothing important was being cut off.
The new font size makes
the front end break away from the feel
of a program running
on a computer for a more seamless experience.
In addition to changing the font size I also looked into creating some special game lists. GameLauncher works in such a way that different command line emulators have their game lists populated as text documents tied to each specific emulator executable. Alternatively multiple lists can be made that run the same emulator, each list simply points to the same executable and in the case of Galaga Multigame the executable is MAME. To keep the same uniformity in the naming scheme I simply copied file names and long display descriptions from the master MAME list that GameLauncher generates. I ended up creating four specific lists: Konami Classics, Namco Classics, Pac-Man Series, and David's Favorites. These are scrolled through by pressing Fire 1 or Fire 2 while on a game list. Fire 1 moves to the left, Fire 2 moves to the right. The nice thing about these custom lists is it alleviates some of the "too many choices" syndrome MAME cabinets can sometimes have. It also allows me to keep my favorite games in a specific list, although most of them happen to be included on the Konami Classics listing.
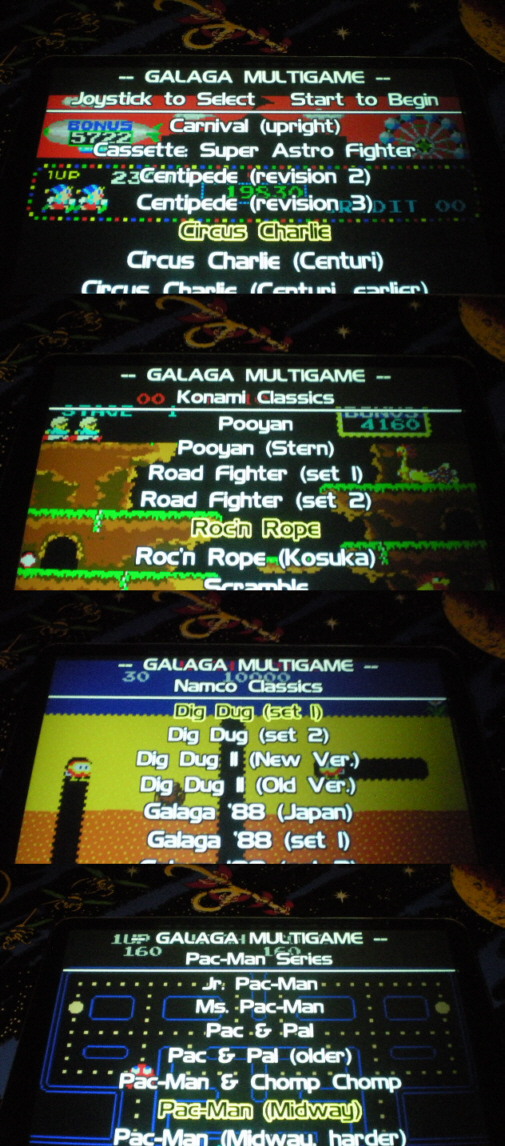
Some of the custom lists
along with a sample of the games included.
Changes didn't stop with the software front end. The location of the computer power button down at the bottom of the cabinet seemed like a good idea at first as it would be near the main power switch. However it turns out I never really use the main power switch, instead electing to leave it always switched on and control power at the outlet. This meant leaning back there to boot the computer became a bit of a pain. The solution was to relocate the power button higher up on the cabinet. I decided to go with a smaller button this time around and mounted it on the top of the back door. Now turning the computer on is as simple as reaching over the top of the cabinet and tapping the easily reachable power button. The connection runs down to a detachable connector so the door can be fully removed for maintenance without having to disconnect it at the motherboard.
The new computer power
switch location makes power on extremely easy.
Putting in the disconnects for the power button made me wonder why I never installed something similar on the control panel. After all, it would make full removal of the control panel easier for when I want to replace the control panel overlay in the future. As there are only nine connections on the control panel (up, down, left, right, fire 1, fire 2, start, credit, common) I was able to use a small and readily available connector. I added a pair of these in between the control panel connections and the I-PAC encoder.
Locking connectors like
these make control panel removal and reconnection a snap.
This is the harness from
the I-PAC toward the control panel.
Due to heat issues I decided to reposition the power supply at the base of the cabinet. The power supply I use is very strange indeed, it almost seems like it came from a workstation or specific computing application. However it was free, is of great quality, and has never let me down so in the cabinet it went. Rather than a fan on the back it has one on the side. Before this fan was pointed toward the back of the cabinet, which had the side effect of blowing its hot air across the motherboard and other components. I changed this by laying the power supply down so the hot air would be blown upward. I had to reposition the motherboard a little but it ended up fitting fine. Having the hard drive on the bottom of the cabinet also worried me a little so I repositioned it vertically. As before, it was simply adhered to the cabinet with high quality double stick tape. Additionally I took some time to rework my cable management one more time. The monitor video and monitor power connections running up the front of the cabinet were kind of unorganized and with the power supply now blowing in that direction I wanted to keep cabling away from there anyway. I decided to run all the excess wire along the lower back panel of the cabinet, keeping everything clean and tied together and most importantly away from interfering with air flow in the cabinet.
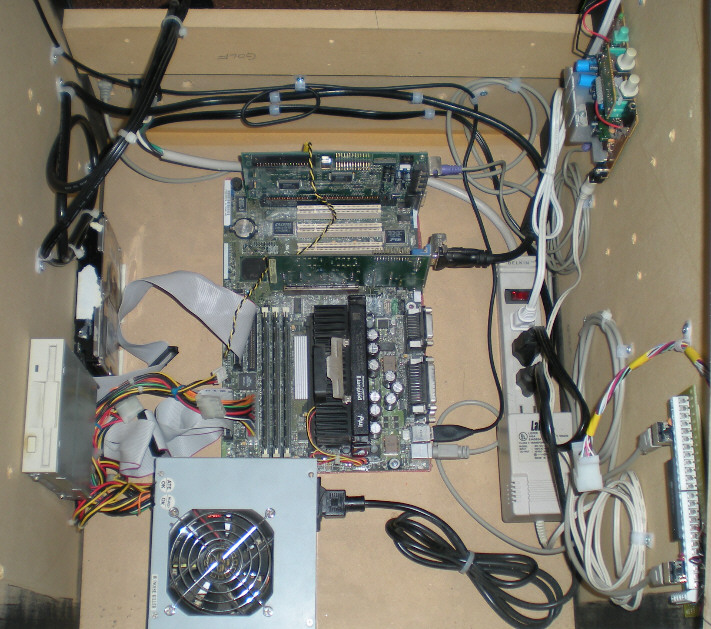
Starting at the power
supply in the lower left and going clockwise: power supply, floppy drive,
hard drive,
video and power cables
for monitor, motherboard with sound and video cards,
amplification board for
speaker, internal power strip, Ultimarc I-PAC keyboard encoder.
With cooling in mind it was time to address a real issue in the design of the cabinet. Originally these cabinets contained a little TV and a plug and play joystick meaning that there wasn't very much heat generated by the electronics, at least not enough that the vents at the back of the cabinet couldn't handle. Well that big power supply, speaker power supply and motherboard generate some real heat - way more than a couple little vents at the back of the cabinet can take care of. For a while I had been thinking about installing a couple small fans on the back door to both cycle warm air out and circulate outside air in. There are four openings on the back door, two at the top and two at the bottom. Originally I wanted to use the upper vents since warm air rises but those particular vents are in a very tight area between the monitor and top of the cabinet which really won't circulate much air. Settling on the lower vents I decided to go with standard 12 volt computer cooling fans however I was never able to find what I was looking for at a price I was willing to pay. Finally on one Saturday at the Silicon Valley Electronics Flea Market I came across a box of 12v fans that would work. They were priced at $1.00 each and were just what I needed.
I mounted the fans on the inside of the door at the bottom, raised away from the door itself a little by a few washers to help with air circulation. One fan pulls air in while the other blows it back out. I was very clean with my work as the last thing I wanted was unruly wires getting in the way when removing the back door to work on the cabinet. The connection for the fans runs into a standard PC power connection and plugs directly into the wiring loom of the PC power supply.
Out with the hot air,
in with the cool.
Each fan is lifted away
from the protective mesh with a few washers. Fans are
simply screwed directly
to the back door for a simple installation.
While a couple little fans like this don't seem like they would do much, the cabinet runs noticeably cooler with them circulating the air around inside. They are also totally unheard due to their location and the sound of the games themselves.
The cooling fans connect
directly to the power supply.
As with the new power button, the fans can easily be disconnected if the door needs to be removed completely. However the cable is long enough that the door can be removed and set on the side of the cabinet without having to disconnect the fans.
These last few changes leave only the control panel overlay left to replace. I've never been happy with the one that came on the cabinet and I have spent some time designing a new one more in line with both the original cabinet as well as my MAME conversion. I was planning on having that completed and installed by now but ran up against some delays and now plan to do that sometime this winter. I pretty much have my new control panel overlay designed and ready to print however.
That about wraps things up for now.
Preparation and installation of the new control panel overlay should be
next and perhaps that will finally wrap up the information portion of this
feature, moving it strictly to a service log.
Written on 05-29-2010 by David, insanedavid@classicplastic.net
Last amended on 06-30-2016 by David, insanedavid@classicplastic.net