
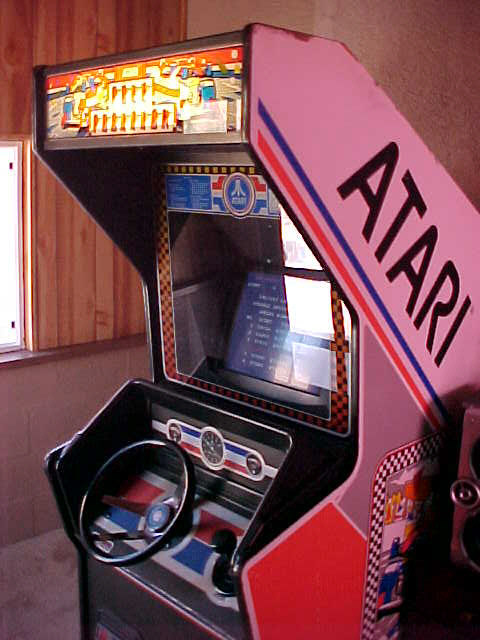
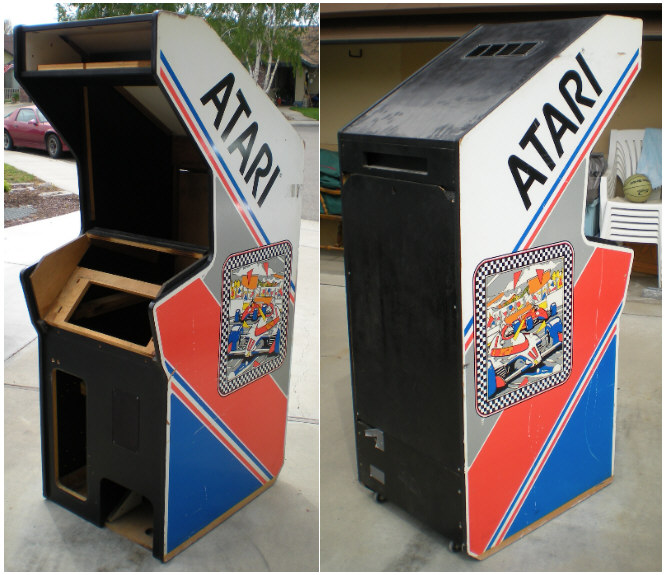
The machine on its first
day in my possession, after removing the internals.

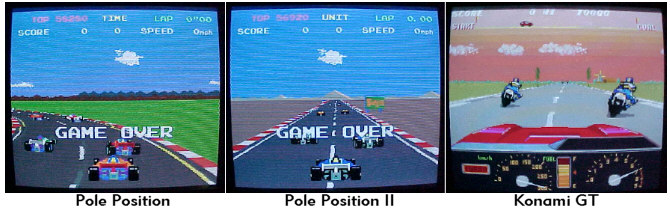
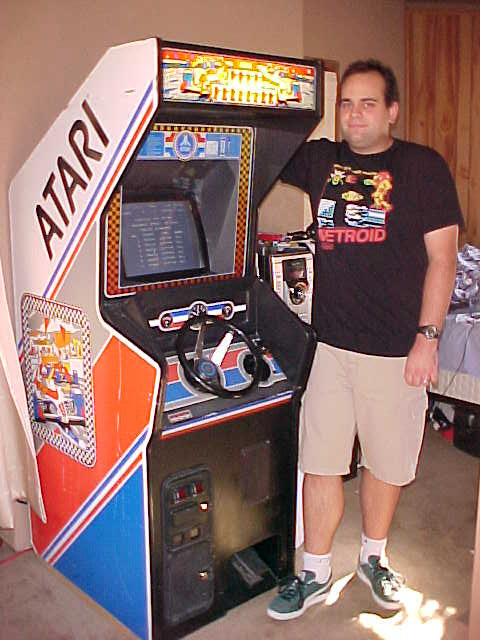
Pole Position (Atari)
upright cabinet - restoration / MAME conversion
I've always wanted an arcade machine. Always? Yes, always. I grew up in California's Silicon Valley, the birthplace of the video game industry as we know it, so arcade gaming was in my blood from a very early age. I spent my weekends at the big now defunct arcades, my summers at the San Jose, Sunnyvale and Milpitas Golfland, and any chance given playing games at convince stores, bowling alleys, grocery stores, restaurants, any place they could be found - and in Silicon Valley there were few places they couldn't be. To say the arcade atmosphere of the 1980's was influential on my love of the video game industry would be an understatement, it was an absolutely amazing time in the history of digital entertainment. Even though I was quite young at the time I can still vividly recall those days of long rows of upright arcade cabinets filling darkened rooms and the friendly glow of the Pac-Man and Millipede cocktails in the waiting area at the local Marie Callender's restaurant. Although the arcade business began to die off in most of the United States it was still quite healthy into the 1990's in Silicon Valley with small operations such as the Galaktican Arcade in San Jose and the massive Tilt arcade in the upper level of the Vallco Fashion Park mall in Cupertino. Yet the end was near and the classic arcade titles that had entertained a generation began to disappear completely. Sure there are still arcades around these days but most of them specialize in the large sitdown "experience" type games. After all, they have to make that $1.00 to $1.50 you just pumped into the machine worthwhile. Although I enjoy those games, call me crazy, I still miss the era of the quarter.
Home arcades are nothing new, heck people home owned the machines back during their heyday. The market is what's interesting. Ten years ago you couldn't give away many of the arcade classics, these days reconditioned Pac-Man uprights can fetch upwards of $1500 on a regular basis. Missing the forgotten years and machines, I sat down awhile ago and made out a list in no particular order of the arcade games I'd like to own. Some of them modern, some of the obscure, but the majority of them popular classics. Given the cost of some of these cabinets that's kind of a hard thing to do - you have to think of a game you can get that few hundred dollars out of over and over again. One of the titles on this list forever filed away in the back of my head was none other than the classic Formula 1 racing game Pole Position. On occasion I'll look in the local papers or online auctions that are close to me for arcade machines. Not a big deal, I do it all the time and more often than not the prices are simply too high for my budget.
That was the case until late June 2007. I noticed a craigslist posting local to me that offered a Pole Position upright for $100, no pictures offered. I e-mailed the seller asking about the condition of the cabinet where I was told that the machine wasn't currently working but was complete and in good shape. After some back and forth it turned out that the seller was only a couple blocks, literally less than a minute, away from me and we had run into each other at the local flea market a few times before. Considering the next day I'd be gone for the weekend at the San Jose Grand Prix and not wanting to let the machine slip through my fingers, I headed right over. The machine had been pried open from the back and was a mess internally, as most non-working machines usually are. I almost gave up until I walked around the front and saw that the control panel, bezel, marquee and the over all front condition of the cabinet was very nice. The side art had scratches and marks, the battle scars of twenty years of service but over all the cabinet was in decent shape. After screwing around with trying to get the machine to boot unsuccessfully I realized the PCB's had the usual damage that is common with Pole Position's. Given the condition I offered $50 and it was accepted as the seller wanted it gone. It was loaded up, hauled home, and moved into the back yard - it was my problem now.
The machine on its first
day in my possession, after removing the internals.
The stench of abuse coming off the machine was incredible but I tried my best to ignore it. Besides, I had bought the machine as an Autumn restoration project so I assumed it would need a good cleaning. After some internal poking around I realized a few things - namely what was good and what was bad.
Good:

A little cleaning went
a long way in beginning to bring out the beauty of this classic.
With everything removed I let the cabinet itself sit outside to get rid of the musty smell that these things are known to pick up in improper storage. The smells of stagnant water, animals, cigarettes, and dirt were the most prevalent and let me tell you it was no picnic having this thing next to the house in that condition for that time. I gave the entire machine a general scrub down with some lightly damp towels, just to get the surface dirt off. After removing all the internal components I vacuumed out the cabinet and the usual scattering of mouse droppings that are common with unrestored arcade cabinets. Thankfully the droppings were far from fresh and only a few were found inside the machine and around the pedal assembly. The coin bin cage was the only part of the machine that had a healthy coating of mouse droppings but since it was headed for the trash anyway it was fine. With the machine torn down I moved to the controls. The way I figured, I'd build the restoration in small steps, building confidence as each part fell into place. That way I could always back out if I felt I was in over my head before investing too much time or money. My family was planing a rather large yard sale in a few weeks so the worst case scenario would be to resell the cabinet for the price I paid if the restoration got out of hand.
Control Panel:
With the control panel removed I gave it a full clean up. There were considerable amounts of rust around the carriage bolts that held the panel to the cabinet as well as control surfaces to the panel. WD-40 along with a scrubbing sponge does a great job at removing rust such as this. The chrome on the steering wheel was also subject to rust spots which I removed in the same manner. A little chrome polish will keep the wheel looking factory fresh for years to come. I didn't notice until much later on when I completely disassembled the steering wheel but the wheel itself is not a stock arcade part. Contrary to what some may think, the steering wheel is in fact a real race car steering wheel that was used in the assembly of the Pole Position cabinets. This can be seen once the steering wheel cap is removed, a makers engraving shows that it's an authentic car part.
Pole Position uses a 360 degree wheel, basically a free spinning optical spinner. Wanting to keep things on the cheap I didn't want to buy any special encoders that transfer the control input into something a computer can recognize. Since an optical spinner is basically the same technology used in a ball mouse, I decided to simply hack an old mouse to be used for steering.
The way a ball mouse works is there are a pair of rollers inside the mouse that the mouse ball rests against. One of these is the horizontal axis and the other the vertical axis. As the ball rolls the rollers turn, each rotating a wheel full of small cutouts called an encoder wheel. Each encoder wheel turns between a pair of optics that project an invisible beam. As the encoder wheel turns the beam is repeatedly broken and restored, which the mouse can interpret as incremental movement. The mouse then passes the information along to the computer where it is interpreted to move the mouse pointer on the screen or anything else mouse input is configured for. A mouse has a pair of axes which can be used in conjunction with one another for diagonal movement and so on. A spinner requires only one axis as it only travels along one plane. Because of this you can control two spinners with a single mouse PCB, having one set to the horizontal axis and the other to the vertical axis. Of course for a single steering wheel only one axis will be needed.
The original Pole Position optics were giving me poor readings so I did away with them all together. Instead I opted to mount the circuit board from a standard PS/2 mouse so that the Pole Position encoder wheel would pass between the horizontal mouse axis optics. This meant that turning the steering wheel would be like moving a mouse back and forth - an analog input MAME easily recognizes and that can easily be fine tuned. I installed MAME on my laptop and took it out to the shop for a test play. With the mouse enabled and the horizontal axis selected to control steering - the wheel worked great.

The first spark of hope,
the steering system converted and working with a test install of MAME v0.56.
With steering working perfectly I moved onto the next nearest control surface, just to the right in fact, the shifter. Pole Position uses a single switch two position shift. When in high gear the switch is depressed, when in low gear it is released. So the game defaults to low gear unless the switch is depressed, in which it will be in high gear. The switch is your standard arcade microswitch with a slightly longer button. Once again saving money and keeping things simple, I connected the switch to the leads that would normally function as the left mouse button. I then configured the left mouse button to be used for shifting in the MAME options for the game. The only problem with this is that MAME is set up to allow Pole Position to be played on a normal computer with a normal keyboard - pressing the shift button toggles between high and low gear, rather than defaulting to low unless held down. Thanks to some help from another Pole Position MAME cabinet owner at the Build Your Own Arcade Controls forum, I was given a recompile of MAME v0.56 that supports proper arcade shifting. Wanting to save money yet again, I decided to use the right mouse button to control acceleration. I ran a long cable with a molex connector on the end to the right mouse button leads and wrapped up the control panel. Using connectors meant that I could service the control panel and pedal assembly separately as it allows the removal of one assembly without having to break hardwired connections on the other.

The mouse PCB is mounted
right where the original optics once sat.
Accelerator Pedal:
As with the control panel, the pedal assembly was in fairly poor shape from a cleanliness perspective. I completely disassembled and cleaned the base plate before repainting it. A few good coats of flat black metal spray paint had it looking like new. As for the pedal itself it needed a good scrubbing to remove a healthy coat of rust. What was left of the pedal pad was removed then I used the same method as with the steering wheel to remove the rust. To replace the pedal pad I cut a strip of anti slip material to the shape of the pedal and affixed it down, it looks factory new. The anti slip material is normally used on stair steps and can be found in the hardware department at any home improvement store.
Pole Position uses an analog accelerator pedal, something not possible with the digital right mouse button. As the pedal is pressed down a cable pulls a potentiometer which is interpreted by the game's electronics and increases car acceleration. Releasing the pedal allows the potentiometer to be pulled back by a spring on the cable, reducing car acceleration. MAME does a pretty good job of reworking analog inputs for use with digital devices so not much is lost with a digital pedal. I wanted to keep everything easy to reverse to factory original should I ever want to properly restore the machine one day. So the cables and tension spring were removed and cataloged away. I took a microswitch with a large actuator finger and found a place on the underside of the pedal where the pedal would make good contact with it. At around 75% pedal press the microswitch is depressed. The actuator finger is long and flexible enough that it flexes back at full pedal press yet springs to normal at anything under 75%. If you're looking for one of these microswitches with the little actuator finger, I pulled mine from an old arcade joystick I had sitting around. I used a good amount of hot glue to mount the switch so that it can be removed if later desired yet is securely fastened. After setting up the right mouse button as the accelerator pedal in the MAME options and connecting the molex connector for the pedal, it worked perfectly. At this point I was actually able to have a full test play using the controls outside of the cabinet on my laptop computer. After that there was no stopping me from completing the project.

Converting the pedal
to digital input was easy and it can be reverted to analog just as easily.
Computer:
With the control panel working 100% I had the confidence to continue forward, after all the majority of the technical rebuild was complete. Next on the agenda was the computer itself. Everything needed for the computer I already had as spare parts. The system specifics are nothing incredible by any standard but are perfect for running DOS MAME and Pole Position...

The entire computer built
and set up outside the cabinet, initial configurations were done at this
point.
Final Clean Up:
The controls were finished, the computer was set up and running, it was time to give the cabinet itself its final big clean up. Up until this point all I had done to the cabinet itself was vacuum it out and give it a basic wipe down. To kick off the real cleaning I went through the entire cabinet and scrubbed it with Simple Green. As it seemed to be one of the main sources of the cabinet smell and looked to have been plagued by humidity, the back door was sanded on both sides and repainted. Please make sure you wear eye and lung protection when cleaning, sanding and painting these old cabinets. The top panels of the cabinet had their black vinyl pulled off, were sanded and then repainted as well. About 80% of the bad smells were coming from those panels and the back door so sanding and repainting did a lot to clean the cabinet up.
I sanded the entire cabinet inside and then scrubbed it all down again. Sanding the inside bottom and around the lower back panel took care of the rest of the smell although the inside bottom was in great condition. As always, I went through every part of the cabinet inside with Simple Green. The side art was damaged and peeling at the bottom on each side and a couple places near the back so I took a utility knife and cut the peeling parts away. This prevented the artwork from continuing to peel, basically I took a straight edge about an inch up from the bottom and made an even slice on both sides. Then it was time to give the sides another wipe down with Simple Green. At this point I had a fully gutted, clean, ready to populate arcade cabinet.

It took half a day to
get the cabinet completely cleaned, sanded, and repainted.
Assembly:
Once clean the process of putting everything back together began. This took the better part of an entire day and I worked nonstop, I didn't even take a break to eat. I suppose I was a man possessed at this point, which should also explain the lack of pictures during reassembly. An inexpensive pair of computer speakers were disassembled and installed inside the cabinet in the same locations as the original speakers. A small fluorescent shop utility light is used to light the marquee, rather than hardwiring it to a receptacle I simply took an equivalent amperage extension cord and wired the utility light to that. I spray painted the first few inches around the sides and bezel of the computer monitor flat black to help it blend better than the original almond color would have. Having the monitor in its original shell makes the cabinet much safer to work on inside. The monitor was fitted and secured, then the cleaned and repainted accelerator pedal was installed along with the coin door. I had to shim up the monitor in the back just a little but after some fine tuning it matched the pitch of the original display perfectly. I then anchored the monitor with boards all around it as well as a bungee cord attached to some eye screws to prevent it from rolling forward during transit.
The coin door was reinstalled followed by control panel. The computer shelf was slid into place next, held up by a pair of "L" brackets on the left side and the lower runner of the PCB cage on the right side. A few screws on each side hold the computer shelf firmly in place. The pushbutton switches used for computer power and reset were mounted within easy reach through the upper coin door. Everything is connected to a power bar which is mounted inside the cabinet near the coin door, the power bar then runs to a heavy duty extension cord that mirrors the original power cord route through the back. The volume control board for the speakers is mounted within easy reach as well, inside just above the upper coin door. I didn't mount it there initially but since moving it to that location the convince of volume control is something I couldn't do without. Careful cord management was paramount from the beginning, keeping everything out of the way of everything else. Lastly the keyboard was set at the bottom of the cabinet and the coin mech leads were plugged into their microswitches. The power leads for the lamps that light the coin reject buttons were wired directly to a 12v connection off the power supply, simple enough to do with a spare molex connector. Again, I can't emphasize enough how important it is to use molex connectors to allow individual components to be removed easily for service.

As one can see, everything
is cleanly laid out for easy maintenance and air circulation.
Operations:
I sealed up the back, plugged the cord in, reached into the coin door, and flipped the main power switch... The marquee sprang to life and the sounds of the monitor powering up could be heard. I reached in and pressed the computer power button... I was greeted by the MAME startup screen, a replacement for the Windows 98 boot screen, and then dumped into DOS. Originally I intended to have MAME automatically boot and automatically load Pole Position at startup but this was met with some problems. No matter what I did MAME seemed to run slow and unstable when directly booted to it. I could exit and reload and things would be fine. Then I tried using a front end, a program that brings up a selection menu of games and loads them for you. This was met with the same problem. It seems that this system requires a couple seconds of idle time in DOS after boot up before everything is stable. No big deal, because I had an alternate solution of using batch files.
My game operations are controlled via batch files and an on screen menu in DOS. Simply reach inside, type in the number corresponding to the game you want to play and it loads. This allows the machine to appear completely stock from the outside - no additional MAME buttons or special controls - yet allows more games to be played. It's basically like doing a board swap except it's faster since it's done in software and through the coin door. So for the average person, the machine appears as a 100% original Pole Position upright. The ten-key keypad is at the front of the machine inside the lower coin door to allow for easy entry of game selection. I reconfigured the "-" key on the ten-key keypad in the MAME options to be used to exit the currently running game. That means all game loading and exiting can be controlled by the ten-key keypad alone.
After a little fine tuning of the controls the only thing left to do was to replace the shroud around the monitor, of which a replacement was made from poster board.

Once the computer boots
up this game selection screen is displayed, just type in the game you'd
like to run.
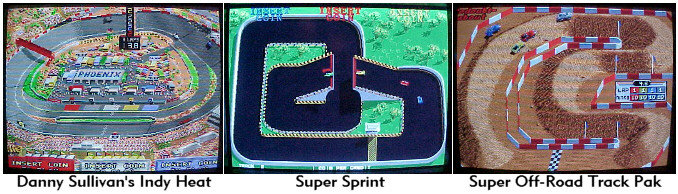
I purchased a proper coin container for a few dollars off eBay, the same one Happs Controls sells but for 1/4 of the cost. To support it I built a little shelf inside between the pedal assembly box and the side of the cabinet. This allows the keyboard to safely rest below the coin bin on the bottom of the cabinet. To type in game selections I simply slide the coin bin out, input my selection, and slide the coin bin back in. The non-working Pole Position PCB's were sold on eBay for $20 to another cabinet owner that needed parts. I finally moved the machine inside, the little casters on the back sure have a tough time getting over door thresholds. The cabinet is set up to play games that use a single pedal and two gear shifter as well as a couple bonus titles:
Painting the monitor
bezel black helps to disguise that it's not an arcade monitor, make sure
scanlines are turned on.
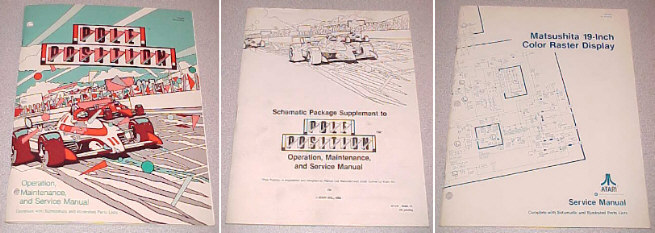
With everything running fine one would think there would be nothing more to do however that's not the case. Anytime you own an arcade cabinet, even a conversion such as this, you will probably want the original technical manual. Although none of the internals are stock the control panel, accelerator pedal, and coin mechs are. Additionally MAME recreates the games exactly so all the special modes are accessed in the same way as they would be on an original arcade board as are the game settings, controlled via virtual DIP switches. Manuals are easy enough to find for most games, a search on eBay will usually find what you need in the $10 range. I was lucky in finding a complete set of Pole Position documents for around $8 on eBay which includes the Operations, Maintenance and Service Manual, the Schematic Package Supplement, and the service manual for the monitor. I don't really need the schematics or the monitor book but it's nice to have the complete set. I've already used the Operations, Maintenance and Service Manual to disassemble the steering wheel and shifter for cleaning and lubrication. The control surfaces must be maintained, it is extremely important. These components are already over twenty years old and who knows how properly maintained they were earlier in the cabinet's life.
A full set of service
documents can go a long way to properly maintaining your arcade cabinet.
So far things have been running smoothly with the machine, only minor adjustments have been required. It has been a big hit with everyone that's played it and it's nice to see that the across the board appeal of these classic games is still alive and well. Total cost of the entire project, including the original cost of the cabinet, was under $150 and that's for everything - every last screw and wire as well as cleaning products. Considering I have about $30 in quarters in the coin bin right now I'd say it won't take long to equal the cost of the machine in coinage. I add quarters constantly to the machine and occasionally recycle quarters for play but never remove any quarters from the cabinet play cycle. It's pretty much the coolest bank you can have and a nice way to save and spend change. I look forward to breaking a dollar throughout the day so I can feed the machine when I get home. The only small modifications I've made since restoring the cabinet have been to add a couple pieces of weather stripping under the accelerator pedal to quiet the clash of metal when at full acceleration and full stop.
I suppose what you're all waiting for are pictures of the completed machine...

Running perfectly, just
begging for another quarter.
The bezel glass is in
beautiful shape and seeing these images are what made me buy the cabinet.
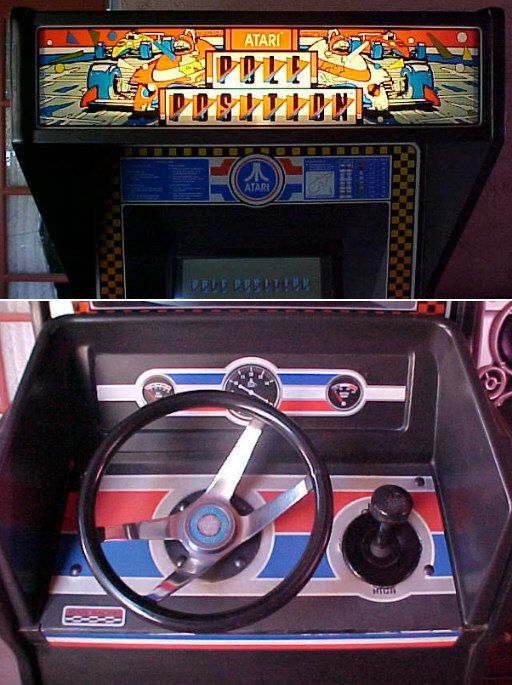
The marquee and control
panel are in beautiful shape, look at that chrome shine.
That's about it, I'm finally an arcade cabinet owner. I still drop at least a dollar a week into the machine and nearly every day I turn at least a few laps around the Fuji Speedway. Although many of my favorite classic driving games are on the machine I usually play the Atari build of Pole Position - after all, it is a Pole Position machine. That's the game I bought the cabinet thinking I would be playing from then on and that's fine by me. One thing that is completely different from the original is the type of lamp I'm using in each coin mech to light the coin reject buttons. Problem is I couldn't find any standard 12v snap in lamps. I ended up going with a pair of 12v xenon bulbs that are super long lasting. The downside is they don't give as warm a glow as most of us remember from these mechs and they run about $7 a piece. The plus of course is that they're 12v snap in lamps that will last for years and years. The only other real difference is the size of the monitor. The display I have in there is a 17" viewable and the original arcade display was a 19". However only 18" of that was really viewable and with the computer monitor bezel painted black it looks totally stock. In truth what you see is only an inch smaller than the original display.
It took many years but
I'm glad that my first machine is one of my all time favorites.
I honestly couldn't be happier with my cabinet. I may go back and repaint the coin door to give it a cleaner look but I like the aged look of the cabinet over all - I think she wears her scars with honor. I especially get a kick out of the cigarette burn marks on the cockpit shroud, the stories these machines could tell. Nearly all the stray marks came off the side art but it could use a little touch up here and there where there are large gouges. I should also remove and replace all the T-molding eventually. A replacement control panel sticker and steering wheel cap Atari emblem would be nice too but I'm fine with how things are now. I also got stupid when cleaning the bezel glass and chipped a tiny bit of glass off one corner but it's nothing that can be seen once it's mounted in the machine, although that was a tense moment.
I've named this machine Pole Position Deluxe since it features all the Pole Position games as well as many popular driving games of the day. I'd still like to own a Championship Sprint machine at one time for head to head two player action but this will do nicely until I find one in good shape. If anything it was a good introduction to arcade ownership and I don't ever plan on parting ways with this machine. There really is nothing like dropping in a quarter, hearing the Pole Position theme play and being told to "Prepare to Qualify."
Current Information...
End of the line, so to speak, for this project. Since moving a few years ago, Pole Position DX had been at my parent's house, out in my brother's room. While still completely functional, it wasn't getting very much use, even when I would visit. The cabinet itself was also starting to be an issue in terms of the space it was taking up. Essentially there was a giant hulking arcade cabinet that wasn't being played. Eventually I came to the verdict that a giant cabinet playing a 90% accurate (due to my on a budget control solutions) simulated version of Pole Position on a computer really wasn't very feasible. Additionally there really was no way I'd be able to fit the cabinet in my apartment and even if I could, I'd want that real estate taken up by a completely authentic arcade cabinet. Truth is, I feel more comfortable with arcade stuff these days (after owning the Galaxian cocktail and Klax cabaret) and would like to try my hand at maintaining an original Pole Position cabinet eventually. Remember, this cabinet was a thrashed lost cause when I originally purchased it.
In fact up until about two weeks before disassembling it I was kicking around ideas about reworking and expanding the Pole Position cabinet to play more games and use more modern hardware, restoring the pedal to full analog, putting in a "proper" steering wheel encoder and so forth. I was thinking about putting in an Atari four switch four gear shifter (reverse N) to allow more flexibility, lots of stuff. Yet the reality of Pole Position uprights being huge and heavy kept overshadowing any of my new plans. The truth of the matter is that I'd probably almost never move the cabinet out here and it takes up too much space where I have it stored presently. It was a great project, a lot of fun, very rewarding, and got me into the arcade cabinet hobby. I suppose I really couldn't ask for more, considering the cabinet was basically free after I sold the non-working boards.
The MAME conversion taught me a lot about MAME and arcade cabinets in general and it was a lot of fun for the couple years I had it. That and I brought it back from a stinky rotting pile and got the salvageable internal parts to people that needed them. The earlier space issues were starting to creep up along with other reasons (such as building a MAME cabinet that only plays a dozen games in one of the most top heavy cabinets ever created) so I stripped out all the MAME components. I removed the marquee, bezel, control panel, control panel plastics and coin door - sealing all that up and putting it in storage for spare parts when it comes time for the next Pole Position cabinet. Then the cabinet itself was moved out into the garage until the day in the next couple months when it will be sold / given away.
Stripped out, the cabinet
looks like it did back in the Summer of 2007 when I was reassembling it.
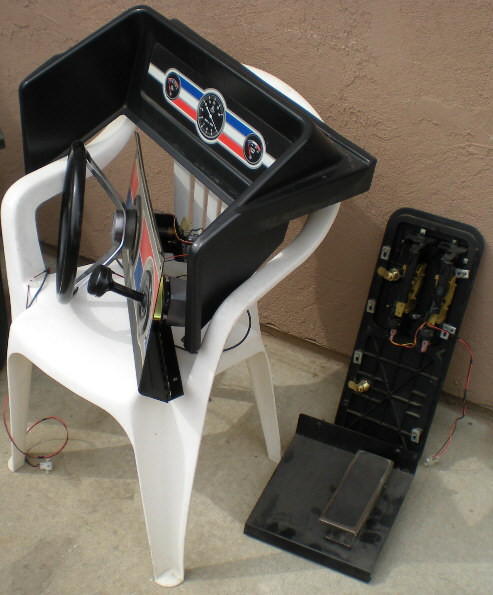
The control panel, pedal,
coin door, and plastics were all removed, stripped of their MAME parts,
cleaned and
then packed away safely
for future use. The bezel and marquee glass was also safely packed
away.
Nice, clean, empty cabinet ready to go for a ground up rebuild or more standardized MAME conversion. Amazing to think of the horrible smell it had and the sad condition it was in when I bought it. Then after I rebuilt it, the couple months it spent located in the backyard while we enclosed the patio, gave a bit of a The Last Starfighter vibe running out there. Great memories. The computer hardware was repurposed into my next MAME project, Mini Galaga Multigame. So I guess one could say that the heart of Pole Position DX lives on.
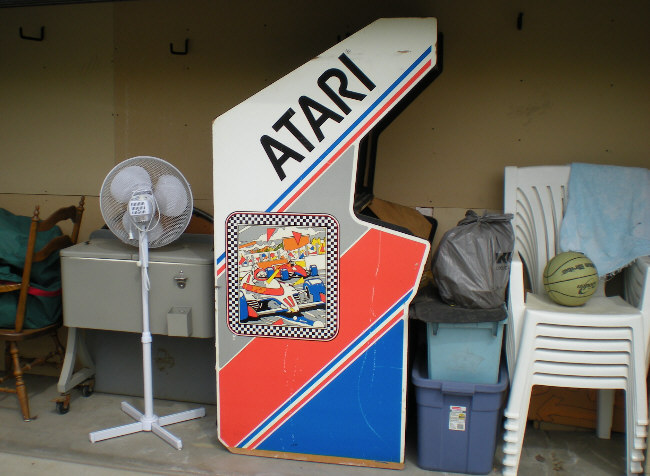
The empty cabinet sits
in storage in the garage, awaiting a new owner.
So the next Pole Position cabinet I acquire will be one purchased in working condition and maintained as such. I have a few years to find one - I really won't have the space until then anyway. Pole Position was really the game I played most on the cabinet - Danny Sullivan's Indy Heat is only fun so many times with one player and Championship Sprint is another cabinet I'd love to own one day, so it'll all work itself out.
This project can be considered completed
and closed. Although I will still gladly answer any questions about
the cabinet, please keep in mind it has been years since I originally set
up the machine. I remember quite a bit but since I did most of this
by the seat of my pants, I have next to zero recollection of things like
program settings. I must be getting old I suppose. =]
Written on 12-17-07 by David, insanedavid@classicplastic.net
Last amended 05-29-10 by David, insanedavid@classicplastic.net